How To Calibrate Phidgets Sensors
by Kat

Introduction
When using certain sensors and devices, you'll need to do some calibration to ensure accurate measurements. For some sensors, you'll probably want to do your own calibration but some Phidgets sensors will have calibration values written on the back of the board (like the light sensors). Before embarking on calibration, look at the device's user guide. Details about calibration are described there. If necessary, the user guide will give you constants that you will need to multiply or add to your sensor value to obtain meaningful readings (for instance, a temperature in degrees celsius or a sound in decibels). The page also outlines any quirks about the specific sensor that you should be aware of and tell you if it has been factory calibrated.
High-end sensors will ship with a certificate of calibration specifying how the sensor responds to stimulus. Less expensive sensors will have to be calibrated, which we'll show you how to do here.
What is calibration:
Calibrating means to mark a measuring device, like a sensor, so that it gives a standardized and meaningful reading. When you calibrate you're taking into account external factors that may have affected the device's readings.
Why calibrate
Well, it might not seem like a big deal if your sensor is reading 11.3A instead of 11.2A, but when there's no current and you're reading 0.1A, that seems a little weird. There are a few reasons why these readings could be off:
- Power Consumption – Sensor cables have some resistance, and the power consumption of the sensor will cause the sensor to have slightly different ground from the Analog Input on the Phidget Interface Kit. The more power consumed by the sensor, and the longer the sensor cable, the more pronounced this effect will be.
- Intrinsic Error In Sensors – For many sensors, the error is quite predictable over the life of the sensor, and it can be measured and calibrated out (even in software, if you wish).
- Non-Ratiometric Configuration/Voltage Reference Error – The 5.0VDC voltage reference is accurate to 0.5%. This can be a significant source of error in some applications, but can be easily measured and compensated for.
Calibration is what we do to correct for these errors.
Easy Case Calibration – Sensor with Linear Output:
A fair amount of sensors have linear output, making them quite simple to calibrate, given that you have the right equipment. Sensors with linear output include:
To calibrate any of these, you'll need to take two measurements, so gather two samples that you know the value of. More points are not necessary, unless your sensor is non-linear by design (more about that later). For instance, if you're calibrating a load cell, you'll measure the output with no load and you'll need another sample weight with known mass (like 1.8137kg, or something). This means you'll need a fairly accurate measuring device (like a weigh scale, multimeter, pH meter). When choosing your samples, the greater the difference between their known values, the more accurate your values will be for the calibration formula.
Here are the steps for calibration:
- Collect two samples with known values. I'm going to calibrate a Micro Load Cell Phidgets 3133, which measures shear (one directional) force up to 5kg. The reference weights I'm using are 0kg (no load) and 1.8137kg. I used a high accuracy scale to verify the weight.
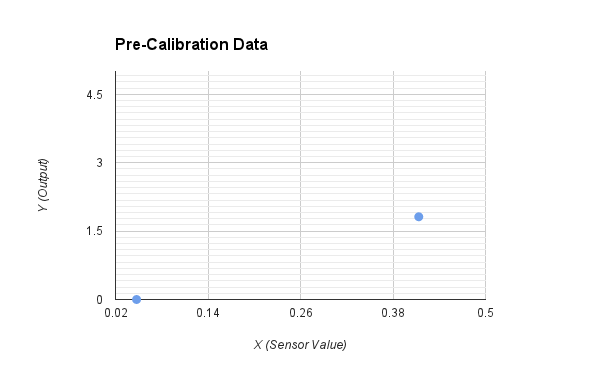
- Collect the values the sensor returns. I used the Phidgets control panel/preference pane to gather data, and turned the data rate up to the maximum. With other sensors, make sure “Ratiometric” is checked but the sensitivity is low. In both cases, this keeps the data from jumping around. In fact, the Phidgets software is averaging out the data it's collected from over a given time period, so you don't have to. For no load, the sensor returned a value of 0.04733. It returned a value of 0.41342 when there was the 1.8137kg load.
- Find the values for the formula. These measurements give us two sets of x, y values: (0.04733, 0) and (0.41342, 1.8137).A linear function has the form `y = mx + b`, where x is the raw value (the sensor value) and y is the the output (this will be our known and expected value when calibrating). Now it's back to high school algebra to solve for our two unknowns: `m` and `b`. You can use the formulas:
`m = (y_1 - y_0) / (x_1 - x_0)` and `b = y_1 - mx_1`. If you really don't like doing math, the internet has the tools to do this for you. Go to the slope-intercept form calculator and you get `m` = 4.954 and `b` = -0.2345. Now we can put this function into our code with a line that would look something like this:
Load = (4.954 * SensorValue) - 0.2345;

Sensors, like potentiometers (sliders, joysticks, and rotation sensors), do not need to be calibrated. All of the times I've dealt with them they return an accurate range from about 0 to 1000. Similarly, most people use sensors like the vibration, touch and motion sensors as “triggers”, so although they do return a range, the data isn't usually meaningful to 99% of people.
Sensors with Non-Linear Output:
There are still some sensors we haven't touched on. Force sensitive resistors, light based distance sensors and others display non-linear output. More complex methods, such as gain and offset trimming or curve fitting, are needed in these cases.
What affects accuracy after calibration:
Phidgets Inc. makes extreme efforts when designing boards to ensure measurements are stable. Certain kinds of interference can affect the calibrated device in unexpected ways. Some of these interferences include:
- Change in temperature of the sensor or the electronics reading it (try putting the sensor and/or electronics into the fridge and log the data to see how it drifts)
- Change in supply voltage to the electronics affects ratiometric sensors that use the supply voltage as the reference (try plugging the electronics into a different computer, or through a USB hub to change the voltage)
- RF interference from nearby electronics or transmitters. This can cause amplifiers to malfunction. (try transmitting with a cheap walkie-talkie close to your system)
The important lesson here is, when calibrating your device, make sure it is in an environment as similar to the one you'll be using it in. For instance, if you're calibrating a Gas Pressure Sensor (a ratiometric sensor) and it's going to run on a Raspberry Pi with a powered USB hub, make sure it is plugged into this setup when calibrating.
For more information:
As mentioned at the beginning, be sure to read the user guide for your device to find out any specifics about calibrating.
Here are some links from Phidgets.com about calibration:
