Phidget Smoker Project #2: Dual Element Bradley Smoker (SmokerPI)
This project is a continuation from the Phidget Smoker Project #1
by Chad

Introduction
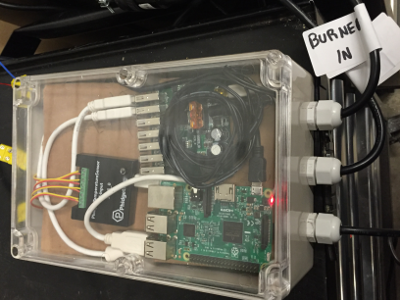
This project was a continuation from the Phidget Smoker Project #1. We replaced the PC with a Raspberry PI, and built an enclosure for the hardware. We also installed a second burner in the Bradley smoker to help it keep up with the strenous Phidget smoking demands.
The Phidget 1014_2 relay from the previous project was used, but a Phidget 1048_2 temperature sensor was used in place of the 1051_2 allowing four temperature channels to be used. We also kept the same software infrastructure, running Raspbian on the Raspberry PI, and implementing the smoker controls in JavaScript on node.js.
The smoker was controlled with a web page served from a node.js server implemented with Koa, connect to four Phidget Temperature Sensor channels and a Phidget DigitalOutput channel (the relay). A graph was created using vis.js to show changes in the internal temperature of the smoker, and whatever else we wanted to measure with our other three thermocouples.
Hardware
- 1014_2 Phidget Interface Kit 0/0/4
- 1048_2 Phidget Temperature Sensor
- Phidgets Powered USB Hub
- Raspberry PI 3
The smoker was monitored with a thermocouple installed near the middle of the cooking area and attached to a Phidget 1048_2 Temperature sensor. The power cord to the heating element was cut and a Phidget 1014_2 relay was inserted to control the power to the element. The actual power to the element was provided by the Bradley so that we could leverage their safety features in the case of a relay or software failure.
Software
A simple web server was implemented with Koa and Node.js that connected to the Phidget Network server using the Phidget22 Node.js JavaScript library. Four Phidget Temperature Sensor channels were created to monitor the temperatures from the 1048_2, and a DigitalOutput channel was created to control 1014_2, and by extension the heating element in the smoker.
Pork Shoulder Smoke
As a test, we smoked a pork shoulder. In that past, this size of shoulder took roughly 20 hours to reach our desired temperature of 95°C (203°F). This cook took almost exactly 16 hours, which in our experience is the perfect time for a pork should. The temperature was perfect, and after a couple of hours rest, the pork pulled perfectly and was still moist throughout.
food 1 and food 2 were inside of the pork shoulder, while smoker measure the temperature roughly half way up the side of the smoker. Initially the smoker temperature was set at 115°C (240°F), but with the dual elements in the smoker easily maintaining that temperature (in the past if ran full time to maintain 240°F), we lowered the smoker temperature to 110°C (230°F) just to slow the cook a bit.
The second element was installed just in front of the old one, and wired with a thin piece of copper sheet. A 16mm hole drilled into the reflective screen held the elemented perfectly, and the copper reduced the risk of a short (and melting shielding).
Below is a vis.js graph of the recorded data.
Waiting for graph to load...
Conclusion
The smoker worked really well with the additional element, and the controller made it convenient to monitor and manage the cook from a cell phone. The only real issue with the entire build was the Raspberry PI. The Raspberry PI's USB ports do not provide enough power to run the Phidgets, so we were required to add a powered USB hub to make everything work. In the future we would choose to implement this with a VINT SBC, and VINT temperature sensors and relay. This would not only make the build simpler, but also 50% cheaper.
