1055 User Guide: Difference between revisions
No edit summary |
|||
| Line 1: | Line 1: | ||
[[Category:UserGuide]] | [[Category:UserGuide]] | ||
=== | ===Required Hardware=== | ||
* A 1055 PhidgetIR | |||
* A PhidgetIR | * An IR remote control and the appliance it controls | ||
* A | * A USB Cable | ||
* A | * A computer | ||
===Connecting the Pieces=== | ===Connecting the Pieces=== | ||
[[Image:1055_0_Connecting_the_Hardware.jpg|300px|right|link=]] | |||
# Connect the PhidgetIR to your computer using the USB cable. | |||
[[ | |||
# | |||
<br clear="all"> | |||
==Testing Using Windows== | |||
| | {{UGcontrolpanel|1055}} | ||
}} | |||
{{ugIR}} | |||
{{ | {{UGotheros}} | ||
==Technical Details== | ==Technical Details== | ||
| Line 80: | Line 36: | ||
You can read more about IR remote controls in our [[IR Remote Control Primer]]. | You can read more about IR remote controls in our [[IR Remote Control Primer]]. | ||
{{UGnext|}} | |||
{{ | |||
| | |||
}} | |||
==Product History== | ==Product History== | ||
{{UGhist}} | {{UGhist}} | ||
{{UGrow|May 2010|0|100|Product Release}} | {{UGrow|May 2010|0|100|Product Release}} | ||
{{UGrow|May 2011|0|101|getLabelString fixed for labels longer than 7 characters}} | {{UGrow|May 2011|0|101|getLabelString fixed for labels longer than 7 characters}} | ||
Revision as of 19:48, 29 August 2016
Required Hardware
- A 1055 PhidgetIR
- An IR remote control and the appliance it controls
- A USB Cable
- A computer
Connecting the Pieces
- Connect the PhidgetIR to your computer using the USB cable.
Testing Using Windows
Phidget Control Panel
In order to demonstrate the functionality of the 1055, the Phidget Control Panel running on a Windows machine will be used.
The Phidget Control Panel is available for use on both macOS and Windows machines.
Windows
To open the Phidget Control Panel on Windows, find the ![]() icon in the taskbar. If it is not there, open up the start menu and search for Phidget Control Panel
icon in the taskbar. If it is not there, open up the start menu and search for Phidget Control Panel
macOS
To open the Phidget Control Panel on macOS, open Finder and navigate to the Phidget Control Panel in the Applications list. Double click on the ![]() icon to bring up the Phidget Control Panel.
icon to bring up the Phidget Control Panel.
For more information, take a look at the getting started guide for your operating system:
Linux users can follow the getting started with Linux guide and continue reading here for more information about the 1055.
First Look
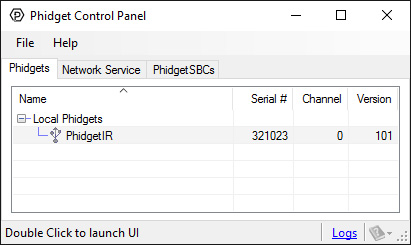
After plugging the 1055 into your computer and opening the Phidget Control Panel, you will see something like this:

The Phidget Control Panel will list all connected Phidgets and associated objects, as well as the following information:
- Serial number: allows you to differentiate between similar Phidgets.
- Channel: allows you to differentiate between similar objects on a Phidget.
- Version number: corresponds to the firmware version your Phidget is running. If your Phidget is listed in red, your firmware is out of date. Update the firmware by double-clicking the entry.
The Phidget Control Panel can also be used to test your device. Double-clicking on an object will open an example.
IR
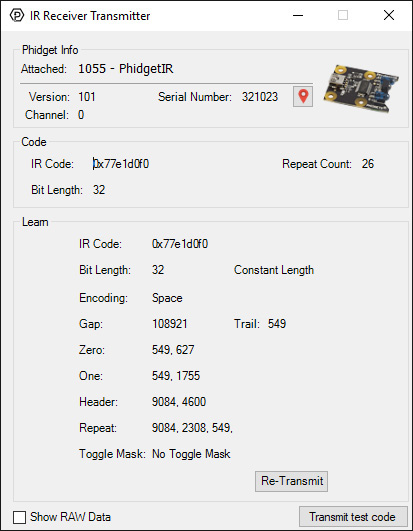
Double-click on the IR object, labelled PhidgetIR, in order to run the example:

General information about the selected object will be displayed at the top of the window. You can also experiment with the following functionality:
- The Show RAW Data checkbox toggles the RAW data window. This window lets you see incoming codes as pulses and gaps (expressed as numbers in milliseconds). You can also re-transmit this raw data.
- IR Code: the hexadecimal code corresponding to the signal just received.
- Repeat Count: how many times the same code has been received in a row. If you hold down a button on most remote controllers, it will continually transmit repeat codes.
- Bit Length: the length of the code in bits.
- When a code is repeated multiple times, the {{{1}}} will learn the code. It will display the relevant information in the Learn box. For more information, see the technical section.
You can read more about IR remote controls in our IR Remote Control Primer.
Testing Using Mac OS X
- Go to the Quick Downloads section on the Mac OS X page.
- Download and run the Phidget OS X Installer
- Click on System Preferences >> Phidgets (under Other) to activate the Preference Pane
- Make sure your device is properly attached
- Double click on your device's objects in the listing to open them. The Preference Pane and examples will function very similarly to the ones described above in the Windows section.
Testing Using Linux
For a general step-by-step guide on getting Phidgets running on Linux, see the Linux page.
Using a Remote OS
We recommend testing your Phidget on a desktop OS before moving on to remote OS. Once you've tested your Phidget, you can go to the PhidgetSBC, or iOS pages to learn how to proceed.
Technical Details
Consumer IR
The PhidgetIR can send and receive data encoded in various fashions as pulses of infrared light. The various encoding that the PhidgetIR supports are grouped under the general term ‘Consumer IR’ or CIR. CIR is generally used to control consumer products such as TVs, DVD players, etc. with a wireless remote control, but in general can be used for any application that needs to transmit low speed data wirelessly.
CIR is a low speed protocol - commands generally contain no more then 32-bits of data with a bit rate of at the most 4000 bits/second, but usually much less. There is no concession for anti-collision, so only one code can be transmitting at any time. Transmission distance depends on the power of the transmitter, but needs to be line of sight - though generally this can include bouncing off walls/ceilings, etc.
CIR data is transmitted using a modulated bit stream. Data is encoded in the length of the pulses / spaces between pulses, of IR light. The pulses of IR light are themselves modulated at a much higher frequency (usually ~38kHz) in order for the receiver to distinguish CIR data from ambient room light.
Further Reading
You can read more about IR remote controls in our IR Remote Control Primer.
What to do Next
- Programming Languages - Find your preferred programming language here and learn how to write your own code with Phidgets!
- Phidget Programming Basics - Once you have set up Phidgets to work with your programming environment, we recommend you read our page on to learn the fundamentals of programming with Phidgets.
