Data Interval/Change Trigger: Difference between revisions
No edit summary |
|||
| Line 85: | Line 85: | ||
[[Phidget Network Server]] - Phidgets can be controlled and communicated with over your network- either wirelessly or over ethernet. | [[Phidget Network Server]] - Phidgets can be controlled and communicated with over your network- either wirelessly or over ethernet. | ||
[[Best Phidgets Practices]] - Good programming habits that will save you from common problems when writing code for your Phidgets. | |||
Revision as of 19:47, 3 May 2017
There are two properties that give you control over how you get data from your Phidget: DataInterval and ChangeTrigger. By default, a Phidget will report data on a regular interval, on the smallest interval it supports. By setting new values for these properties, you can change how often or under what conditions a data event will fire.
Data Interval
To find the minimum and maximum possible DataInterval for your device, go to the Phidget22 API and select the device, language and object you're using. Clicking on getMinDataInterval (or MinDataInterval, in C#) will show you the minimum DataInterval for your device. Likewise for getMaxDataInterval.
You can also use these properties in your code when you want to set DataInterval to the minimum or maximum, but you don't know the numerical values. For example,
myPhidget.setDataInterval(myPhidget.getMaxDataInterval());
would set the DataInterval to the maximum, regardless of what kind of Phidget myPhidget is (as long as it's a Phidget that supports setting DataInterval).
Again, by default, a Phidget's DataInterval is the smallest possible time interval (usually one millisecond). This means that data events would fire every millisecond. You can set DataInterval using setDataInterval (or using the DataInterval property in C#). Some USB Phidgets' DataInterval can only be set to multiples of 4ms or 8ms, so setDataInterval may round to the nearest permissible value in this case.
If you want less frequent events, you can choose a larger value for DataInterval. Setting a larger data interval has differing effects for USB Phidgets and VINT Phidgets:
USB Phidgets - Setting a larger DataInterval will reduce white noise on your measurements, because internally the Phidget will continue to sample at its minimum DataInterval and will average these samples together. For example, setting a 10ms DataInterval on a Phidget that normally samples at 1ms will cause 10 samples (gathered at 1ms intervals) to be averaged and reported in an event every 10ms. (Note: The only USB Phidgets that support setting DataInterval are InterfaceKits and Spatials)
VINT Phidgets - Setting a larger DataInterval will reduce current consumption, since VINT devices will actually "sleep" in between intervals. Unlike USB Phidgets, VINT devices will not take samples while they sleep, so when they wake up to fire an event, it will be an instantaneous value for that moment in time, not an average of all values during that interval.
Change Trigger
As with DataInterval, you can find your minimum and maximum ChangeTrigger values in the Phidget Phidget22 API. The methods are getMin***ChangeTrigger and getMax***ChangeTrigger where *** is replaced with the quality being reported by the Phidget. For example, a voltage input object would use getMinVoltageChangeTrigger.
Again, you can use these methods to easily set the ChangeTrigger to the minimum or maximum, like so:
myPhidget.setVoltageChangeTrigger(myPhidget.getMaxVoltageChangeTrigger());
By default, the change trigger of a device will be zero. This means that any new value, even if it is the same as the previous value, will be reported in a data event. As a result, you will get regular data events on the interval you specified with the device's DataInterval.
When you set the ChangeTrigger of a Phidget using set***ChangeTrigger, where *** is the quality being reported, you will create a threshold that is checked on every interval. If the value has changed by an amount greater than or equal to the ChangeTrigger you specified, a data event will fire. For example, if you had a temperature sensor and you set the TemperatureChangeTrigger to 0.7, you would only get data events whenever the temperature changed by 0.7°C or more, compared to the previous event that fired. This is particularly useful when you have a user readout for a value. If you had the TemperatureChangeTrigger at zero, the tenths and hundredths digits of the temperature readout would be fluctuating so quickly on the screen that the user may have a hard time reading it. By increasing the ChangeTrigger to something more relevant like 0.5°C, the readout would change infrequently enough that it would be much more readable.
Setting Both Properties
In many cases, it is likely that you'll simply use these properties as follows:
- Keep ChangeTrigger at zero and select a DataInterval based on how often you want your program to get data. This is useful for applications when you're logging data that is being processed in real-time or will eventually be represented in a graph.
- Keep DataInterval at the minimum possible interval, and set ChangeTrigger to the lowest relevant value for the quality you're measuring. This is useful for applications when you want to ignore values below a certain threshold or you're simply displaying sensor values for the user to read.
However, in some complex situations, you may want to set both ChangeTrigger and DataInterval to non-trivial values. This behaves as you might expect: The device will check on every specified interval whether or not the new value differs from the last event by an amount greater than or equal to the ChangeTrigger. If it is, it will fire a data event. If not, it will wait until the next interval where it'll check again.
The only complication is when you consider a situation where the value has spiked by a large amount and then returned to the baseline, in-between intervals. For example, suppose you have a voltage sensor and you've set the DataInterval to 5 milliseconds an the VoltageChangeTrigger to 3mV. The way this is handled depends on whether you're using a USB Phidget or a VINT Phidget:
USB Phidgets

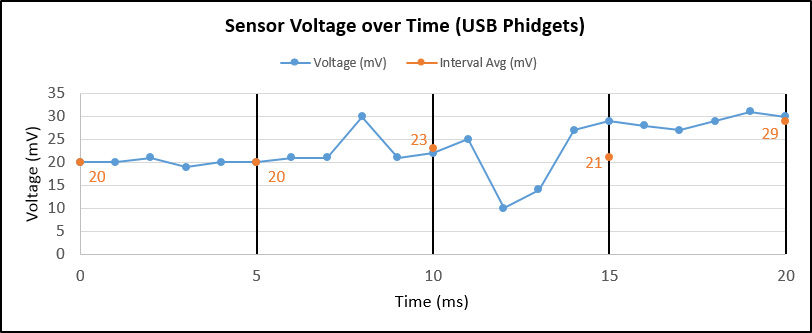
In this example, the blue data points represent the real value of the voltage at any given time. The thick black bars represent the sampling interval, which is 5 milliseconds. When a USB Phidget samples at a slower rate than its default, it will average the last interval worth of samples together and report that value on each interval. This average is represented by the orange data point that lands on each interval line. It is this average that is compared against the change trigger to decide whether or not a data event fires or not. Let's step through each interval:
Interval 1 (0-5ms): The voltage stays mostly stable throughout this interval. The average at the end of the interval is 20mV, which is no different than our first sample. Since our change trigger is 3mV, an event does not fire at the 5ms mark.
Interval 2 (5-10ms): In this interval, the voltage spikes to 30mV and then drops back down. The average for this interval is 23mV, which is 3mV higher than our last event at 0ms. Thus, the change is sufficient to cause a data even to fire at 10ms.
Interval 3 (10-15ms): In this interval, the voltage drops down to 10mV and then rises close to 30mV. The average for this interval is 21mV, which is only 2mV off from our last event. Since this does not meet our change trigger, an event does not fire.
Interval 4 (15-20ms): In this interval, the voltage remains relatively stable at around 28mV. However, the average for this interval is 29mV, which is much higher than our last data event (23mV). This change of 6mV is greater than our change trigger, so an event fires.
VINT Phidgets

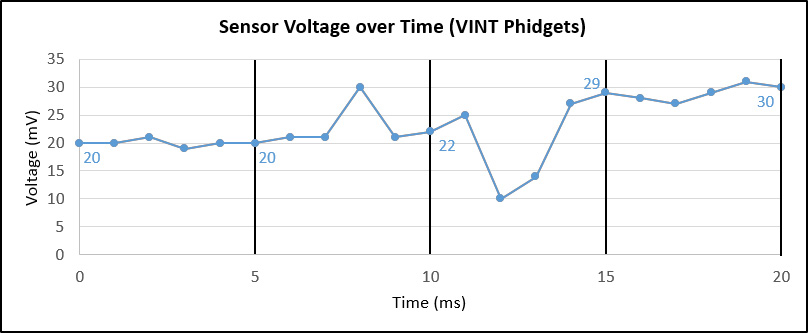
Let's see how a VINT devices behaves in the same example. Now, instead of averaging all of the values in the past interval, the VINT device goes to sleep to save power. That means it only cares about the data values on each interval line, and ignores all others.
Interval 1 (0-5ms): The device wakes up and sees a value of 20mV, which is no different than the starting value of 20mV. No event is fired.
Interval 2 (5-10ms): The device wakes up and sees 22mV, which does not differ enough from the last event of 20mV, as our change trigger is 3mV. No event is fired.
Interval 3 (10-15ms): The device wakes up and sees 29mV, which is enough of a change to fire a data event.
Interval 4 (15-20ms): The device wakes up and sees 30mV, which is only 1mV off from the last event, which is not sufficient to trigger a new event.
Further Reading
Phidget Programming Basics - Here you can find the basic concepts to help you get started with making your own programs that use Phidgets.
Polling vs. Events - Your program can gather data in either a polling-driven or event-driven manner. Learn the difference to determine which is best for your application.
Using Multiple Phidgets - It can be difficult to figure out how to use more than one Phidget in your program. This page will guide you through the steps.
Logging, Exceptions, and Errors - Learn about all the tools you can use to debug your program.
Phidget Network Server - Phidgets can be controlled and communicated with over your network- either wirelessly or over ethernet.
Best Phidgets Practices - Good programming habits that will save you from common problems when writing code for your Phidgets.
