Language - Python: Difference between revisions
No edit summary |
No edit summary |
||
| Line 1: | Line 1: | ||
[[Category:Language]] | [[Category:Language]] | ||
__TOC__ | __TOC__ | ||
| Line 15: | Line 14: | ||
=== Libraries === | === Libraries === | ||
{{AllQuickDownloads}} | {{AllQuickDownloads}} | ||
== Getting Started with Python == | == Getting Started with Python == | ||
Welcome to using Phidgets with Python! By using Python, you will have access to the complete {{Phidget22API}}, including events. We also provide example code in Python for all Phidget devices. | Welcome to using Phidgets with Python! By using Python, you will have access to the complete {{Phidget22API}}, including events. We also provide example code in Python for all Phidget devices. | ||
If you are developing for Windows, keep reading. Otherwise, select your operating system to jump ahead: | If you are developing for Windows, keep reading. Otherwise, select your operating system to jump ahead: | ||
*[[#macOS | macOS]] | *[[#macOS | macOS]] | ||
*[[#Linux | Linux]] | *[[#Linux | Linux]] | ||
== Windows == | == Windows == | ||
{{Windows_Languages}} | {{Windows_Languages}} | ||
===Install Phidget Python | ===Install Phidget Python module for Windows=== | ||
Before getting started with the guides below, ensure you have [https://www.python.org/downloads/ Python] installed on your machine (both 2.7 and 3.6 are compatible with Phidgets). You will also need to download the [{{SERVER}}/downloads/phidget22/libraries/any/Phidget22Python.zip Phidget Python module]. | Before getting started with the guides below, ensure you have [https://www.python.org/downloads/ Python] installed on your machine (both 2.7 and 3.6 are compatible with Phidgets). You will also need to download the [{{SERVER}}/downloads/phidget22/libraries/any/Phidget22Python.zip Phidget Python module]. | ||
| Line 42: | Line 38: | ||
[[File:Python_install.png|link=|center]] | [[File:Python_install.png|link=|center]] | ||
===Command | ===Command line=== | ||
====Use | ====Use our examples==== | ||
One of the best ways to start programming with Phidgets is to use our example code as a guide. Before we get started, make sure you have read [[#Install Phidget Python module for Windows | how to install the Phidget Python module]] section above. | One of the best ways to start programming with Phidgets is to use our example code as a guide. Before we get started, make sure you have read [[#Install Phidget Python module for Windows | how to install the Phidget Python module]] section above. | ||
| Line 59: | Line 55: | ||
[[Image:Python_command_run.png|link=|center]] | [[Image:Python_command_run.png|link=|center]] | ||
{{Edit_the_Examples}} | |||
====Setting Up a New Script==== | |||
When you are building a script from scratch, or adding Phidget functionality to an existing script, you'll need to configure your program to properly link the Phidget Python library. | |||
==== | |||
When you are building a | |||
To include the Phidget Python library, add the following line to your code: | To include the Phidget Python library, add the following line to your code: | ||
| Line 79: | Line 73: | ||
</syntaxhighlight> | </syntaxhighlight> | ||
You can now | You can now compile the file as shown in the previous section. | ||
The project now has access to Phidgets. | |||
===IDLE=== | ===IDLE=== | ||
====Use | ====Use our examples==== | ||
One of the best ways to start programming with Phidgets is to use our example code as a guide. Before we get started, make sure you have read [[#Install Phidget Python module for Windows| how to install the Phidget Python module]] section above. | One of the best ways to start programming with Phidgets is to use our example code as a guide. Before we get started, make sure you have read [[#Install Phidget Python module for Windows| how to install the Phidget Python module]] section above. | ||
| Line 99: | Line 95: | ||
{{Edit_the_Examples}} | |||
==== | ====Setting Up a New Script==== | ||
When you are building a | When you are building a script from scratch, or adding Phidget functionality to an existing script, you'll need to configure your program to properly link the Phidget Python library. | ||
| Line 118: | Line 114: | ||
</syntaxhighlight> | </syntaxhighlight> | ||
You can now | You can now compile the file as shown in the previous section. | ||
The project now has access to Phidgets. | |||
===Visual Studio=== | ===Visual Studio=== | ||
====Use | ====Use our examples==== | ||
One of the best ways to start programming with Phidgets is to use our example code as a guide. Before we get started, make sure you have read [[#Install Phidget Python module for Windows| how to install the Phidget Python module]] section above. You will also need to download [https://www.visualstudio.com/ Microsoft Visual Studio] if you have not already. | One of the best ways to start programming with Phidgets is to use our example code as a guide. Before we get started, make sure you have read [[#Install Phidget Python module for Windows| how to install the Phidget Python module]] section above. You will also need to download [https://www.visualstudio.com/ Microsoft Visual Studio] if you have not already. | ||
| Line 150: | Line 148: | ||
[[Image:Python_version.PNG|link=|center]] | [[Image:Python_version.PNG|link=|center]] | ||
You can view/edit your Python environment under the ''Python Environments'' tab: | You can view/edit your Python environment under the ''Python Environments'' tab: | ||
| Line 156: | Line 153: | ||
{{Edit_the_Examples}} | |||
==== | ====Setting Up a New Project==== | ||
When you are building a project from scratch, or adding Phidget functionality to an existing project, you'll need to configure your development environment to properly link the Phidget Python library. | When you are building a project from scratch, or adding Phidget functionality to an existing project, you'll need to configure your development environment to properly link the Phidget Python library. | ||
To start, you need to create your project as shown in the previous section. | |||
To include the Phidget Python library, add the following line to your code: | To include the Phidget Python library, add the following line to your code: | ||
| Line 175: | Line 173: | ||
</syntaxhighlight> | </syntaxhighlight> | ||
The project now has access to Phidgets. | |||
===LiClipse=== | ===LiClipse=== | ||
====Use | ====Use our examples==== | ||
One of the best ways to start programming with Phidgets is to use our example code as a guide. Before we get started, make sure you have read [[#Install Phidget Python module for Windows | how to install the Phidget Python module]] section above. You will also need to download [http://www.liclipse.com/ LiClipse] if you have not already. | One of the best ways to start programming with Phidgets is to use our example code as a guide. Before we get started, make sure you have read [[#Install Phidget Python module for Windows | how to install the Phidget Python module]] section above. You will also need to download [http://www.liclipse.com/ LiClipse] if you have not already. | ||
| Line 197: | Line 195: | ||
{{Edit_the_Examples}} | |||
==== | ====Setting Up a New Project==== | ||
When you are building a project from scratch, or adding Phidget functionality to an existing project, you'll need to configure your development environment to properly link the Phidget Python library. | When you are building a project from scratch, or adding Phidget functionality to an existing project, you'll need to configure your development environment to properly link the Phidget Python library. | ||
To start, you need to create your project as shown in the previous section. | |||
To include the Phidget Python library, add the following line to your code: | To include the Phidget Python library, add the following line to your code: | ||
| Line 216: | Line 215: | ||
</syntaxhighlight> | </syntaxhighlight> | ||
The project now has access to Phidgets. | |||
==macOS== | ==macOS== | ||
{{macOS_Languages}} | {{macOS_Languages}} | ||
===Install Phidget Python | ===Install Phidget Python module for macOS=== | ||
Before getting started with the guides below, ensure you have [https://www.python.org/downloads/ Python] installed on your machine (both 2.7 and 3.6 are compatible with Phidgets). You will also need to download the [{{SERVER}}/downloads/phidget22/libraries/any/Phidget22Python.zip Phidget Python module]. | Before getting started with the guides below, ensure you have [https://www.python.org/downloads/ Python] installed on your machine (both 2.7 and 3.6 are compatible with Phidgets). You will also need to download the [{{SERVER}}/downloads/phidget22/libraries/any/Phidget22Python.zip Phidget Python module]. | ||
| Line 233: | Line 232: | ||
===Terminal=== | ===Terminal=== | ||
====Use | ====Use our examples==== | ||
One of the best ways to start programming with Phidgets is to use our example code as a guide. Before we get started, make sure you have read [[#Install Phidget Python module for macOS| how to install the Phidget Python module]] section above. | One of the best ways to start programming with Phidgets is to use our example code as a guide. Before we get started, make sure you have read [[#Install Phidget Python module for macOS| how to install the Phidget Python module]] section above. | ||
| Line 245: | Line 244: | ||
python example.py | python example.py | ||
</syntaxhighlight> | </syntaxhighlight> | ||
[[Image:Python_mac_terminal_run.png|link=|center]] | [[Image:Python_mac_terminal_run.png|link=|center]] | ||
{{Edit_the_Examples}} | |||
==== Setting Up a New Script==== | |||
When you are building a script from scratch, or adding Phidget functionality to an existing script, you'll need to configure your program to properly link the Phidget Python library. | |||
==== | |||
When you are building a | |||
To include the Phidget Python library, add the following line to your code: | To include the Phidget Python library, add the following line to your code: | ||
| Line 269: | Line 265: | ||
</syntaxhighlight> | </syntaxhighlight> | ||
You can now | You can now compile the file as shown in the previous section. | ||
The project now has access to Phidgets. | |||
== Linux == | == Linux == | ||
{{Linux_Languages}} | {{Linux_Languages}} | ||
===Install Phidget Python | ===Install Phidget Python module for Linux=== | ||
Before getting started with the guides below, ensure you have [https://www.python.org/downloads/ Python] installed on your machine (both 2.7 and 3.6 are compatible with Phidgets). | Before getting started with the guides below, ensure you have [https://www.python.org/downloads/ Python] installed on your machine (both 2.7 and 3.6 are compatible with Phidgets). | ||
| Line 288: | Line 287: | ||
===Terminal=== | ===Terminal=== | ||
====Use | ====Use our examples==== | ||
One of the best ways to start programming with Phidgets is to use our example code as a guide. Before we get started, make sure you have read [[#Install Phidget Python module for Linux| how to install the Phidget Python module]] section above. | One of the best ways to start programming with Phidgets is to use our example code as a guide. Before we get started, make sure you have read [[#Install Phidget Python module for Linux| how to install the Phidget Python module]] section above. | ||
| Line 304: | Line 303: | ||
[[Image:Python_linux_terminal_run.png|link=|center]] | [[Image:Python_linux_terminal_run.png|link=|center]] | ||
{{Edit_the_Examples}} | |||
====Setting Up a New Script==== | |||
==== | When you are building a script from scratch, or adding Phidget functionality to an existing script, you'll need to configure your program to properly link the Phidget Python library. | ||
When you are building a | |||
To include the Phidget Python library, add the following line to your code: | To include the Phidget Python library, add the following line to your code: | ||
| Line 323: | Line 321: | ||
</syntaxhighlight> | </syntaxhighlight> | ||
The script now has access to Phidgets. | |||
== Editing the Examples== | |||
To get our example code to run in a custom application, simply remove the calls to ''AskForDeviceParameters'' and ''PrintEventDescriptions'', and hard-code the addressing parameters for your application. | |||
If you are unsure what values to use for the addressing parameters, check the [[Finding The Addressing Information]] page. | |||
For instance: | |||
<syntaxhighlight lang=python> | |||
channelInfo = AskForDeviceParameters(ch) | |||
ch.setDeviceSerialNumber(channelInfo.deviceSerialNumber) | |||
ch.setHubPort(channelInfo.hubPort) | |||
ch.setIsHubPortDevice(channelInfo.isHubPortDevice) | |||
ch.setChannel(channelInfo.channel) | |||
if(channelInfo.netInfo.isRemote): | |||
ch.setIsRemote(channelInfo.netInfo.isRemote) | |||
if(channelInfo.netInfo.serverDiscovery): | |||
Net.enableServerDiscovery(PhidgetServerType.PHIDGETSERVER_DEVICEREMOTE) | |||
else: | |||
Net.addServer("Server", channelInfo.netInfo.hostname, | |||
channelInfo.netInfo.port, channelInfo.netInfo.password, 0) | |||
</syntaxhighlight> | |||
Might become: | |||
<syntaxhighlight lang=python> | |||
ch.setDeviceSerialNumber(370114) | |||
ch.setHubPort(2) | |||
ch.setIsHubPortDevice(1) | |||
</syntaxhighlight> | |||
Notice that you can leave out any parameter not relevant to your application for simplicity. | |||
You can then manipulate the rest of the code as your application requires. A more in-depth description of programming with Phidgets follows in the [[#Write Code| Write Code]] section. | |||
==Write Code== | ==Write Code== | ||
{{WriteCode_Intro|Python}} | {{WriteCode_Intro|Python}} | ||
=== Step One: | === Step One: Create and Address=== | ||
You will need to declare your Phidget object in your code. For example, we can declare a digital input object like this: | You will need to declare your Phidget object in your code. For example, we can declare a digital input object like this: | ||
<syntaxhighlight lang=python> | <syntaxhighlight lang=python> | ||
| Line 334: | Line 368: | ||
</syntaxhighlight> | </syntaxhighlight> | ||
Next, we can address which Phidget we want to connect to by setting parameters such as ''DeviceSerialNumber''. | |||
<syntaxhighlight lang=python> | <syntaxhighlight lang=python> | ||
ch. | ch.setDeviceSerialNumber(496911) | ||
</syntaxhighlight> | </syntaxhighlight> | ||
Although we are not including it on this page, you should handle exceptions of all Phidget functions. Here is an example of the previous code with error handling: | |||
Although we are not including it on this page, you should handle | |||
<syntaxhighlight lang=python> | <syntaxhighlight lang=python> | ||
try: | try: | ||
| Line 348: | Line 381: | ||
print("Runtime Error: %s" % e.message) | print("Runtime Error: %s" % e.message) | ||
try: | try: | ||
ch. | ch.setDeviceSerialNumber(496911) | ||
except PhidgetException as e: | except PhidgetException as e: | ||
print (“Phidget Exception %i: %s” % (e.code, e.details)) | print (“Phidget Exception %i: %s” % (e.code, e.details)) | ||
</syntaxhighlight> | </syntaxhighlight> | ||
=== Step Two: Open and Wait for Attachment=== | |||
After we have specified which Phidget to connect to, we can open the Phidget object like this: | |||
<syntaxhighlight lang=python> | <syntaxhighlight lang=python> | ||
ch.openWaitForAttachment(5000) | ch.openWaitForAttachment(5000) | ||
</syntaxhighlight> | </syntaxhighlight> | ||
To use a Phidget, it must be plugged in (attached). We can handle this by calling ''openWaitForAttachment'', which will block indefinitely until a connection is made, or until the timeout value is exceeded. Simply calling ''open'' does not guarantee you can use the Phidget immediately. | |||
Alternately, you could verify the device is attached by using event driven programming and tracking the attach events. | |||
To use events to handle attachments, we have to modify our code slightly: | To use events to handle attachments, we have to modify our code slightly: | ||
| Line 369: | Line 401: | ||
ch = DigitalInput() | ch = DigitalInput() | ||
ch.setOnAttachHandler(onAttachHandler) | ch.setOnAttachHandler(onAttachHandler) | ||
ch. | ch.openWaitForAttachment(5000) | ||
</syntaxhighlight> | </syntaxhighlight> | ||
Next, we have to declare the function that will be called when an attach event is fired - in this case the function '' | Next, we have to declare the function that will be called when an attach event is fired - in this case the function ''onAttachHandler'' will be called: | ||
<syntaxhighlight lang=python> | <syntaxhighlight lang=python> | ||
def onAttachHandler(e): | def onAttachHandler(e): | ||
print("Phidget attached!") | print("Phidget attached!") | ||
</syntaxhighlight> | </syntaxhighlight> | ||
We recommend using this attach handler to set any initialization parameters for the channel such as DataInterval and ChangeTrigger from within the AttachHandler, so the parameters are set as soon as the device becomes available. | |||
=== Step Three: Do Things with the Phidget === | === Step Three: Do Things with the Phidget === | ||
| Line 387: | Line 421: | ||
</syntaxhighlight> | </syntaxhighlight> | ||
This code will connect a function | This code will connect a function to an event. In this case, the ''onStateChangeHandler'' function will be called when there has been a change to the channel's input. Next, we need to create the ''onStateChangeHandler'' function: | ||
<syntaxhighlight lang=python> | <syntaxhighlight lang=python> | ||
def onStateChangeHandler(e, state): | def onStateChangeHandler(e, state): | ||
| Line 400: | Line 434: | ||
print("State %f" % state) | print("State %f" % state) | ||
</syntaxhighlight> | </syntaxhighlight> | ||
'''Important Note:''' There will be a period of time between the attachment of a Phidget sensor and the availability of the first data from the device. Any attempts to get this data before it is ready will result in an exception. See more information on this on our page for [[Unknown Values]]. | |||
====Enumerations==== | |||
Some Phidget devices have functions that deal with specific predefined values called enumerations. Enumerations commonly provide readable names to a set of numbered options. | |||
Enumerations with Phidgets in Python will take the form of '''EnumerationType.ENUMERATION_NAME'''. | |||
For example, specifying a SensorType to use the 1142 for a voltage input would look like: | |||
<syntaxhighlight lang=python> | |||
VoltageSensorType.SENSOR_TYPE_1142 | |||
</syntaxhighlight> | |||
and specifying a K-Type thermocouple for a temperature sensor would be: | |||
<syntaxhighlight lang=python> | |||
ThermocoupleType.THERMOCOUPLE_TYPE_K | |||
</syntaxhighlight> | |||
The Phidget error code for timing out could be specified as: | |||
<syntaxhighlight lang=python> | |||
ErrorCode.EPHIDGET_TIMEOUT | |||
</syntaxhighlight> | |||
You can find the Enumeration Type under the ''Enumerations'' section of the {{Phidget22API}} for your device, and the Enumeration Name in the drop-down list within. | |||
=== Step Four: Close and Delete === | === Step Four: Close and Delete === | ||
| Line 408: | Line 465: | ||
== Further Reading == | == Further Reading == | ||
[[Phidget Programming Basics]] - Here you can find the basic concepts to help you get started with making your own programs that use Phidgets. | [[Phidget Programming Basics]] - Here you can find the basic concepts to help you get started with making your own programs that use Phidgets. | ||
Revision as of 22:01, 5 June 2018
Quick Downloads
Documentation
- Phidget22 API (Select Python from drop-down menu)
Example Code
Libraries
- Windows Drivers Installer (32-Bit)
- Windows Drivers Installer (64-Bit)
- Windows Development Libraries
- macOS Installer
- macOS Standalone Control Panel
- Linux Libraries
- Linux Phidget Network Server
Getting Started with Python
Welcome to using Phidgets with Python! By using Python, you will have access to the complete Phidget22 API, including events. We also provide example code in Python for all Phidget devices.
If you are developing for Windows, keep reading. Otherwise, select your operating system to jump ahead:
Windows
If you haven't already, please visit the Windows page before you continue reading. There you will be instructed on how to properly set up your Windows machine so you can follow the guides below!
Install Phidget Python module for Windows
Before getting started with the guides below, ensure you have Python installed on your machine (both 2.7 and 3.6 are compatible with Phidgets). You will also need to download the Phidget Python module.
After unpacking the Phidget Python module, open the command prompt at folder location and enter the following command:
python setup.py install
This will build the module and install the Python module files into your site-packages directory.

Command line
Use our examples
One of the best ways to start programming with Phidgets is to use our example code as a guide. Before we get started, make sure you have read how to install the Phidget Python module section above.
Now that you have Python and the Phidget Python module installed, select an example that will work with your Phidget:
Open the command prompt at the location of the example and enter the following command:
python example.py
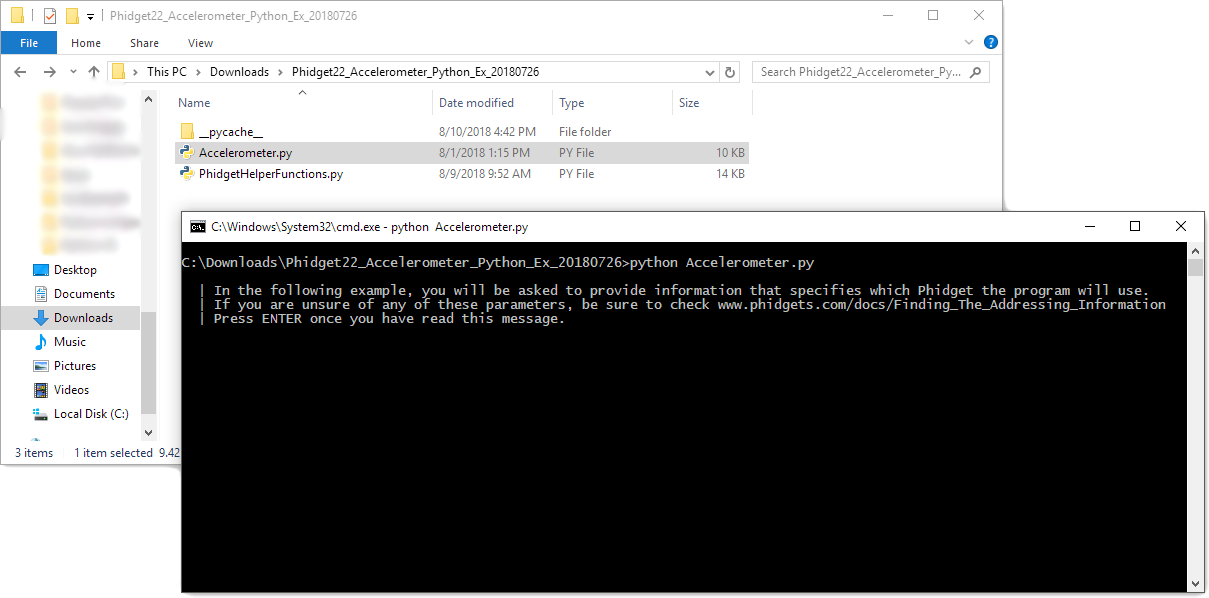
You should now have the example up and running for your device. Your next step is to look at the Editing the Examples section below for information about the example and important concepts for programming Phidgets. This would be a good time to play around with the device and experiment with some of its functionality.
Setting Up a New Script
When you are building a script from scratch, or adding Phidget functionality to an existing script, you'll need to configure your program to properly link the Phidget Python library.
To include the Phidget Python library, add the following line to your code:
from Phidget22.PhidgetException import *
from Phidget22.Phidget import *
Then, you will also have to add a reference to your particular Phidget. For example, you would include the following line for a DigitalInput:
from Phidget22.Devices.DigitalInput import *
You can now compile the file as shown in the previous section.
The project now has access to Phidgets.
IDLE
Use our examples
One of the best ways to start programming with Phidgets is to use our example code as a guide. Before we get started, make sure you have read how to install the Phidget Python module section above.
Now that you have Python and the Phidget Python module installed, select an example that will work with your Phidget:
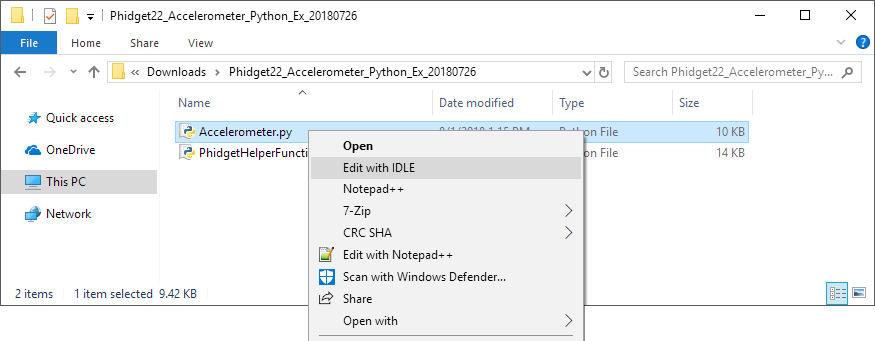
Right-click on the example and open it in IDLE:
To run the example, simply click on Run and select Run Module:
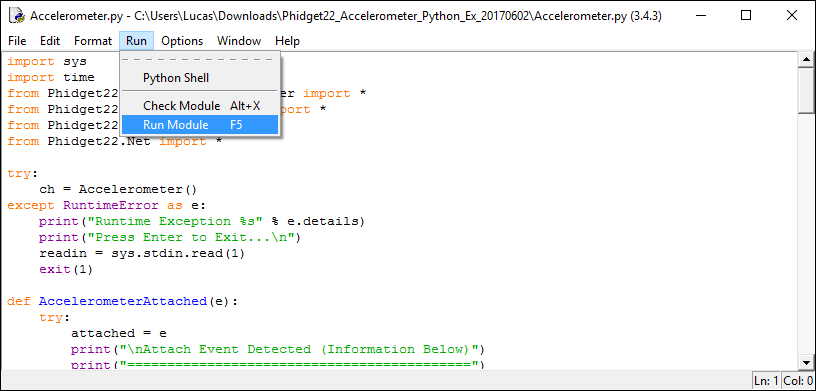
You should now have the example up and running for your device. Your next step is to look at the Editing the Examples section below for information about the example and important concepts for programming Phidgets. This would be a good time to play around with the device and experiment with some of its functionality.
Setting Up a New Script
When you are building a script from scratch, or adding Phidget functionality to an existing script, you'll need to configure your program to properly link the Phidget Python library.
To include the Phidget Python library, add the following line to your code:
from Phidget22.PhidgetException import *
from Phidget22.Phidget import *
Then, you will also have to add a reference to your particular Phidget. For example, you would include the following line for a DigitalInput:
from Phidget22.Devices.DigitalInput import *
You can now compile the file as shown in the previous section.
The project now has access to Phidgets.
Visual Studio
Use our examples
One of the best ways to start programming with Phidgets is to use our example code as a guide. Before we get started, make sure you have read how to install the Phidget Python module section above. You will also need to download Microsoft Visual Studio if you have not already.
Now that you have Python and the Phidget Python module installed, as well as Visual Studio, select an example that will work with your Phidget:
Next, create a new Python project:
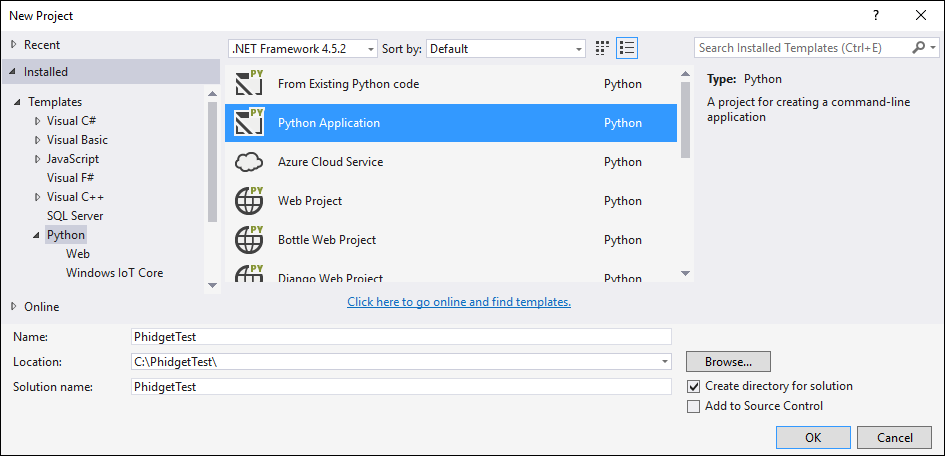
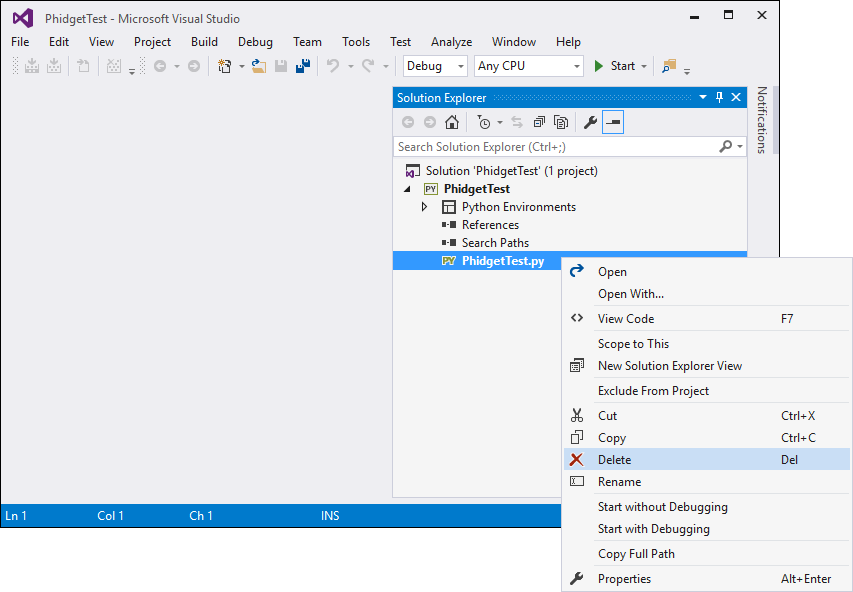
Delete the Python file that was generated with the project:
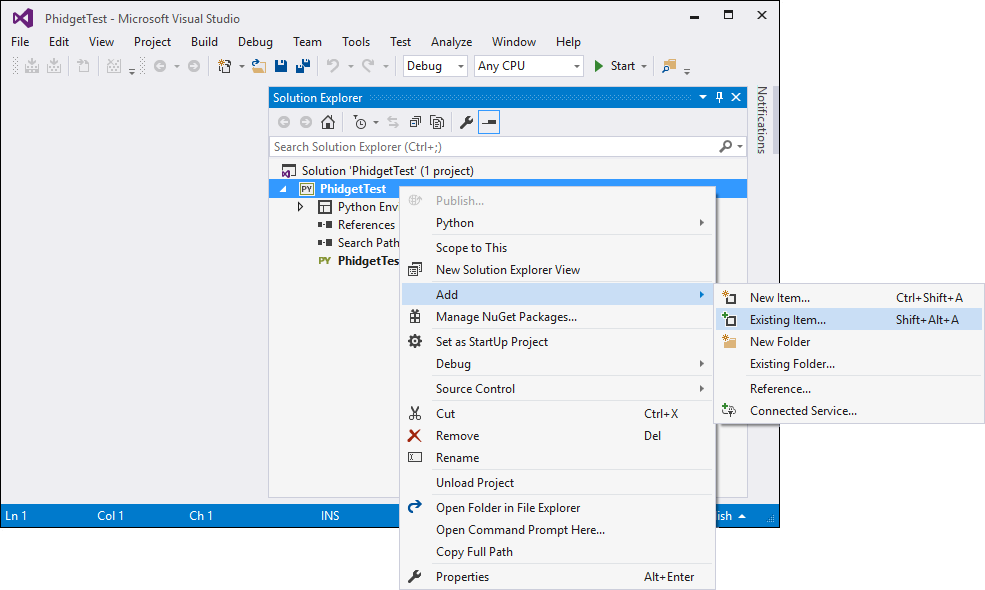
Add the example you just downloaded by right-clicking on the project and adding an existing item:
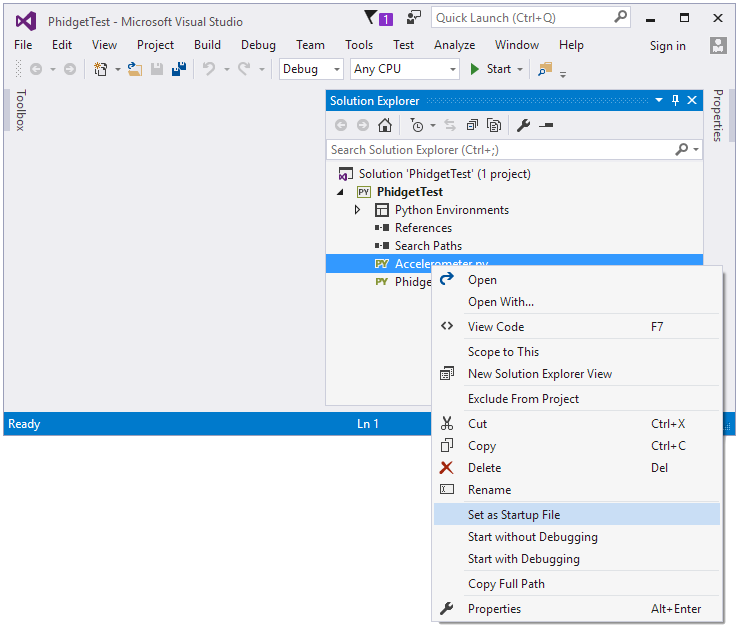
Select the example as the startup file:
Ensure that your Python environment is the same as the version you have installed. Enter the following command to view your Python version if you are unsure:
python -V

You can view/edit your Python environment under the Python Environments tab:
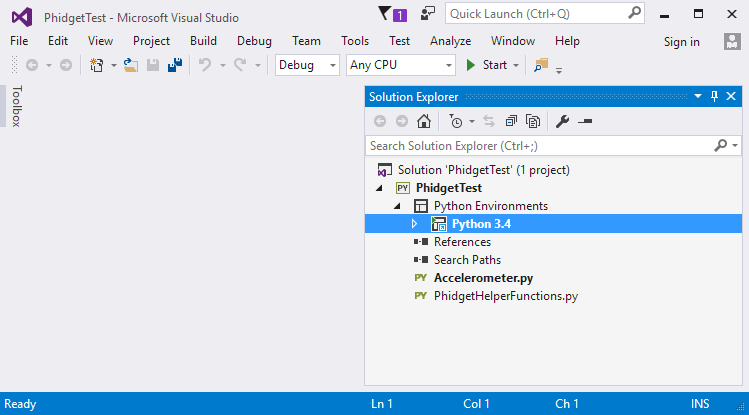
You should now have the example up and running for your device. Your next step is to look at the Editing the Examples section below for information about the example and important concepts for programming Phidgets. This would be a good time to play around with the device and experiment with some of its functionality.
Setting Up a New Project
When you are building a project from scratch, or adding Phidget functionality to an existing project, you'll need to configure your development environment to properly link the Phidget Python library.
To start, you need to create your project as shown in the previous section.
To include the Phidget Python library, add the following line to your code:
from Phidget22.PhidgetException import *
from Phidget22.Phidget import *
Then, you will also have to add a reference to your particular Phidget. For example, you would include the following line for a DigitalInput:
from Phidget22.Devices.DigitalInput import *
The project now has access to Phidgets.
LiClipse
Use our examples
One of the best ways to start programming with Phidgets is to use our example code as a guide. Before we get started, make sure you have read how to install the Phidget Python module section above. You will also need to download LiClipse if you have not already.
Now that you have Python and the Phidget Python module installed, as well as LiClipse, select an example that will work with your Phidget:
Next, create a new Python project:
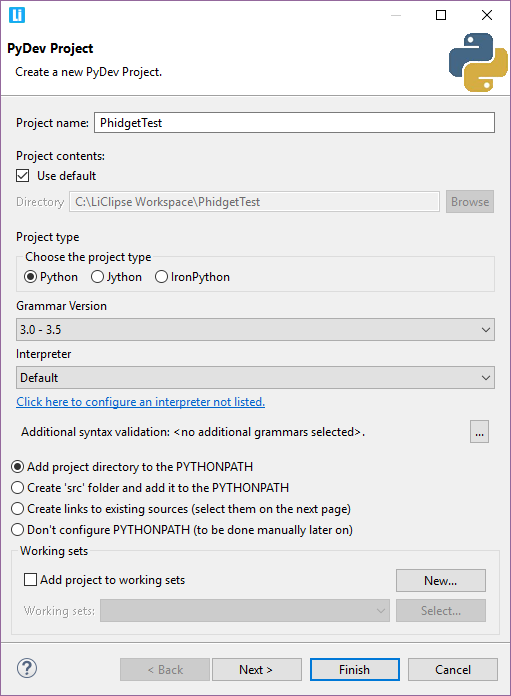
Add the example you just downloaded by dragging it into the project:
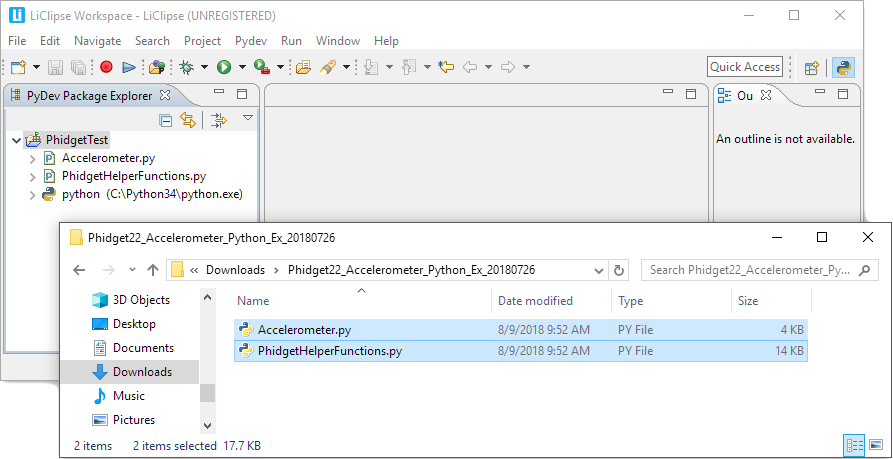
Finally, run the project:

You should now have the example up and running for your device. Your next step is to look at the Editing the Examples section below for information about the example and important concepts for programming Phidgets. This would be a good time to play around with the device and experiment with some of its functionality.
Setting Up a New Project
When you are building a project from scratch, or adding Phidget functionality to an existing project, you'll need to configure your development environment to properly link the Phidget Python library.
To start, you need to create your project as shown in the previous section.
To include the Phidget Python library, add the following line to your code:
from Phidget22.PhidgetException import *
from Phidget22.Phidget import *
Then, you will also have to add a reference to your particular Phidget. For example, you would include the following line for a DigitalInput:
from Phidget22.Devices.DigitalInput import *
The project now has access to Phidgets.
macOS
If you haven't already, please visit the macOS page before you continue reading. There you will be instructed on how to properly set up your macOS machine so you can follow the guides below!
Install Phidget Python module for macOS
Before getting started with the guides below, ensure you have Python installed on your machine (both 2.7 and 3.6 are compatible with Phidgets). You will also need to download the Phidget Python module.
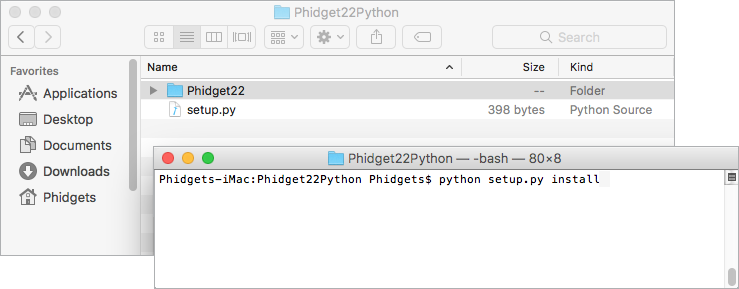
After unpacking the Phidget Python module, open the terminal at folder location and enter the following command:
python setup.py install
This will build the module and install the Python module files into your site-packages directory.
Terminal
Use our examples
One of the best ways to start programming with Phidgets is to use our example code as a guide. Before we get started, make sure you have read how to install the Phidget Python module section above.
Now that you have Python and the Phidget Python module installed, select an example that will work with your Phidget:
Open the terminal at the location of the example and enter the following command:
python example.py
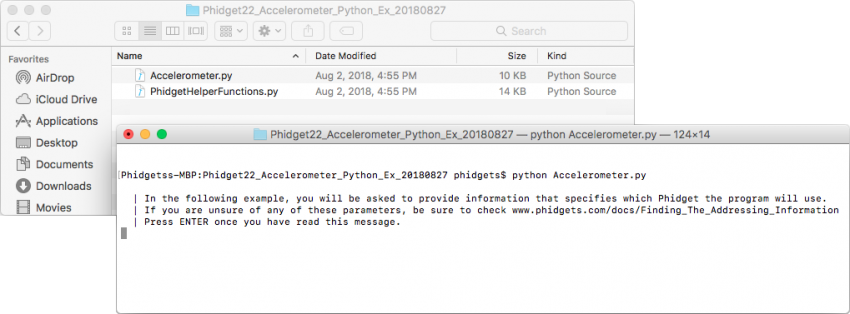
You should now have the example up and running for your device. Your next step is to look at the Editing the Examples section below for information about the example and important concepts for programming Phidgets. This would be a good time to play around with the device and experiment with some of its functionality.
Setting Up a New Script
When you are building a script from scratch, or adding Phidget functionality to an existing script, you'll need to configure your program to properly link the Phidget Python library.
To include the Phidget Python library, add the following line to your code:
from Phidget22.PhidgetException import *
from Phidget22.Phidget import *
Then, you will also have to add a reference to your particular Phidget. For example, you would include the following line for a DigitalInput:
from Phidget22.Devices.DigitalInput import *
You can now compile the file as shown in the previous section.
The project now has access to Phidgets.
Linux
If you haven't already, please visit the Linux page before you continue reading. There you will be instructed on how to properly set up your Linux machine so you can follow the guides below!
Install Phidget Python module for Linux
Before getting started with the guides below, ensure you have Python installed on your machine (both 2.7 and 3.6 are compatible with Phidgets).
You will also need to download the Phidget Python module.
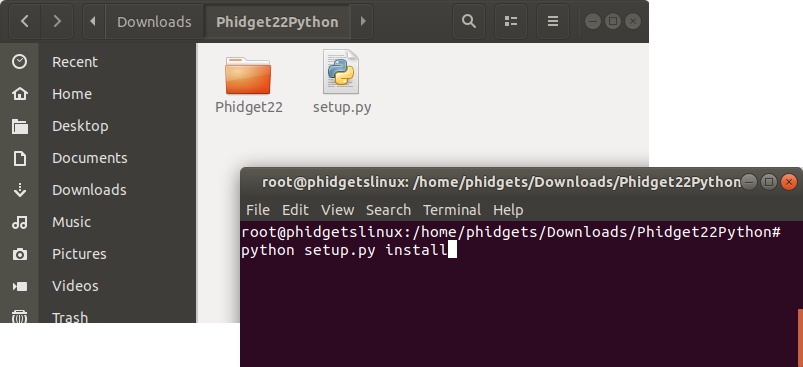
After unpacking the Phidget Python module, open the terminal at folder location and enter the following command:
python setup.py install
This will build the module and install the Python module files into your site-packages directory.
Terminal
Use our examples
One of the best ways to start programming with Phidgets is to use our example code as a guide. Before we get started, make sure you have read how to install the Phidget Python module section above.
Now that you have Python and the Phidget Python module installed, select an example that will work with your Phidget:
Open the terminal at the location of the example and enter the following command:
python example.py

You should now have the example up and running for your device. Your next step is to look at the Editing the Examples section below for information about the example and important concepts for programming Phidgets. This would be a good time to play around with the device and experiment with some of its functionality.
Setting Up a New Script
When you are building a script from scratch, or adding Phidget functionality to an existing script, you'll need to configure your program to properly link the Phidget Python library.
To include the Phidget Python library, add the following line to your code:
from Phidget22.PhidgetException import *
from Phidget22.Phidget import *
Then, you will also have to add a reference to your particular Phidget. For example, you would include the following line for a DigitalInput:
from Phidget22.Devices.DigitalInput import *
The script now has access to Phidgets.
Editing the Examples
To get our example code to run in a custom application, simply remove the calls to AskForDeviceParameters and PrintEventDescriptions, and hard-code the addressing parameters for your application.
If you are unsure what values to use for the addressing parameters, check the Finding The Addressing Information page.
For instance:
channelInfo = AskForDeviceParameters(ch)

ch.setDeviceSerialNumber(channelInfo.deviceSerialNumber)
ch.setHubPort(channelInfo.hubPort)
ch.setIsHubPortDevice(channelInfo.isHubPortDevice)
ch.setChannel(channelInfo.channel)

if(channelInfo.netInfo.isRemote):
    ch.setIsRemote(channelInfo.netInfo.isRemote)
    if(channelInfo.netInfo.serverDiscovery):
        Net.enableServerDiscovery(PhidgetServerType.PHIDGETSERVER_DEVICEREMOTE)
    else:
        Net.addServer("Server", channelInfo.netInfo.hostname,
            channelInfo.netInfo.port, channelInfo.netInfo.password, 0)
Might become:
ch.setDeviceSerialNumber(370114)
ch.setHubPort(2)
ch.setIsHubPortDevice(1)
Notice that you can leave out any parameter not relevant to your application for simplicity.
You can then manipulate the rest of the code as your application requires. A more in-depth description of programming with Phidgets follows in the Write Code section.
Write Code
By following the instructions for your operating system and compiler above, you now have working examples and a project that is configured. This teaching section will help you understand how the examples were written so you can start writing your own code.
Remember: your main reference for writing Python code will be the Phidget22 API Manual and the example code.
Step One: Create and Address
You will need to declare your Phidget object in your code. For example, we can declare a digital input object like this:
ch = DigitalInput()
Next, we can address which Phidget we want to connect to by setting parameters such as DeviceSerialNumber.
ch.setDeviceSerialNumber(496911)
Although we are not including it on this page, you should handle exceptions of all Phidget functions. Here is an example of the previous code with error handling:
try:
  ch = DigitalInput()
except RuntimeError as e:
  print("Runtime Error: %s" % e.message)
try:
  ch.setDeviceSerialNumber(496911)
except PhidgetException as e:
  print (“Phidget Exception %i: %s” % (e.code, e.details))
Step Two: Open and Wait for Attachment
After we have specified which Phidget to connect to, we can open the Phidget object like this:
ch.openWaitForAttachment(5000)
To use a Phidget, it must be plugged in (attached). We can handle this by calling openWaitForAttachment, which will block indefinitely until a connection is made, or until the timeout value is exceeded. Simply calling open does not guarantee you can use the Phidget immediately.
Alternately, you could verify the device is attached by using event driven programming and tracking the attach events.
To use events to handle attachments, we have to modify our code slightly:
ch = DigitalInput()
ch.setOnAttachHandler(onAttachHandler)
ch.openWaitForAttachment(5000)
Next, we have to declare the function that will be called when an attach event is fired - in this case the function onAttachHandler will be called:
def onAttachHandler(e):
    print("Phidget attached!")
We recommend using this attach handler to set any initialization parameters for the channel such as DataInterval and ChangeTrigger from within the AttachHandler, so the parameters are set as soon as the device becomes available.
Step Three: Do Things with the Phidget
We recommend the use of event driven programming when working with Phidgets. In a similar way to handling an attach event as described above, we can also add an event handler for a state change event:
ch = DigitalInput()
ch.setOnAttachHandler(onAttachHandler)
ch.setOnStateChangeHandler(onStateChangeHandler)
ch.open()
This code will connect a function to an event. In this case, the onStateChangeHandler function will be called when there has been a change to the channel's input. Next, we need to create the onStateChangeHandler function:
def onStateChangeHandler(e, state):
    print("State %f" % state)
    return 0
If events do not suit your needs, you can also poll the device directly for data using code like this:
state = ch.getState()
print("State %f" % state)
Important Note: There will be a period of time between the attachment of a Phidget sensor and the availability of the first data from the device. Any attempts to get this data before it is ready will result in an exception. See more information on this on our page for Unknown Values.
Enumerations
Some Phidget devices have functions that deal with specific predefined values called enumerations. Enumerations commonly provide readable names to a set of numbered options.
Enumerations with Phidgets in Python will take the form of EnumerationType.ENUMERATION_NAME.
For example, specifying a SensorType to use the 1142 for a voltage input would look like:
VoltageSensorType.SENSOR_TYPE_1142
and specifying a K-Type thermocouple for a temperature sensor would be:
ThermocoupleType.THERMOCOUPLE_TYPE_K
The Phidget error code for timing out could be specified as:
ErrorCode.EPHIDGET_TIMEOUT
You can find the Enumeration Type under the Enumerations section of the Phidget22 API for your device, and the Enumeration Name in the drop-down list within.
Step Four: Close and Delete
At the end of your program, be sure to close and delete your device:
ch.close()
Further Reading
Phidget Programming Basics - Here you can find the basic concepts to help you get started with making your own programs that use Phidgets.
Data Interval/Change Trigger - Learn about these two properties that control how much data comes in from your sensors.
Using Multiple Phidgets - It can be difficult to figure out how to use more than one Phidget in your program. This page will guide you through the steps.
Polling vs. Events - Your program can gather data in either a polling-driven or event-driven manner. Learn the difference to determine which is best for your application.
Logging, Exceptions, and Errors - Learn about all the tools you can use to debug your program.
Phidget Network Server - Phidgets can be controlled and communicated with over your network- either wirelessly or over ethernet.
