OS - iOS: Difference between revisions
No edit summary |
No edit summary |
||
| (19 intermediate revisions by 3 users not shown) | |||
| Line 1: | Line 1: | ||
[[Category:OS]] | [[Category:OS]] | ||
{| | |||
|style="vertical-align:middle; width: 60%;"| | |||
= | |||
==Getting Started with iOS== | ==Getting Started with iOS== | ||
Welcome to using Phidgets with iOS | Welcome to using Phidgets with iOS! | ||
== | If you haven't already, check out the [[:Category:UserGuide|user guide]] for your device. If you are ready to go, the first step to creating an iOS application with Phidgets is downloading the Phidget libraries on your macOS development machine! | ||
|{{TOC limit|3}} | |||
|} | |||
==Download== | |||
The Phidget libraries for iOS development are available here: | |||
*[https://cdn.phidgets.com/downloads/phidget22/libraries/ios/Phidget22_iOS.zip iOS Libraries] | |||
Download and unpack the libraries. You will need to reference these files from your Xcode project in order to use Phidgets. This step is covered in detail after you select your programming language below. If you need to access older versions of the libraries, [https://www.phidgets.com/downloads/phidget22/libraries/ios/ click here]. | |||
==Network Server== | |||
Phidgets cannot be connected directly to iOS devices, therefore, in order to use Phidgets with your iOS device, you must have a host computer that is running the Phidget Network Server. | |||
[[Image:iOS-connection.jpg|link=]] | |||
*Host computer: the computer that is physically connected to the Phidgets via USB and is running the Phidget Network Server. | |||
*Client computer: a computer running a Phidgets application that accesses Phidgets connected to the host computer. When developing for iOS, your iOS device acts as the client. | |||
The next step is to install the Phidget libraries on your host computer, and get the Phidget Network Server up and running. Start by following the ''Getting Started'' guide, and continue with the ''Network Server'' guide. When you are done, come back and finish this guide! | |||
*[[OS - Windows#Phidget Network Server| Windows]] | |||
*[[OS - OS X#Phidget Network Server| macOS]] | |||
*[[OS - Linux#Phidget Network Server| Linux]] | |||
*[[OS - Phidget SBC#Phidget Network Server| Phidget Single Board Computer]] | |||
==Programming== | |||
Now that you have everything set up, all you have to do is code! Select from one of the following programming languages to get started: | Now that you have everything set up, all you have to do is code! Select from one of the following programming languages to get started: | ||
* [[Language - Objective C#iOS|Objective C]] | * [[Language - Objective C#iOS|Objective C]] | ||
* [[Language - Swift#iOS|Swift]] | * [[Language - Swift#iOS|Swift]] | ||
Latest revision as of 22:03, 17 October 2023
Getting Started with iOSWelcome to using Phidgets with iOS! If you haven't already, check out the user guide for your device. If you are ready to go, the first step to creating an iOS application with Phidgets is downloading the Phidget libraries on your macOS development machine! |
Download
The Phidget libraries for iOS development are available here:
Download and unpack the libraries. You will need to reference these files from your Xcode project in order to use Phidgets. This step is covered in detail after you select your programming language below. If you need to access older versions of the libraries, click here.
Network Server
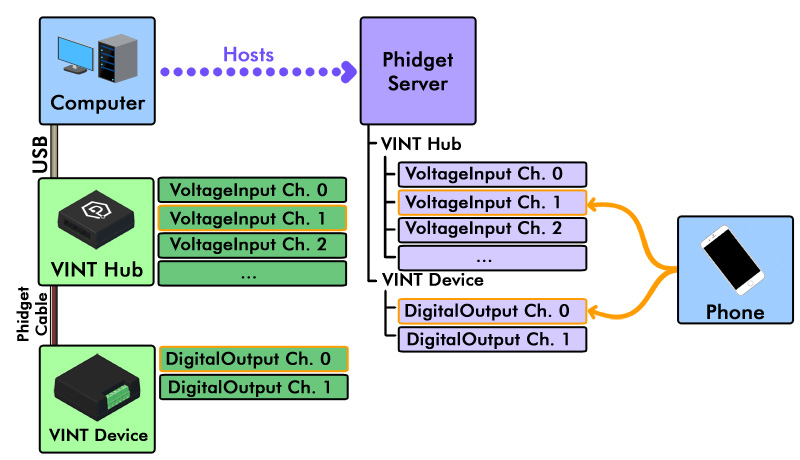
Phidgets cannot be connected directly to iOS devices, therefore, in order to use Phidgets with your iOS device, you must have a host computer that is running the Phidget Network Server.

- Host computer: the computer that is physically connected to the Phidgets via USB and is running the Phidget Network Server.
- Client computer: a computer running a Phidgets application that accesses Phidgets connected to the host computer. When developing for iOS, your iOS device acts as the client.
The next step is to install the Phidget libraries on your host computer, and get the Phidget Network Server up and running. Start by following the Getting Started guide, and continue with the Network Server guide. When you are done, come back and finish this guide!
Programming
Now that you have everything set up, all you have to do is code! Select from one of the following programming languages to get started:
