SBC3003 User Guide: Difference between revisions
No edit summary |
|||
| (20 intermediate revisions by 4 users not shown) | |||
| Line 1: | Line 1: | ||
__NOINDEX__ | |||
<metadesc>Single Board Computer running Debian with 3 high-speed USB ports, 6 VINT ports, ethernet and HDMI, with 512 MiB Memory and a 8 GB SD Card. </metadesc> | |||
[[Category:UserGuide]] | [[Category:UserGuide]] | ||
| Line 7: | Line 9: | ||
*An 8-30VDC power supply. | *An 8-30VDC power supply. | ||
*A computer. | *A computer. | ||
*Optional: A USB Phidget, VINT Phidget, or analog sensor. | *Optional: A USB Phidget, {{CT|VINTDevice|VINT Phidget}}, or {{CT|AnalogSensor|analog sensor}}. | ||
| Line 13: | Line 15: | ||
==Getting Started== | ==Getting Started== | ||
You can get set up using this video or by following the steps below: | |||
<center>{{#ev:youtube|DTHnd2xPxag|||||rel=0}}</center> | |||
1. If you have any USB Phidgets, VINT Phidgets, or analog sensors, plug them into the SBC now. | 1. If you have any USB Phidgets, VINT Phidgets, or analog sensors, plug them into the SBC now. | ||
| Line 31: | Line 36: | ||
*[{{SERVER}}/downloads/phidget22/libraries/windows/Phidget22-x86.exe 32 Bit Installer Download] | *[{{SERVER}}/downloads/phidget22/libraries/windows/Phidget22-x86.exe 32 Bit Installer Download] | ||
*[{{SERVER}}/downloads/phidget22/libraries/windows/Phidget22-x64.exe 64 Bit Installer Download] | *[{{SERVER}}/downloads/phidget22/libraries/windows/Phidget22-x64.exe 64 Bit Installer Download] | ||
You also need to download [https://support.apple.com/kb/DL999?locale=en_US Bonjour] on your Windows computer so that you can access your SBC over the network. | |||
| Line 39: | Line 47: | ||
Double click on the icon to open the Phidget Control Panel and navigate to the | Double click on the icon to open the Phidget Control Panel and navigate to the Network Phidgets tab: | ||
| Line 61: | Line 69: | ||
Open the Phidget Control Panel application and navigate to the PhidgetSBCs tab: | Open the Phidget Control Panel application and navigate to the PhidgetSBCs tab: | ||
[[File:Phidgetsbc_maccontrolpanel.png|link=|center]] | [[File:Phidgetsbc_maccontrolpanel.png|600px|link=|center]] | ||
As shown in the image above, the Phidget Control Panel will relay the following information to you: | As shown in the image above, the Phidget Control Panel will relay the following information to you: | ||
| Line 110: | Line 118: | ||
Welcome to the SBC homepage! Here you can view system information such as the firmware version, the amount of storage you have left, and more. Take a minute to look around, and, when you're ready, we will give an overview of the SBC Web Interface, starting with networking. | Welcome to the SBC homepage! Here you can view system information such as the firmware version, the amount of storage you have left, and more. Take a minute to look around, and, when you're ready, we will give an overview of the SBC Web Interface, starting with networking. | ||
===Update Packages=== | |||
We strongly recommend you update your packages before you start using your SBC. This will make sure that all of the software is up to date and will fix many potential issues with compiling code and using the Phidget Control Panel. To update your packages, go to System -> Packages. | |||
[[File:phidgetsbc_packages.jpg|link=|alt=|center]] | |||
Then, scroll to the bottom of the list and click on "Refresh Available Packages". It will take a few minutes to refresh the packages. Then, click on "Upgrade All Packages". | |||
===Set up Networking=== | ===Set up Networking=== | ||
| Line 173: | Line 189: | ||
*If multiple webcams are attached, they will start up with the same settings (port number will be incremented for each one). When using multiple webcams, resolution and frame rates will have to be reduced. | *If multiple webcams are attached, they will start up with the same settings (port number will be incremented for each one). When using multiple webcams, resolution and frame rates will have to be reduced. | ||
== | ==Advanced Topics and Troubleshooting== | ||
{{UGC-Start}} | |||
{{ | {{UGC-Firmware}} | ||
{{UGC-Entry|Armbian Packages|| | |||
You can find a directory of Armbian packages [{{SERVER}}/downloads/phidgetsbc/SBC3003/armbian/images/ here]. | |||
We have both desktop and server versions available. The Armbian release is more like a general Linux release with the Phidget libraries bundled in, whereas the default OS on the PhidgetSBC is kept very minimal to improve boot time and performance for Phidget-focused tasks. | |||
}} | |||
{{UGC-Entry|Connecting a USB Hub|| | |||
If you plan on connecting more than 3 USB devices to the SBC4, you'll need to use a [{{SERVER}}/?view{{=}}comparetable&rel{{=}}USBHub USB Hub]. If you do, make sure you plug it into one of the ports highlighted in green below: | |||
| | |||
[[ | [[Image:SBC3003_USB.jpg|600px|link=]] | ||
:1. The Ethernet port is used for network connectivity to the SBC. This enables access to the SBC as well as any connected Phidgets through the Phidget Network Server. Alternatively, a Wi-Fi USB adapter can be used for network connectivity. | |||
:2. The USB ports can be used for connecting Phidgets, Wi-Fi adapters, flash drives, webcams, USB hubs, | The port highlighted in red is a USB On-the-go port, which functions as a normal USB port except that connecting multiple devices to it using a USB hub will cause those devices to be unstable and to disconnect unexpectedly. | ||
If the devices you're plugging into your hub are rated for a total of 500mA or more, you should use an externally powered USB hub. | |||
}} | |||
{{UGC-Entry|Ports and Connectors|| | |||
[[File:SBC3003_Ports.JPG|800px|link=]] | |||
:1. The Ethernet port is used for network connectivity to the SBC. This enables network access to the SBC as well as any connected Phidgets through the Phidget Network Server. Alternatively, a Wi-Fi USB adapter can be used for wireless network connectivity. | |||
:2. The USB ports can be used for connecting Phidgets, Wi-Fi adapters, flash drives, webcams, USB hubs, and other devices. | |||
:3. The HDMI connector can be used for connecting a monitor the the SBC. In this situation, the SBC will function like any other Linux computer. (Note: you must plug the monitor in before powering up the SBC in order for it to be recognized). | :3. The HDMI connector can be used for connecting a monitor the the SBC. In this situation, the SBC will function like any other Linux computer. (Note: you must plug the monitor in before powering up the SBC in order for it to be recognized). | ||
:4. | :4. Six [[What_is_VINT?|VINT]] ports, essentially an integrated [{{SERVER}}/products.php?product_id{{=}}HUB0000_0 VINT Hub Phidget]. | ||
:5. The SBC is powered from the barrel connector. | :5. The SBC is powered from the barrel jack connector. | ||
:6 These LEDs indicate the status of the SBC. The red LED indicates that the SBC is receiving power. The green LED indicates boot status. The green LED will turn on and off once during boot and then remain on while the SBC is running. | :6 These LEDs indicate the status of the SBC. The red LED indicates that the SBC is receiving power. The green LED indicates boot status. The green LED will turn on and off once during boot and then remain on while the SBC is running. | ||
:7 The micro SD card slot. | :7 The micro SD card slot. | ||
}} | |||
{{UGC-Entry|Hardware Details|| | |||
The SBC4 is built around the A20 processor. This is an ARM Cortex-A7 based microprocessor from Allwinner Technology, which runs at 1 GHz. Connected to this is 512 MB of DDR3 SDRAM, and a 10/100baseT Ethernet controller. The microprocessors USB Host port is connected to 3 USB 2.0 High Speed ports. | |||
}} | |||
The | {{UGC-Entry|Software Details|| | ||
The PhidgetSBC runs Debian/GNU Linux 9.0 as its operating system and gets booted with U-Boot. | |||
}} | |||
{{UGC-Entry|Date and Time|| | |||
The | The date and time are set using NTP (Network Time Protocol) at boot. A NTP daemon continues to run in the background and will periodically update the clock, ensuring the time is always accurate. | ||
There is a real-time clock with battery backup which will preserve date/time across reboots and power removal. If power is suddenly lost, the real-time clock may not have the correct time. | |||
}} | |||
{{UGC-Entry|Factory Reset|| | |||
The | The SBC3003 does not natively support factory reset functionality. However, if your SBC3003 becomes corrupt and needs to be reset to factory firmware, you can [[OS_-_Phidget_SBC#Writing_Image_to_SD_Card|write a new image to the micro SD card]] (or a new card) to similar effect. | ||
}} | |||
{{UGC-Entry|Power Distribution|| | |||
The 12V power supply is stepped down to 5V and distributed in the following way: | |||
* Each USB port has 500 mA available. | |||
* The bulit-in VINT Hub Phidget has 500mA available. | |||
}} | |||
{{UGC-Entry|Configuration System|| | |||
The configuration system used by the SBC Web Interface is stored in ''/etc/webif''. It is not recommended to modify these files. | The configuration system used by the SBC Web Interface is stored in ''/etc/webif''. It is not recommended to modify these files. | ||
}} | |||
{{UGC-End}} | |||
==What's Next?== | ==What's Next?== | ||
Check the [[OS - Phidget SBC|Phidget SBC page]] next for a guide on how to start writing your own programs, and more! | Check the [[OS - Phidget SBC|Phidget SBC page]] next for a guide on how to start writing your own programs, and more! | ||
Latest revision as of 18:47, 6 May 2024
Welcome
Welcome to the user guide for the SBC3003. In this guide we will introduce you to your new Phidget and show you what it is capable of. To get started, make sure you have the following things available:
- Your new SBC3003.
- An Ethernet cable.
- An 8-30VDC power supply.
- A computer.
- Optional: A USB Phidget, VINT Phidget, or analog sensor.
Ready? Then let's get started!
Getting Started
You can get set up using this video or by following the steps below:
1. If you have any USB Phidgets, VINT Phidgets, or analog sensors, plug them into the SBC now.
2. Connect your SBC to your network using the Ethernet cable.
3. Connect your SBC to power. A red LED will immediately light up underneath the power barrel, indicating your SBC is receiving power. There is also a green LED that will briefly turn on when power is supplied, and then remain on after the SBC has fully booted.
The next step will be to access the SBC Web Interface. This process will vary slightly depending on what type of computer you use:
- Jump to getting started with macOS
- Jump to getting started with Linux
- Using a Windows machine? Keep reading.
Windows
First things first: make sure you have the latest Phidget drivers installed on your machine. Download and run the installer:
You also need to download Bonjour on your Windows computer so that you can access your SBC over the network.
Now that you have the drivers installed, find the ![]() icon in the taskbar. If it is not there, open up the start menu and search for Phidget Control Panel
icon in the taskbar. If it is not there, open up the start menu and search for Phidget Control Panel
Double click on the icon to open the Phidget Control Panel and navigate to the Network Phidgets tab:
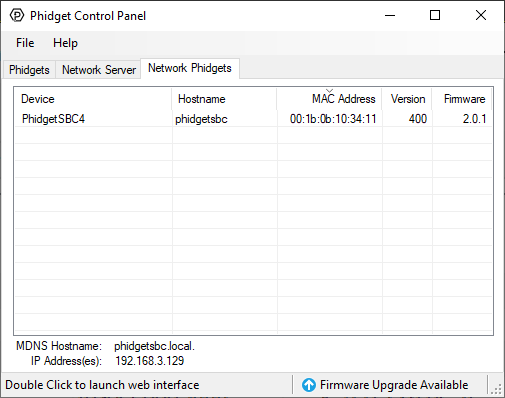
As shown in the image above, the Phidget Control Panel will relay the following information to you:
- The default link local address (mDNS address) which is phidgetsbc.local
- The IP address. There is no default IP address, it must be assigned to the SBC.
- The MAC address. This is useful for distinguishing between multiple SBCs.
Next, double-click on your SBC in the Phidget Control Panel. This will automatically open the SBC Web Interface, which, conveniently enough, is our next topic! Jump ahead to the SBC Web Interface.
macOS
First things first: make sure you have the latest Phidget drivers installed on your machine. Download and run the installer:
Now that you have the drivers installed, open the Phidget Control Panel by finding the ![]() icon in your applications folder.
icon in your applications folder.
Open the Phidget Control Panel application and navigate to the PhidgetSBCs tab:
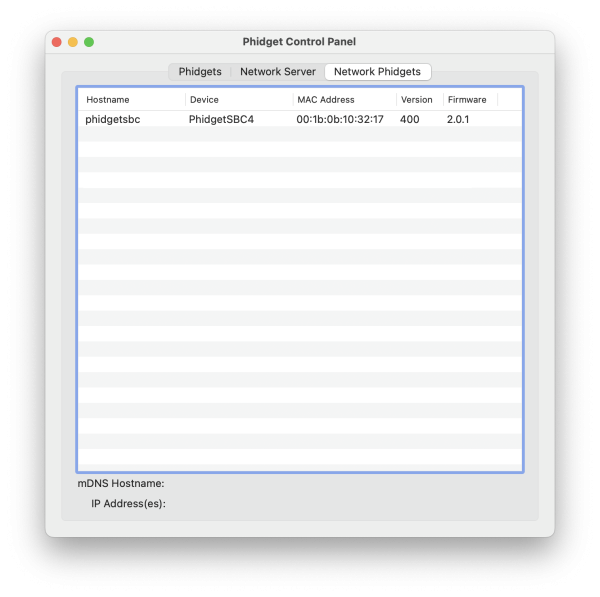
As shown in the image above, the Phidget Control Panel will relay the following information to you:
- The default link local address (mDNS hostname) which is phidgetsbc.local
- The IP address. There is no default IP address, it must be assigned to the SBC.
- The MAC address. This is useful for distinguishing between multiple SBCs.
Next, double-click on your SBC in the Phidget Control Panel. This will automatically open the SBC Web Interface, which, conveniently enough, is our next topic! Jump ahead to the SBC Web Interface.
Linux
First things first: make sure you have the latest Phidget drivers installed on your machine. Head over to the getting started with Linux section on the Linux page in order to get everything installed.
Now that your machine is ready to go, type the following command into the terminal:
phidget22admin -s
Your terminal will look something like this:

As shown in the image above, the phidget22admin call will relay the following information to you:
- The default link local address (mDNS hostname) which is phidgetsbc.local
- The IP address. There is no default IP address, it must be assigned to the SBC.
- The MAC address. This is useful for distinguishing between multiple SBCs.
Now that you know the IP address that has been assigned to the SBC, type it into a web browser and hit enter. This will open the SBC Web Interface, which, conveniently enough, is our next topic!
SBC Web Interface
The SBC Web Interface is a powerful tool that will prove invaluable when you begin development. You opened the SBC Web Interface in the previous step, so let`s jump right in and set a password!
Setting a password
The first time you open the SBC Web Interface, you will be greeted with this screen:
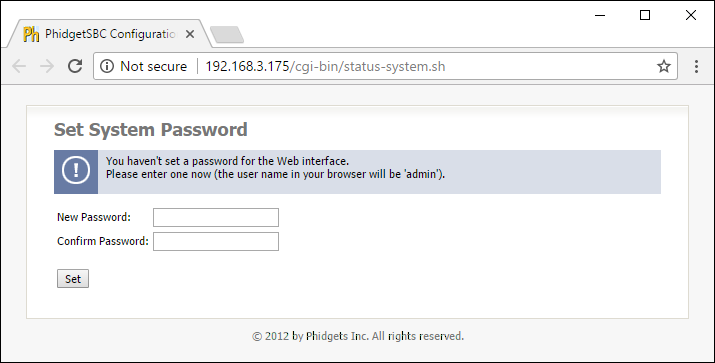
You will use this password in the following situations:
- Future SBC Web Interface access (linked to user admin)
- SBC terminal access (linked to user root)
Take a look around
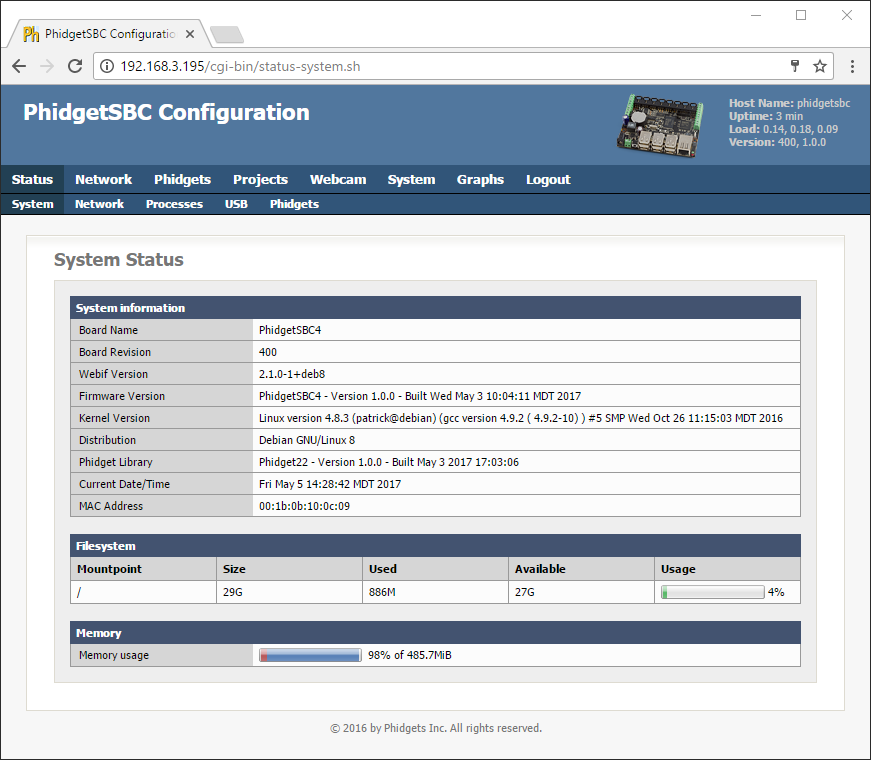
Welcome to the SBC homepage! Here you can view system information such as the firmware version, the amount of storage you have left, and more. Take a minute to look around, and, when you're ready, we will give an overview of the SBC Web Interface, starting with networking.
Update Packages
We strongly recommend you update your packages before you start using your SBC. This will make sure that all of the software is up to date and will fix many potential issues with compiling code and using the Phidget Control Panel. To update your packages, go to System -> Packages.

Then, scroll to the bottom of the list and click on "Refresh Available Packages". It will take a few minutes to refresh the packages. Then, click on "Upgrade All Packages".
Set up Networking
You can connect to your network in two ways with the SBC:
- via an Ethernet cable
- via a Wi-Fi USB adapter (we recommend this one)
The SBC will try to connect to Ethernet first. It can also switch between Wi-Fi and Ethernet on the fly. If you're following this guide, you've already set up your network using an Ethernet cable by simply plugging it in. Next, we will take a look at setting up Wi-Fi.
Wireless
To set up Wi-Fi on the SBC, first plug in your Wi-Fi USB adapter. Next, navigate to Network->Wireless and your screen will look something like this:
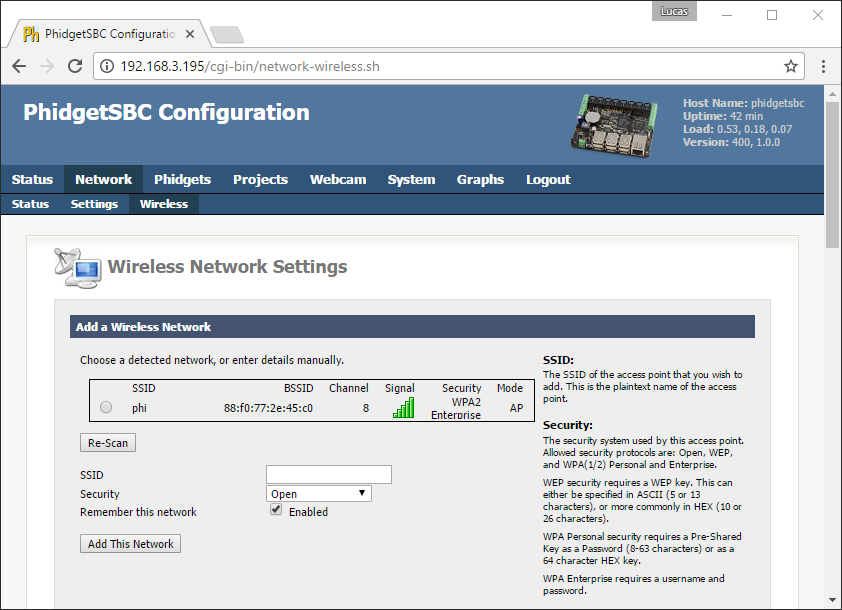
Add your Wi-Fi network by selecting it from the list, providing any necessary credentials, and clicking the Add This Network button.
Here are some useful Wi-Fi tips:
- You don't have to see a network in order to connect to it. You can add the SSID and password of a network, and the next time the SBC boots it will connect to that network if it is available.
- The SSID settings are only for DHCP networks.
Next, we will cover setting a static IP with the SBC Web Interface.
Static IP
Don't have DHCP on your main network? Not to worry, you can easily set up a static IP with the SBC:
- Ethernet: Navigate to Network->Settings to set up a static IP.
- Wi-Fi: Navigate to Network->Wireless to set up a static IP.
Now simply enter your network configuration and save the changes. The SBC will immediately start to use the static IP.
Warning: setting a static IP improperly can make the SBC very hard to re-connect to depending on the routing within the rest of your network.
View Attached Phidgets
Phidgets Status
Now that your networking is set up, let's take a look at which Phidgets are attached to the SBC. Do this by navigating to Phidgets->Status. Your screen should look something like this:
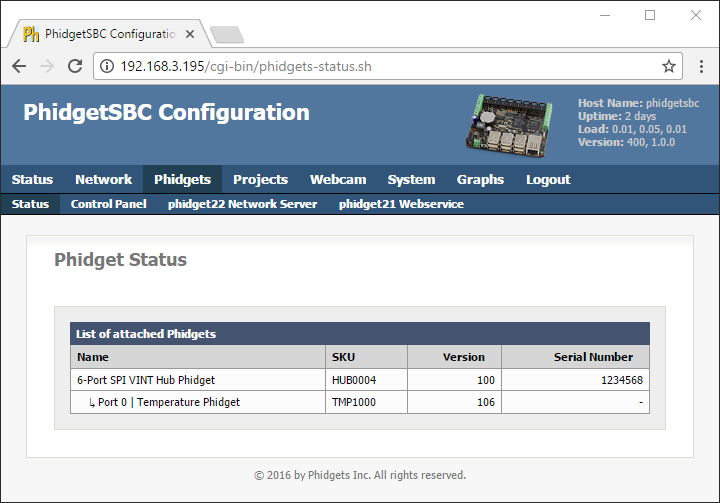
Notes about attached Phidgets:
- The SBC has a built in VINT Hub Phidget, so you will always see it on your list of attached Phidgets.
Control Panel
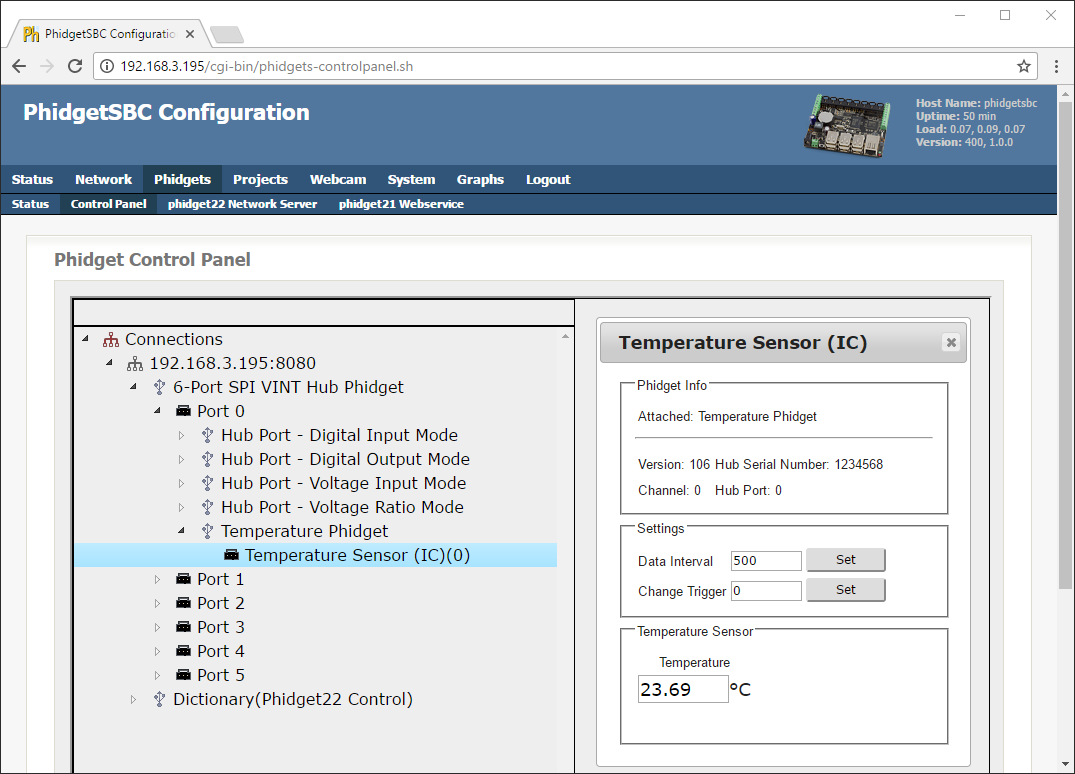
After you confirm which Phidgets are attached to your SBC, navigate to Phidgets->Control Panel. Here, you can test your Phidgets and learn more about their functionality.
Using a Webcam
If you would like to use a webcam with the SBC, ensure it is a UVC (USB Video Class) compatible webcam that supports MJPEG. Next, simply plug it into the SBC and navigate to the Webcam tab.
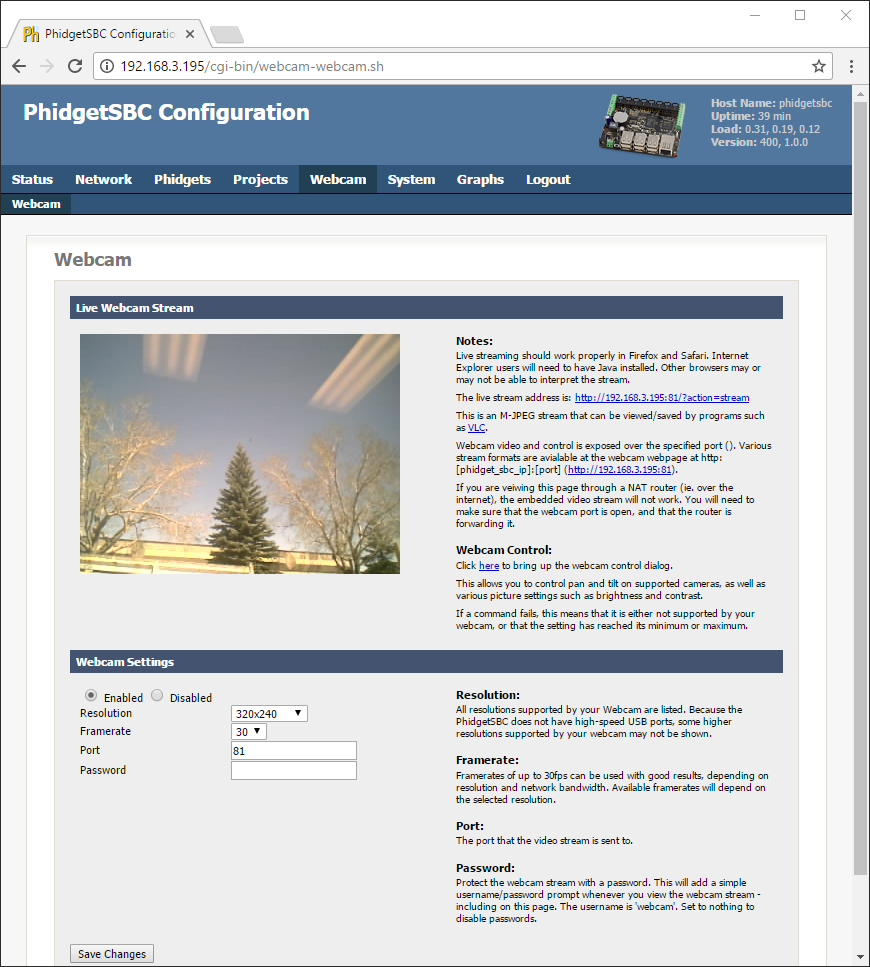
Take a minute to play around with the different resolutions and frame rates available. Also, be sure to check out the webcam control dialog shown below:
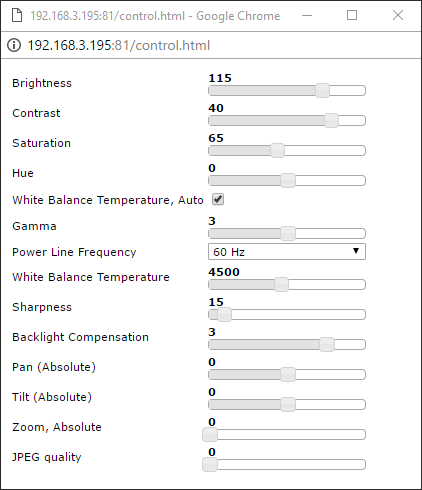
Notes about using a webcam:
- When using a password, the username is webcam. It is recommended to add a password if you are planning to share the stream. Note: the HTTP authentication is sent unencrypted.
- If multiple webcams are attached, they will start up with the same settings (port number will be incremented for each one). When using multiple webcams, resolution and frame rates will have to be reduced.
Advanced Topics and Troubleshooting
Firmware Upgrade
MacOS users can upgrade device firmware by double-clicking the device row in the Phidget Control Panel.
Linux users can upgrade via the phidget22admin tool (see included readme for instructions).
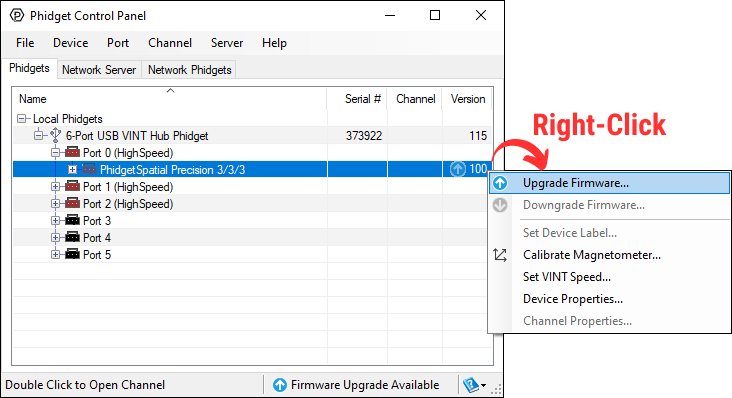
Windows users can upgrade the firmware for this device using the Phidget Control Panel as shown below.
Firmware Downgrade
Firmware upgrades include important bug fixes and performance improvements, but there are some situations where you may want to revert to an old version of the firmware (for instance, when an application you're using is compiled using an older version of phidget22 that doesn't recognize the new firmware).
MacOS and Linux users can downgrade using the phidget22admin tool in the terminal (see included readme for instructions).
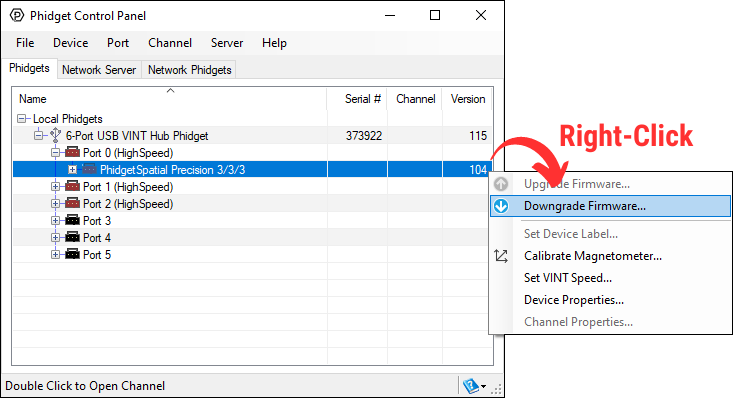
Windows users can downgrade directly from the Phidget Control Panel if they have driver version 1.9.20220112 or newer:
Firmware Version Numbering Schema
Phidgets device firmware is represented by a 3-digit number. For firmware patch notes, see the device history section on the Specifications tab on your device's product page.
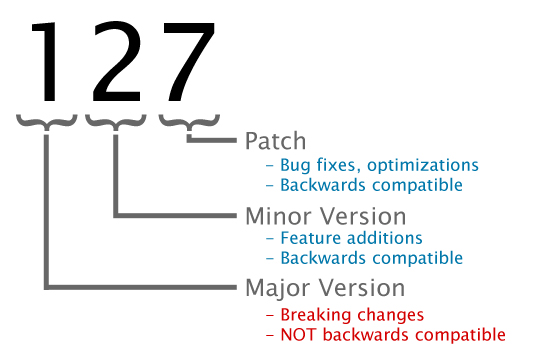
- If the digit in the 'ones' spot changes, it means there have been bug fixes or optimizations. Sometimes these changes can drastically improve the performance of the device, so you should still upgrade whenever possible. These upgrades are backwards compatible, meaning you can still use this Phidget on a computer that has Phidget22 drivers from before this firmware upgrade was released.
- If the digit in the 'tens' spot changes, it means some features were added (e.g. new API commands or events). These upgrades are also backwards compatible, in the sense that computers running old Phidget22 drivers will still be able to use the device, but they will not be able to use any of the new features this version added.
- If the digit in the 'hundreds' spot changes, it means a major change has occurred (e.g. a complete rewrite of the firmware or moving to a new architecture). These changes are not backwards compatible, so if you try to use the upgraded board on a computer with old Phidget22 drivers, it will show up as unsupported in the Control Panel and any applications build using the old libraries won't recognize it either. Sometimes, when a Phidget has a new hardware revision (e.g. 1018_2 -> 1018_3), the firmware version's hundreds digit will change because entirely new firmware was needed (usually because a change in the processor). In this case, older hardware revisions won't be able to be upgraded to the higher version number and instead continue to get bug fixes within the same major revision.
You can find a directory of Armbian packages here.
We have both desktop and server versions available. The Armbian release is more like a general Linux release with the Phidget libraries bundled in, whereas the default OS on the PhidgetSBC is kept very minimal to improve boot time and performance for Phidget-focused tasks.
If you plan on connecting more than 3 USB devices to the SBC4, you'll need to use a USB Hub. If you do, make sure you plug it into one of the ports highlighted in green below:
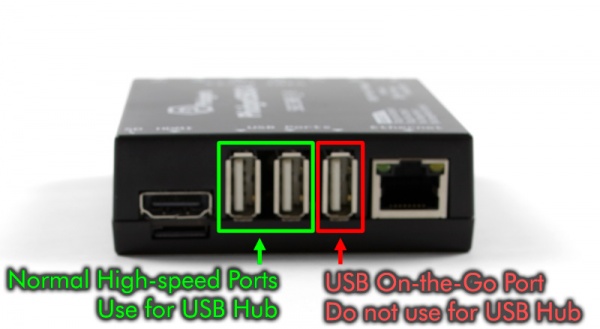
The port highlighted in red is a USB On-the-go port, which functions as a normal USB port except that connecting multiple devices to it using a USB hub will cause those devices to be unstable and to disconnect unexpectedly.
If the devices you're plugging into your hub are rated for a total of 500mA or more, you should use an externally powered USB hub.
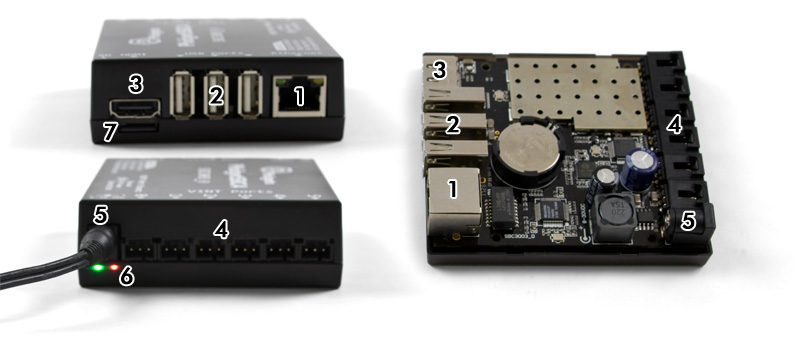
- 1. The Ethernet port is used for network connectivity to the SBC. This enables network access to the SBC as well as any connected Phidgets through the Phidget Network Server. Alternatively, a Wi-Fi USB adapter can be used for wireless network connectivity.
- 2. The USB ports can be used for connecting Phidgets, Wi-Fi adapters, flash drives, webcams, USB hubs, and other devices.
- 3. The HDMI connector can be used for connecting a monitor the the SBC. In this situation, the SBC will function like any other Linux computer. (Note: you must plug the monitor in before powering up the SBC in order for it to be recognized).
- 4. Six VINT ports, essentially an integrated VINT Hub Phidget.
- 5. The SBC is powered from the barrel jack connector.
- 6 These LEDs indicate the status of the SBC. The red LED indicates that the SBC is receiving power. The green LED indicates boot status. The green LED will turn on and off once during boot and then remain on while the SBC is running.
- 7 The micro SD card slot.
The SBC4 is built around the A20 processor. This is an ARM Cortex-A7 based microprocessor from Allwinner Technology, which runs at 1 GHz. Connected to this is 512 MB of DDR3 SDRAM, and a 10/100baseT Ethernet controller. The microprocessors USB Host port is connected to 3 USB 2.0 High Speed ports.
The PhidgetSBC runs Debian/GNU Linux 9.0 as its operating system and gets booted with U-Boot.
The date and time are set using NTP (Network Time Protocol) at boot. A NTP daemon continues to run in the background and will periodically update the clock, ensuring the time is always accurate.
There is a real-time clock with battery backup which will preserve date/time across reboots and power removal. If power is suddenly lost, the real-time clock may not have the correct time.
The SBC3003 does not natively support factory reset functionality. However, if your SBC3003 becomes corrupt and needs to be reset to factory firmware, you can write a new image to the micro SD card (or a new card) to similar effect.
The 12V power supply is stepped down to 5V and distributed in the following way:
- Each USB port has 500 mA available.
- The bulit-in VINT Hub Phidget has 500mA available.
The configuration system used by the SBC Web Interface is stored in /etc/webif. It is not recommended to modify these files.
What's Next?
Check the Phidget SBC page next for a guide on how to start writing your own programs, and more!
