|
|
| (8 intermediate revisions by the same user not shown) |
| Line 21: |
Line 21: |
| {{UGC-Start}} | | {{UGC-Start}} |
|
| |
|
| {{UGC-Entry|DigitalOutput | Switchable 5V output (max current 400mA) | | {{UGC-Entry|Digital Output | Switchable 5V output (max current 400mA) |
| | | | | |
| In your Control Panel, double click on "Digital Output": | | In your Control Panel, double click on "Digital Output": |
| Line 45: |
Line 45: |
| {{UG-Part3}} | | {{UG-Part3}} |
|
| |
|
| == Part 4: Advanced Topics and Troubleshooting == | | == Part 4: Other Resources == |
|
| |
|
| {{UGC-Start}} | | {{UGC-Start}} |
| | {{UGC-Entry|RFID Guide| |
| | | |
| | View our [[RFID Guide]] for an in-depth look at Phidget RFID systems. |
| | }} |
| {{UGC-Firmware}} | | {{UGC-Firmware}} |
| {{UGC-Entry|Interference from multiple RFID readers|
| |
| |
| |
| If you are using multiple RFID readers, placing them too close together will cause interference when reading tags. You could work around this problem by rapidly "polling" each 1024 by turning the antenna on, checking for tags, and then turning it off in sequence. Of course, this will lengthen the amount of time it takes for your system to read a tag, since you may have to wait for the nearest reader to become active.
| |
| }}
| |
|
| |
| {{UGC-Entry|Object Speed|
| |
| |
| |
| When trying to read tags, you should allow the tag to remain within detection range for at least 50ms. Tags moving through the detection area faster than this may not register at all.
| |
| }}
| |
|
| |
|
| {{UGC-Entry|FCC Compliance| | | {{UGC-Entry|FCC Compliance| |
| Line 81: |
Line 76: |
| :This unit was tested with shielded cables on the peripheral devices. Shielded cables must be used with the unit to ensure compliance. | | :This unit was tested with shielded cables on the peripheral devices. Shielded cables must be used with the unit to ensure compliance. |
| }} | | }} |
| | |
| | {{UGC-Entry|IC Compliance| |
| | | |
| | |
| | {{1024-IC-Table|1024_1|32570-10241}} |
| | |
| | :This device contains licence-exempt transmitter(s)/receiver(s) that comply with Innovation, Science and Economic Development Canada’s licence-exempt RSS(s). Operation is subject to the following two conditions: |
| | |
| | :1 This device may not cause interference. |
| | :2 This device must accept any interference, including interference that may cause undesired operation of the device. |
| | }} |
| | |
|
| |
|
| {{UGC-End}} | | {{UGC-End}} |
Part 1: Setup
PhidgetRFID
Welcome to the PhidgetRFID Read-Write User Guide! To get started, make sure you have the following hardware on hand:
- PhidgetRFID Read-Write (1024_1)
- USB cable or a VINT Hub Phidget and a Phidget Cable
- RFID tag
- Computer
Click on the blue arrow below to continue.
Select your Operating System:
Step 1: Install Phidgets Library
Step 2: Connect Devices
Step 3: Verify Connection
Step 1: Install Phidgets Library
Before you begin using your Phidgets, you will need to install the Phidget Library.
1. Download the installer for your system:
● 32-bit Installer Download
● 64-bit Installer Download
If you're unsure which one you should get, press ⊞ WIN + Pause/Break:
Before installing our libraries, be sure to read our Software License.
Step 1: Install Phidgets Library
2. Open the download. If it asks you for permission, select Run
Step 1: Install Phidgets Library
3a. Select Next
Step 1: Install Phidgets Library
3b. Read the Licence Agreement. Select Next.
Step 1: Install Phidgets Library
3c. Choose Installation Location. Select Next.
Step 1: Install Phidgets Library
3d. Confirm Install
Step 1: Install Phidgets Library
3e. Wait for Installation to complete. This should only take a few moments.
Step 1: Install Phidgets Library
3f. Installation Complete. Close installation Window.
Step 2: Connect Devices
● Connect a USB Cable to your computer and PhidgetRFID Read-Write
● Connect a USB Cable to your computer and VINT Hub
● Connect a Phidget Cable to your VINT Hub and PhidgetRFID Read-Write
Step 3: Verify Connection
1. Open the Phidgets Control Panel:
If your Control Panel does not open, look in your taskbar. Double click the Phidget Icon.
Step 3: Verify Connection
2. If connected, your Phidgets will appear in the Phidget Control Panel.
Done!
If you're able to see and interact with your devices in the Phidget Control Panel, you're done with the Setup part of this guide.
Scroll down to Part 2: Using Your Phidget for the next step.
For more help installing in Windows (e.g. manual install, using a VM, etc.), visit this page:
● Windows Advanced Information
Step 1: Install Phidgets Library
Step 2: Connect Devices
Step 3: Verify Connection
Step 1: Install Phidgets Library
Before you begin using your Phidgets, you will need to install the Phidget Library.
1. Download the installer for your system:
● macOS 10.11+: Installer Download
● macOS 10.7 - macOS 10.10: Installer Download
● macOS 10.5 - macOS 10.6: Installer Download
Before installing our libraries, be sure to read our Software License.
Step 1: Install Phidgets Library
2. Open the download and double click on Phidgets.pkg
Step 1: Install Phidgets Library
3a. Select Continue
Step 1: Install Phidgets Library
3b. Read and continue. Read the License and click Agree.
Step 1: Install Phidgets Library
3c. Here, you have the option to select the installation location. Select Install to continue.
Step 1: Install Phidgets Library
3d. MacOS may ask for permission to install. Enter your username and password and Install Software.
Step 1: Install Phidgets Library
3e. Wait for Installation to complete. This should only take a few moments.
Step 1: Install Phidgets Library
3f. You may see a message that the extension has been blocked. Select Open Security Preferences.
Step 1: Install Phidgets Library
3g. Beside the message for Phidgets Inc, Click Allow.
Step 1: Install Phidgets Library
3h. Installation Complete, Click Close.
Step 1: Install Phidgets Library
3i. To delete the installer, click Move to Trash.
Step 2: Connect Devices
● Connect a USB Cable to your computer and PhidgetRFID Read-Write
● Connect a USB Cable to your computer and VINT Hub
● Connect a Phidget Cable to your VINT Hub and PhidgetRFID Read-Write
Step 3: Verify Connection
1. Open the Phidgets Control Panel:
Step 3: Verify Connection
2. If connected, your Phidgets will appear in the Phidget Control Panel.
Done!
If you're able to see and interact with your devices in the Phidget Control Panel, you're done with the Setup part of this guide.
Scroll down to Part 2: Using Your Phidget for the next step.
For more info installing in MacOS (e.g. developer tools, driver extension, etc.), visit this page:
● MacOS Advanced Information
Step 1: Install Phidgets Library
Step 2: Connect Devices
Step 3: Verify Connection
Step 1: Install Phidgets Library
1. First, you need to install the libusb-1.0 development libraries. For example, in Debian based distributions:
apt-get install libusb-1.0-0-dev
You’ll also need a C compiler and builder, if you don’t already have one installed.
apt-get install gcc
apt-get install make
Step 1: Install Phidgets Library
2. Next, download and unpack the Phidgets library:
● libphidget22
Step 1: Install Phidgets Library
3. Use the following commands in the location you unpacked to install the library:
./configure
make
sudo make install
Step 1: Install Phidgets Library
4. (Optional) You can also download and unpack the following optional packages:
● phidget22networkserver - Phidget Network Server, which
enables the use of Phidgets over your network
● phidget22admin - Admin tool to track who is connected to your
Phidgets when using the network server
● libphidget22extra - Required for phidget22networkserver
and phidget22admin
● libphidget22java - The Java libraries for Phidget22
For installation instructions for these packages, see the README file included with each one.
Step 2: Connect Devices
● Connect USB Cable to your computer and PhidgetRFID
● Connect USB Cable to your computer and VINT Hub
● Connect Phidget Cable to your VINT Hub and PhidgetRFID
Step 3: Verify Connection
1. The easiest way to verify that your libraries are working properly is to compile and run an example program. Download and unpack this C example that will
detect any Phidget:
● HelloWorld C Example
Step 3: Verify Connection
2. Next, open the terminal in the location where you unpacked the example. Compile and run using:
gcc HelloWorld.c -o HelloWorld -lphidget22
sudo ./HelloWorld
ou should receive a “Hello” line for each Phidget channel that is discovered:
You need to run it with sudo in order to be able to access USB devices. In order to use
Phidgets without sudo, you need to set your udev rules. See the Advanced Information page on the final slide of this guide for details.
Done!
If you're able to see your devices in the Hello World example, you're done with the Setup part of this guide.
Scroll down to Part 2: Using Your Phidget for the next step.
For more info installing in Linux (e.g. Udev rules, old versions, etc.), visit this page:
● Linux Advanced Information
Part 2: Using Your Phidget
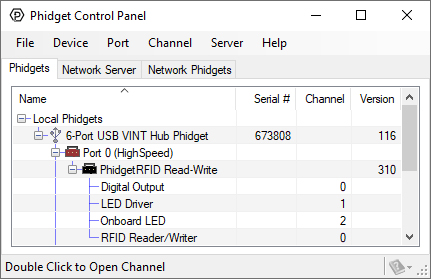
Phidget Control Panel
You can use the Phidget Control Panel to explore your device's functionality.
1. After opening the Phidget Control Panel you will find the following channels:
2. Double click on a channel to open an example program.
Expand All
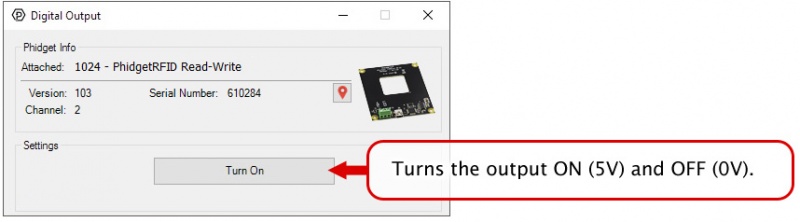
In your Control Panel, double click on "Digital Output":
In your Control Panel, double click on "LED Driver":
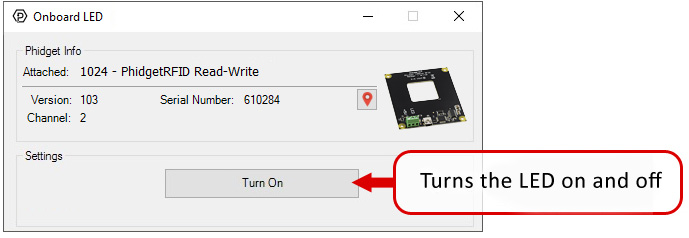
In your Control Panel, double click on "Onboard LED":
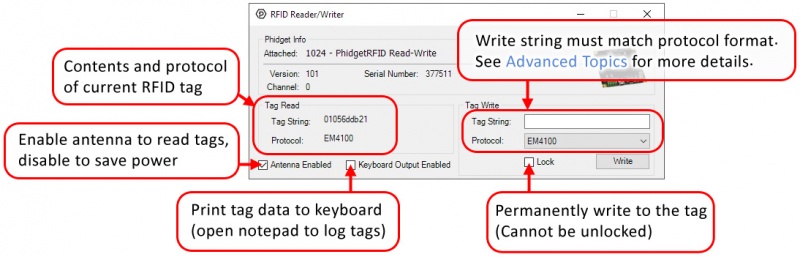
In your Control Panel, double click on "RFID Reader/Writer":
Part 3: Create your Program
Part 4: Other Resources
Expand All
View our RFID Guide for an in-depth look at Phidget RFID systems.
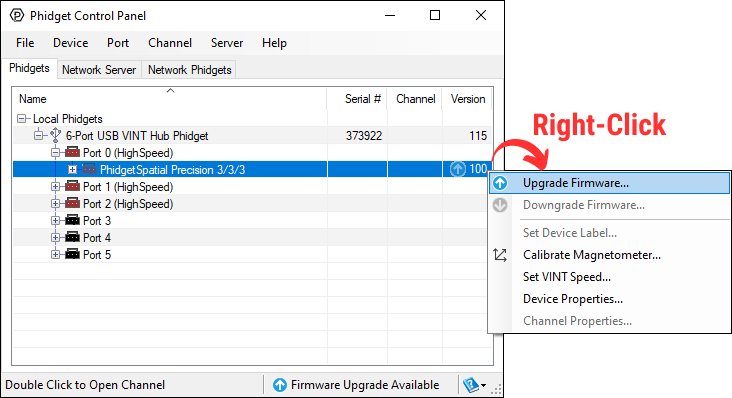
Firmware Upgrade
MacOS users can upgrade device firmware by double-clicking the device row in the Phidget Control Panel.
Linux users can upgrade via the phidget22admin tool (see included readme for instructions).
Windows users can upgrade the firmware for this device using the Phidget Control Panel as shown below.
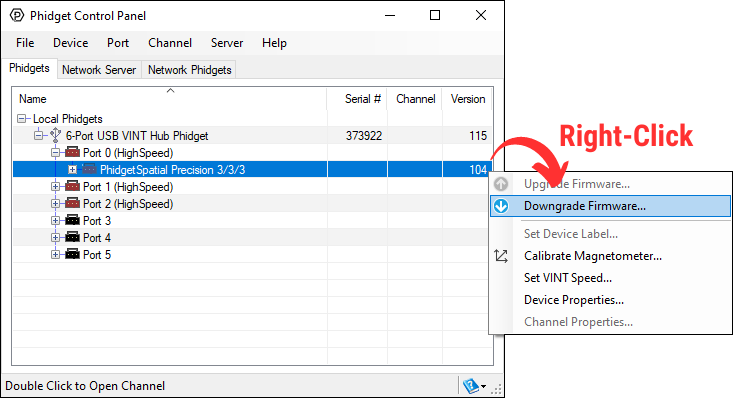
Firmware Downgrade
Firmware upgrades include important bug fixes and performance improvements, but there are some situations where you may want to revert to an old version of the firmware (for instance, when an application you're using is compiled using an older version of phidget22 that doesn't recognize the new firmware).
MacOS and Linux users can downgrade using the phidget22admin tool in the terminal (see included readme for instructions).
Windows users can downgrade directly from the Phidget Control Panel if they have driver version 1.9.20220112 or newer:
Firmware Version Numbering Schema
Phidgets device firmware is represented by a 3-digit number. For firmware patch notes, see the device history section on the Specifications tab on your device's product page.
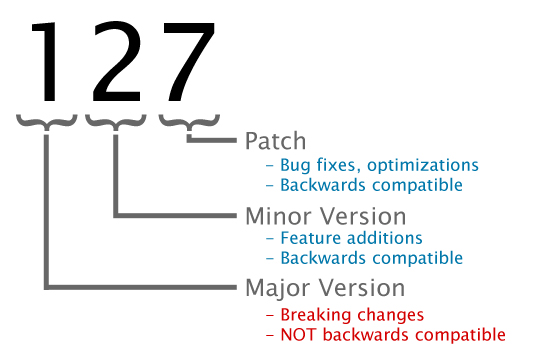
- If the digit in the 'ones' spot changes, it means there have been bug fixes or optimizations. Sometimes these changes can drastically improve the performance of the device, so you should still upgrade whenever possible. These upgrades are backwards compatible, meaning you can still use this Phidget on a computer that has Phidget22 drivers from before this firmware upgrade was released.
- If the digit in the 'tens' spot changes, it means some features were added (e.g. new API commands or events). These upgrades are also backwards compatible, in the sense that computers running old Phidget22 drivers will still be able to use the device, but they will not be able to use any of the new features this version added.
- If the digit in the 'hundreds' spot changes, it means a major change has occurred (e.g. a complete rewrite of the firmware or moving to a new architecture). These changes are not backwards compatible, so if you try to use the upgraded board on a computer with old Phidget22 drivers, it will show up as unsupported in the Control Panel and any applications build using the old libraries won't recognize it either. Sometimes, when a Phidget has a new hardware revision (e.g. 1018_2 -> 1018_3), the firmware version's hundreds digit will change because entirely new firmware was needed (usually because a change in the processor). In this case, older hardware revisions won't be able to be upgraded to the higher version number and instead continue to get bug fixes within the same major revision.

|
Phidgets Inc
|
| 1024_1
|
| FCC ID: SUT1024-1
|
- This device complies with Part 15 of the FCC Rules. Operation is subject to the following two conditions:
- (1) This device may not cause harmful interference, and
- (2) This device must accept any interference received, including interference that may cause undesired operation.
- Note: The manufacturer is not responsible for any radio or TV interference caused by unauthorized modifications to this equipment. Such modifications could void the user’s authority to operate the equipment.
- The user is cautioned that any changes or modifications not expressly approved by the party responsible for compliance could void the user’s authority to operate the equipment.
- This equipment has been tested and found to comply with the limits for a Class B digital device, pursuant to part 15 of the FCC Rules. These limits are designed to provide reasonable protection against harmful interference in a residential installation. This equipment generates, uses and can radiate radio frequency energy and, if not installed and used in accordance with the instructions, may cause harmful interference to radio communications. However, there is no guarantee that interference will not occur in a particular installation. If this equipment does cause harmful interference to radio or television reception, which can be determined by turning the equipment off and on, the user is encouraged to try to correct the interference by one or more of the following measures:
- • Reorient or relocate the receiving antenna.
- • Increase the separation between the equipment and receiver.
- • Connect the equipment into an outlet on a circuit different from that to which the receiver is connected.
- • Consult the dealer or an experienced radio/TV technician for help.
- This unit was tested with shielded cables on the peripheral devices. Shielded cables must be used with the unit to ensure compliance.
| Phidgets Inc
|
| 1024_1
|
| IC ID: 32570-10241
|
- This device contains licence-exempt transmitter(s)/receiver(s) that comply with Innovation, Science and Economic Development Canada’s licence-exempt RSS(s). Operation is subject to the following two conditions:
- 1 This device may not cause interference.
- 2 This device must accept any interference, including interference that may cause undesired operation of the device.