1052 User Guide: Difference between revisions
(Created page with "==Getting Started== ===Checking the Contents=== {{UGbox| '''You should have received:''' * A PhidgeEncoder board * A custom USB cable |||}} ===Connecting the Pieces=== {{UGb...") |
No edit summary |
||
| (18 intermediate revisions by 4 users not shown) | |||
| Line 1: | Line 1: | ||
__NOINDEX__ | |||
<metadesc>The PhidgetEncoder can be used as a control dial for user input. The centre of the dial is a pushbutton and it connects directly to USB.</metadesc> | |||
[[Category:UserGuide]] | |||
==Getting Started== | ==Getting Started== | ||
{{UGIntro|1052}} | |||
*[{{SERVER}}/products.php?product_id=1052 1052 PhidgetEncoder] and [{{SERVER}}/products.php?product_id=3016 custom USB cable] | |||
*computer | |||
Next, you will need to connect the pieces: | |||
[[Image:1052_0_Connecting_The_Hardware.jpg|400px|right|link=]] | |||
# Connect the PhidgetEncoder to your computer using the included USB cable. | |||
[[ | |||
= | <br clear="all"> | ||
{{UGIntroDone|1052}} | |||
{{ | ==Using the 1052== | ||
{{UGcontrolpanel|1052}} | |||
{{ugEncoder|1052|Encoder Input}} | |||
{{ | {{ugDigitalInputBTN|1052}} | ||
{{ | {{ugAddressingInformation}} | ||
}} | |||
{{ugUsingYourOwnProgram|1052}} | |||
{{ | |||
==Technical Details== | ==Technical Details== | ||
If you want to learn more about encoders in general, check out the [[Encoder Guide]]. | |||
If you want to learn more about encoders in general, check out the [[Encoder | |||
===Using Other Encoders=== | ===Using Other Encoders=== | ||
[[File:1052_0_Footprint_Diagram.jpg|300px|link=|right]] | [[File:1052_0_Footprint_Diagram.jpg|300px|link=|right]] | ||
If you decide that the mounted encoder does not meet your requirements it is possible to use other two-bit mechanical encoders. Optical encoders with large counts per revolution should not be expected to work with this device. To change the encoder the user will have to carefully desolder and remove the existing encoder. However, if you attempt to remove the encoder the warranty willl be void and we can not offer technical support. | If you decide that the mounted encoder does not meet your requirements it is possible to use other two-bit mechanical encoders. Optical encoders with large counts per revolution should not be expected to work with this device. To change the encoder the user will have to carefully desolder and remove the existing encoder. However, if you attempt to remove the encoder the warranty willl be void and we can not offer technical support. | ||
Since your new encoder may not have the exact same pin configuration, you should use wire to connect your new encoder to the appropriate pins on the PhidgetEncoder board. We have tested the following encoders, and found that they can be used as replacements: | |||
{| style=" | {|class = "wikitable" | ||
| align="center" style="background:#f0f0f0;"|'''Manufacturer ''' | |||
| align="center" style="background:#f0f0f0;"|'''Part Number''' | |||
| align="center" style="background:#f0f0f0;"|'''Description''' | |||
|- | |- | ||
| | |align=center| CTS | ||
| | |align=center| 290UAA5F201B2 | ||
| | |align=center| 2-Bit 9mm 20CPR Encoder Detent w/MO SPST | ||
|- | |- | ||
| | |align=center| CTS | ||
| | |align=center| 290UAA5F201B1 | ||
| | |align=center| 2-Bit 9mm 20CPR Encoder Non-Detent w/MO SPST | ||
|- | |- | ||
| | |align=center| CTS | ||
| | |align=center| 288V232R161B2 | ||
| | |align=center| 2-Bit 16mm 16CPR Encoder Detent w/MO SPST | ||
|- | |- | ||
|} | |} | ||
| Line 79: | Line 57: | ||
Note: Most of the above components can be bought at [http://www.digikey.com Digikey]. | Note: Most of the above components can be bought at [http://www.digikey.com Digikey]. | ||
<br clear=all> | <br clear=all> | ||
{{ | {{UGnext|}} | ||
Latest revision as of 19:48, 1 June 2023
Getting Started
Welcome to the 1052 user guide! In order to get started, make sure you have the following hardware on hand:
- 1052 PhidgetEncoder and custom USB cable
- computer
Next, you will need to connect the pieces:
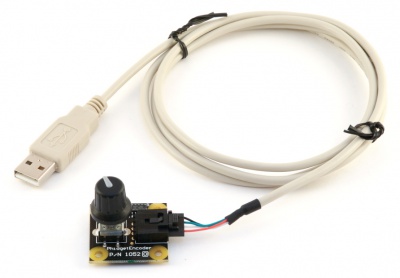
- Connect the PhidgetEncoder to your computer using the included USB cable.
Now that you have everything together, let's start using the 1052!
Using the 1052
Phidget Control Panel
In order to demonstrate the functionality of the 1052, the Phidget Control Panel running on a Windows machine will be used.
The Phidget Control Panel is available for use on both macOS and Windows machines.
Windows
To open the Phidget Control Panel on Windows, find the ![]() icon in the taskbar. If it is not there, open up the start menu and search for Phidget Control Panel
icon in the taskbar. If it is not there, open up the start menu and search for Phidget Control Panel
macOS
To open the Phidget Control Panel on macOS, open Finder and navigate to the Phidget Control Panel in the Applications list. Double click on the ![]() icon to bring up the Phidget Control Panel.
icon to bring up the Phidget Control Panel.
For more information, take a look at the getting started guide for your operating system:
Linux users can follow the getting started with Linux guide and continue reading here for more information about the 1052.
First Look
After plugging the 1052 into your computer and opening the Phidget Control Panel, you will see something like this:
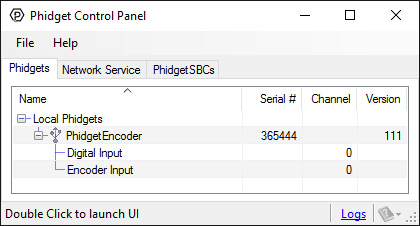
The Phidget Control Panel will list all connected Phidgets and associated objects, as well as the following information:
- Serial number: allows you to differentiate between similar Phidgets.
- Channel: allows you to differentiate between similar objects on a Phidget.
- Version number: corresponds to the firmware version your Phidget is running. If your Phidget is listed in red, your firmware is out of date. Update the firmware by double-clicking the entry.
The Phidget Control Panel can also be used to test your device. Double-clicking on an object will open an example.
Encoder
Double-click on the Encoder object, labelled Encoder Input, in order to run the example:
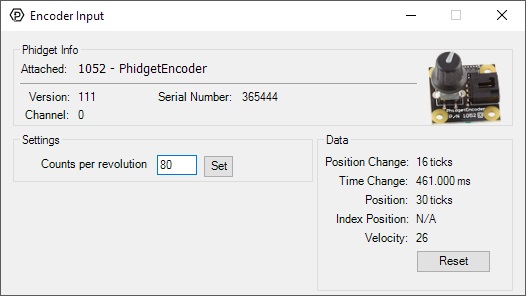
General information about the selected object will be displayed at the top of the window. You can also experiment with the following functionality:
- Position Change: the number of ticks (or quadrature cycles) that have occurred since the last change event.
- Time Change: the amount of time in milliseconds that has elapsed since the last change event.
- Position: the total position in ticks relative to where the encoder was when the window was opened.
- Index Position: the position where the index channel was last encountered. Some encoders do not support index, check your encoder's datasheet for more information.
- Velocity: the average velocity in rotations per second. A CPR must be specified to enable this functionality.
- Specify a counts per revolution (CPR) value to enable velocity calculation.
Digital Input
Double-click on the Digital Input object in order to run the example:
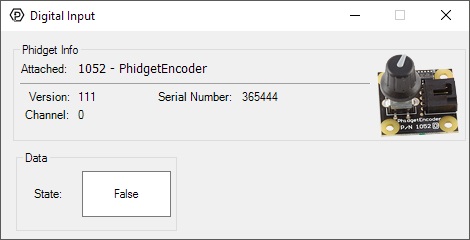
General information about the selected object will be displayed at the top of the window. You can also experiment with the following functionality:
- This is a button type device, therefore, it will be true when the button is pressed, and false in the default state.
Finding The Addressing Information
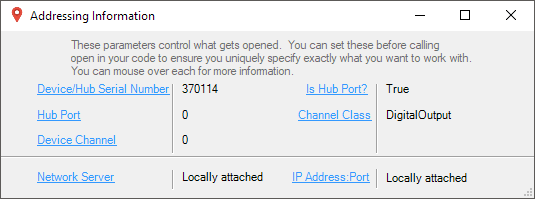
Before you can access the device in your own code, and from our examples, you'll need to take note of the addressing parameters for your Phidget. These will indicate how the Phidget is physically connected to your application. For simplicity, these parameters can be found by clicking the button at the top of the Control Panel example for that Phidget.

In the Addressing Information window, the section above the line displays information you will need to connect to your Phidget from any application. In particular, note the Channel Class field as this will be the API you will need to use with your Phidget, and the type of example you should use to get started with it. The section below the line provides information about the network the Phidget is connected on if it is attached remotely. Keep track of these parameters moving forward, as you will need them once you start running our examples or your own code.
Using Your Own Program
You are now ready to start writing your own code for the device. The best way to do that is to start from our Code Samples.
Select your programming language of choice from the drop-down list to get an example for your device. You can use the options provided to further customize the example to best suit your needs.
Once you have your example, you will need to follow the instructions on the page for your programming language to get it running. To find these instructions, select your programming language from the Programming Languages page.
Technical Details
If you want to learn more about encoders in general, check out the Encoder Guide.
Using Other Encoders
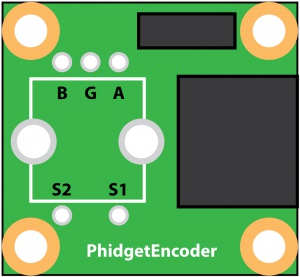
If you decide that the mounted encoder does not meet your requirements it is possible to use other two-bit mechanical encoders. Optical encoders with large counts per revolution should not be expected to work with this device. To change the encoder the user will have to carefully desolder and remove the existing encoder. However, if you attempt to remove the encoder the warranty willl be void and we can not offer technical support.
Since your new encoder may not have the exact same pin configuration, you should use wire to connect your new encoder to the appropriate pins on the PhidgetEncoder board. We have tested the following encoders, and found that they can be used as replacements:
| Manufacturer | Part Number | Description |
| CTS | 290UAA5F201B2 | 2-Bit 9mm 20CPR Encoder Detent w/MO SPST |
| CTS | 290UAA5F201B1 | 2-Bit 9mm 20CPR Encoder Non-Detent w/MO SPST |
| CTS | 288V232R161B2 | 2-Bit 16mm 16CPR Encoder Detent w/MO SPST |
Note: Most of the above components can be bought at Digikey.
What to do Next
- Programming Languages - Find your preferred programming language here and learn how to write your own code with Phidgets!
- Phidget Programming Basics - Once you have set up Phidgets to work with your programming environment, we recommend you read our page on to learn the fundamentals of programming with Phidgets.

