|
|
| (13 intermediate revisions by 4 users not shown) |
| Line 1: |
Line 1: |
| <metadesc>Communicate with sensors, controllers and relays with Phidgets! Our JavaScript API supports Node.js and Browsers.</metadesc>
| | {{#seo:|description=Learn how to use Phidget USB devices with JavaScript.}} |
| [[Category:Language]] | | [[Category:Language]] |
| __TOC__
| | ==Get Started== |
| | | JavaScript is supported for browser and Node.js applications. Phidget devices can be accessed either directly through a [[#USB Connection | USB Connection]] or indirectly through a [[#Network Connection | Network Connection]]. |
| == Quick Downloads ==
| |
| === Documentation ===
| |
| | |
| *{{Phidget22API}} (Select JavaScript from drop-down menu)
| |
| | |
| === Libraries ===
| |
| | |
| *'''Browser''': [{{SERVER}}/downloads/phidget22/libraries/any/Phidget22JavaScript.zip JavaScript Library Download]
| |
| *'''Node.js''': npm install phidget22
| |
| | |
| === Example Code ===
| |
| | |
| *[{{SERVER}}?view=code_samples&lang=JavaScript&os=Nodejs JavaScript Examples (Node.js)]
| |
| *[{{SERVER}}?view=code_samples&lang=JavaScript&os=Browser JavaScript Examples (Browser)]
| |
| | |
| === Tools ===
| |
| | |
| *[{{SERVER}}/downloads/phidget22/tools/any/Phidget22JavaScriptControlPanel.zip JavaScript Control Panel Source]
| |
| | |
| === OS Libraries ===
| |
| | |
| {{AllQuickDownloads}}
| |
| | |
| == Getting Started with JavaScript == | |
| Welcome to using Phidgets with JavaScript! By using JavaScript, you will have access to the complete {{Phidget22API}}, including events. We also provide example code in JavaScript for all Phidget devices.
| |
| | |
| === Version Change ===
| |
| '''Note:''' The Phidgets JavaScript library has been bumped to version 2.x.x following a rewrite. The version 2 API is mostly identical to version 1, but does have some breaking changes. It is highly recommended that any code written against version 1 be updated to version 2, as version 1 is considered unstable.
| |
| | |
| == Phidget Network Server ==
| |
| The JavaScript library requires the [[Phidget Network Server]]. Start by configuring the server for your OS:
| |
| | |
| * [[OS - Windows#Phidget Network Server|Windows]]
| |
| * [[OS - OS X#Phidget Network Server|macOS]]
| |
| * [[OS - Linux#Phidget Network Server|Linux]]
| |
| * [[OS - Phidget SBC#Phidget Network Server|PhidgetSBC]]
| |
| | |
| The Phidget Server includes a built-in Webserver. This must be enabled when using the JavaScript library in browser, but can be left disabled when using the library from Node.js.
| |
| | |
| The Phidget Server Webserver can be used to serve files - such as the Phidget JavaScript library, or your own projects. By default, it serves the JavaScript control panel files. The main purpose of the Webserver is to support a Websockets connection for the Browser library - because regular sockets cannot be used in Browser. The Node.js library uses raw sockets to connect to the Phidget Server, and so does not require the Webserver or Websockets.
| |
| | |
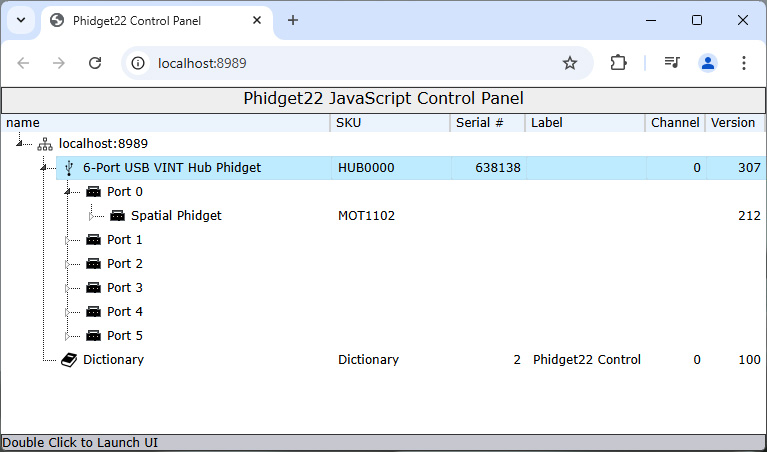
| == JavaScript Control Panel ==
| |
| The JavaScript control panel is a Browser version of our Phidget control panel. This can be used to view and control all Phidgets attached to a Phidget server. The JavaScript control panel is installed by default on Windows, macOS and PhidgetSBC. You can also download the source [{{SERVER}}/downloads/phidget22/tools/any/Phidget22JavaScriptControlPanel.zip here].
| |
| | |
| Make sure the Phidget Server - Webserver is enabled, and running, then navigate to http://localhost:8989. You will now see a program written with JavaScript/HTML that mimics the Phidget Control Panel. It will show all the Phidgets attached to your machine. By double-clicking on the Phidgets, and example will launch.
| |
| | |
| [[File:Javascript_windows_controlpanel.png|link=|center]] | |
| | |
| == Browser ==
| |
| === Use Our Examples ===
| |
| One of the best ways to start programming with Phidgets is to use our example code as a guide. Our browser examples are available [{{SERVER}}?view=code_samples&lang=JavaScript&os=Browser here].
| |
| | |
| === Write Your Own Code ===
| |
| Let's start by writing a simple HTML page that makes a dynamic list of attached Phidgets visible to the user.
| |
| We will be using the JavaScript library [https://jquery.com/download/ jQuery] in these examples. jQuery is not required in order to use Phidgets, however, it will make it easier for us to access elements on an HTML page.
| |
| | |
| To start, create a new empty folder.
| |
| | |
| Next, download the latest JavaScript browser library from [{{SERVER}}/downloads/phidget22/libraries/any/Phidget22JavaScript.zip here] and copy the files into the folder.
| |
| | |
| Next, create a file called ''index.html'' and copy the following code into it (Note: if you have a newer jQuery, modify the code below to match your version):
| |
|
| |
|
| | ==JavaScript Libraries== |
| | ===Browser Applications=== |
| | For browser applications, you can load the library directly from UNPKG: |
| <syntaxhighlight lang=javascript> | | <syntaxhighlight lang=javascript> |
| <!DOCTYPE html>
| | <script src="https://unpkg.com/phidget22@3.x/browser/phidget22.min.js"></script> |
| <html>
| |
| <head>
| |
| <title>Phidget Manager</title>
| |
| <script src="jquery-2.1.4.min.js"></script>
| |
| <script src="sha256.min.js"></script>
| |
| <script src="phidget22.min.js"></script>
| |
| <script>
| |
| $(document).ready(function() {
| |
| var conn = new phidget22.Connection(8989, 'localhost');
| |
| | |
| conn.connect().then(function() {
| |
| console.log('connected');
| |
| }).catch(function(err) {
| |
| conn.delete();
| |
| alert('failed to connect to server:' + err);
| |
| });
| |
| | |
| var man = new phidget22.Manager({
| |
| onDeviceAttach: function(dev) {
| |
| $('#list').append(new Option(dev.getDeviceName(), dev.getKey()));
| |
| },
| |
| onDeviceDetach: function(dev) {
| |
| $("#list option[value='" + dev.getKey() + "']").remove();
| |
| }
| |
| });
| |
| man.open();
| |
| });
| |
| </script>
| |
| </head>
| |
| | |
| <body>
| |
| <label> Attached Phidgets: </label>
| |
| <div>
| |
| <select multiple id="list" style="width: 500px; height: 200px"></select>
| |
| </div>
| |
| </body>
| |
| </html>
| |
| </syntaxhighlight> | | </syntaxhighlight> |
|
| |
|
| Finally, double click index.html to open it in a browser. You should see something like this:
| | Compiled and minified library files are also available [https://www.phidgets.com/downloads/phidget22/libraries/any/Phidget22JavaScript.zip here]. |
| [[File:Javascript_windows_example.png|link=|center]]
| |
|
| |
|
| Open the developer console to get a better idea what is going on:
| | ===Node.js Applications=== |
| [[File:Javascript_windows_devconsole.png|link=|center]]
| | For Node.js applications, a [https://www.npmjs.com/package/phidget22 npm package] is available and can be installed with the following command: |
| | | <syntaxhighlight lang=javascript> |
| For information about the Node.js examples, keep reading. Otherwise, skip ahead to the [[#Edit the Examples | edit the examples]] section located below.
| | npm install phidget22 |
| | |
| == Node.js == | |
| === Use Our Examples ===
| |
| One of the best ways to start programming with Phidgets is to use our example code as a guide. In order to run the examples, you will need to download and install [https://nodejs.org/ Node.js].
| |
| | |
| Now that you have Node.js installed, select an example that will work with your Phidget:
| |
| *[{{SERVER}}?view=code_samples&lang=JavaScript&os=Nodejs JavaScript Examples (Node.js)]
| |
| | |
| Navigate to the example folder that you previously downloaded, open the command prompt at this location and enter the following command:
| |
| <syntaxhighlight lang='bash'> | |
| npm update | |
| </syntaxhighlight> | | </syntaxhighlight> |
|
| |
|
| [[File:Javascript_windows_npmupdate.png]]
| | ==USB Connection== |
| | Browser and Node.js applications can access Phidget devices directly via USB. |
|
| |
|
| Next, enter the following command to run the example (replacing Accelerometer with your example name):
| | ===Supported Devices=== |
| <syntaxhighlight lang='bash'>
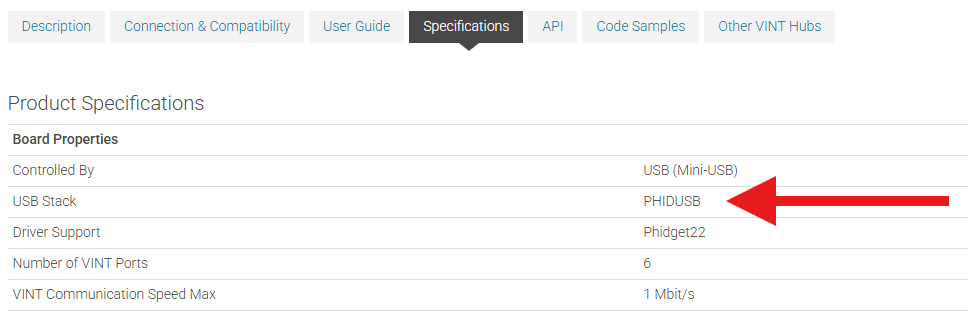
| | USB connections with JavaScript are supported on Phidget devices running a PHIDUSB USB stack. To determine what USB stack your Phidget device is on, navigate to the product page and then to the specification tab, and look for the ''USB Stack'' specification. If you are using a VINT device, navigate to the product page for the VINT Hub you are using. |
| node Accelerometer localhost
| |
| </syntaxhighlight>
| |
| [[File:Javacsript_windows_nodeexample.png|link=|center]]
| |
| You should now have the example up and running. When you are ready, the next step is [[#Edit the Examples | editing the examples]].
| |
|
| |
|
| == Edit the Examples ==
| |
| {{WriteCode_Intro|JavaScript}}
| |
|
| |
|
| === Step One: Connect=== | | [[Image:Javascript_networkserver_webusb_spec.png|center|500px|link=https://cdn.phidgets.com/docs/images/8/80/Javascript_networkserver_webusb_spec.png]] |
| In Javascript, you must first connect to the Phidget server using the {{Code|Connection}} object. Have a look at the Connection API for more details: {{Phidget22API}} -> Select JavaScript then select Connection API.
| | <br><br> |
|
| |
|
| <syntaxhighlight lang=javascript>
| | ===Browser Applications=== |
| function main() {
| | ====Supported Browsers==== |
| var conn = new phidget22.Connection(5661, 'localhost');
| | In-browser USB connections are achieved through the WebUSB API. This API is currently supported by Chromium-based browsers like Google Chrome and Microsoft Edge. |
| conn.connect().then(function () {
| |
| console.log("Connected");
| |
| runCode();
| |
| }).catch(function (err) {
| |
| console.error("Failed to connect", err);
| |
| });
| |
| }
| |
| </syntaxhighlight>
| |
|
| |
|
| Once a connection has been established, it will stay active until it is closed, even across network outages and server restarts.
| | ====JavaScript Control Panel (USB)==== |
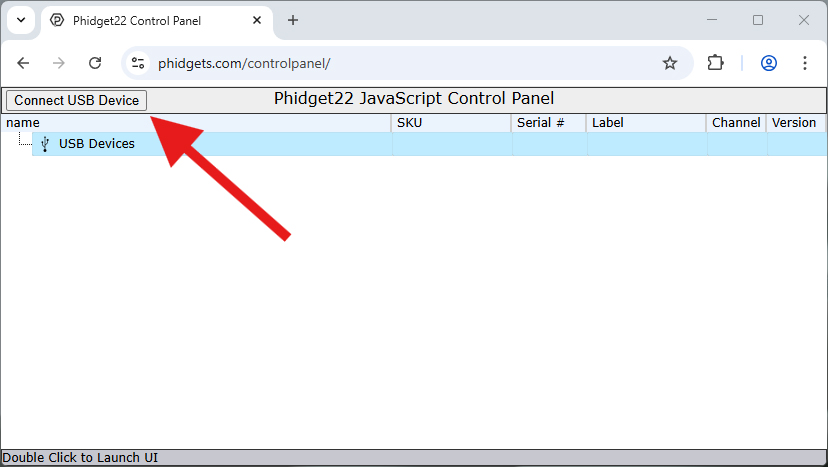
| | You can experiment with browser-based USB applications by opening the JavaScript Phidget Control Panel: |
| | * [https://www.phidgets.com/controlpanel phidgets.com/controlpanel] |
|
| |
|
| Multiple Connections can be created and connected at once. Any opened Phidget or Manager objects will match against devices on all connections.
| |
|
| |
|
| === Step Two: Create and Open===
| | Click on the ''Connect USB Device'' button to give the website permission to access your device. |
| After connecting, create a new channel object of the correct channel class, then call the {{Code|open()}} function to open the channel. Once it has successfully opened we can interact with it and start receiving data from it. We can also set up event handlers just before opening.
| |
|
| |
|
| For example, if we were using an Digital Input as our device, it would look like this:
| |
|
| |
|
| <syntaxhighlight lang=javascript>
| | [[Image:Javascript_networkserver_webusb_contropanel1.jpg|600px|center|link=https://cdn.phidgets.com/docs/images/9/9d/Javascript_networkserver_webusb_contropanel1.jpg]] |
|
| |
|
| function runCode() {
| |
| var ch = new phidget22.DigitalInput();
| |
|
| |
|
| ch.onAttach = digitalInput_attach;
| | After granting permission, your device will be accessible from the control panel. |
| ch.onStateChange = digitalInput_change;
| |
|
| |
|
| ch.open().then(function () {
| | ====USB Permission==== |
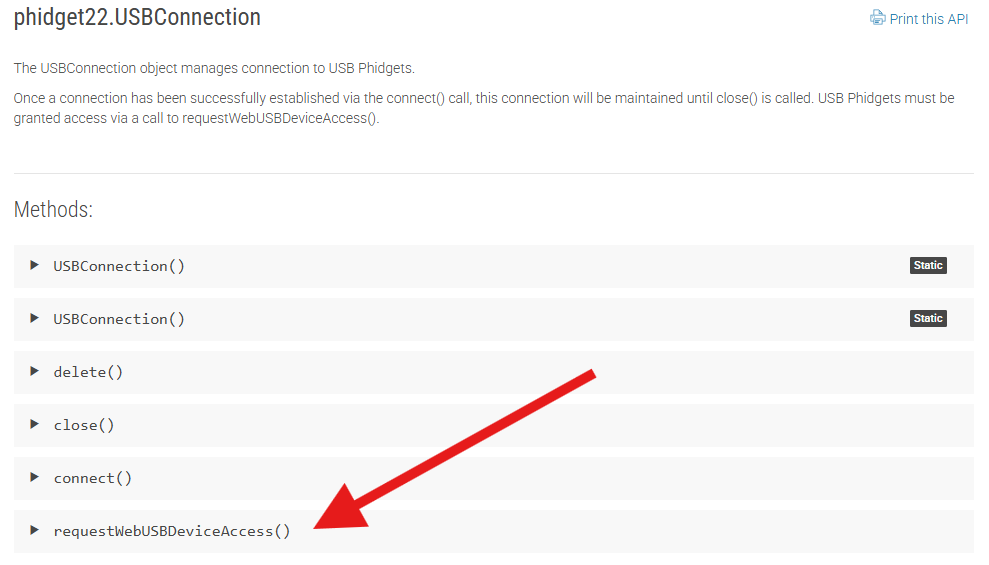
| // code to execute after open succeeds
| | As demonstrated above, websites must request access to communicate with USB devices. This must be implemented through an interactive element, like a button. Use the '''requestWebUSBDeviceAccess''' method in the Phidget USBConnection API for this purpose. |
| }).catch(function (err) {
| |
| // code to execute if open fails
| |
| });
| |
| }
| |
|
| |
|
| </syntaxhighlight>
| | [[Image:Javascript_networkserver_browser_api.png|center|500px|link=https://cdn.phidgets.com/docs/images/8/88/Javascript_networkserver_browser_api.png]] |
|
| |
|
| Once the channel successfully opens, you can access it and you will start to get events from it. We can define the event handler functions :
| | ===Example Code=== |
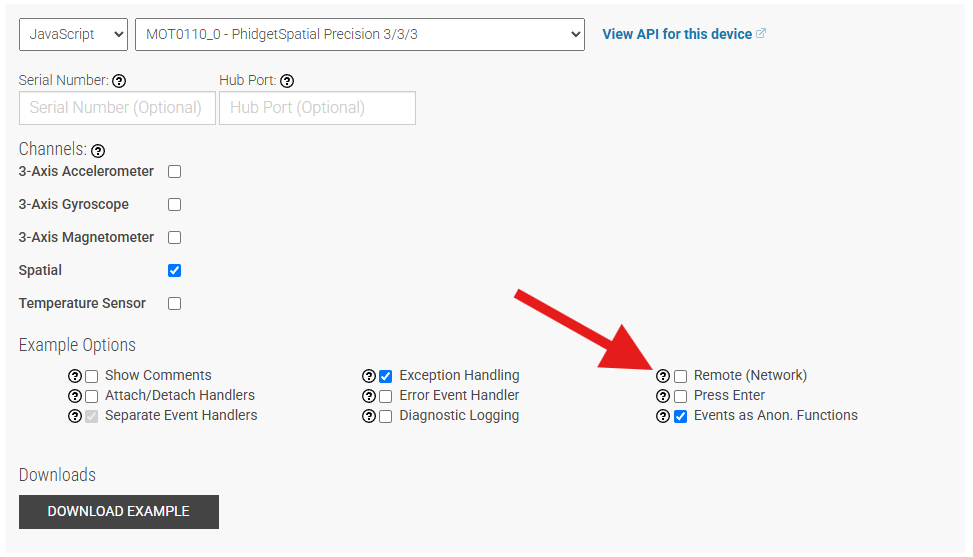
| | | Navigate to our [https://www.phidgets.com/?view=code_samples Code Sample Generator] to view code samples for both browser and Node.js applications that are tailored to your specific device. |
| <syntaxhighlight lang=javascript>
| |
|
| |
|
| function digitalInput_attach(ch) {
| |
| console.log(ch + ' attached');
| |
| }
| |
|
| |
|
| function digitalInput_change(state) {
| | Make sure to '''uncheck''' the ''Remote (Network)'' box when using a direct USB connection. If you leave this box checked, your application will look for a [[#Network Connection | Network Connection]]. |
| console.log('state changed:' + state);
| |
| }
| |
|
| |
|
| </syntaxhighlight> | | [[Image:Javascript_networkserver_webusb_codesample.png|center|500px|link=https://cdn.phidgets.com/docs/images/5/5f/Javascript_networkserver_webusb_codesample.png]] |
| | <br><br> |
|
| |
|
| Now that they've been registered in the {{Code|runCode()}} function and the device has been opened, these event handlers will be able to trigger. The first one triggers when the DigitalInput channel attaches, and the second one will trigger whenever the state of the attached DigitalInput changes.
| | ==Network Connection== |
| | Browser and Node.js applications can connect to Phidget devices through the [[Phidget Network Server]]. In this configuration, client applications can run on machines that don't have Phidget devices physically connected to them. |
|
| |
|
| === Step Three: Do Things with the Phidget === | | ===Running the Phidget Network Server=== |
| Some values can be directly read and set on the Phidget. These functions can be used inside a polling loop as an alternative to event driven programming. The lines inside the loop would be something like this, after which you could do something with the value:
| | Before starting, ensure you are [{{SERVER}}/docs/Network_Server_Guide#Running_the_Phidget_Network_Server running the Phidget Network Server] on your host machine. |
| | ===Browser Considerations=== |
| | When using a Network Connection in a browser-based application, you must [{{SERVER}}/docs/Network_Server_Guide#Enabling_the_Webserver enable the web server] on your host machine. |
|
| |
|
| <syntaxhighlight lang=javascript>
| | ====JavaScript Control Panel (Network)==== |
| | You can experiment with browser-based Network applications by opening the JavaScript Phidget Control Panel: |
| | * If your host is a Windows or macOS machine, visit port 8989 (http://localhost:8989). |
| | * If your host is a Linux machine, a PhidgetSBC, or a Wireless VINT Hub, visit port 8080 (http://localhost:8080). |
|
| |
|
| var di_state = ch.getState(); // get the state of the digital input
| | If you are accessing the JavaScript Control Panel from a machine that is not the host, you will need to enter the IP address or hostname in place of localhost (e.g. http://phidgetsbc:8080). |
|
| |
|
| </syntaxhighlight>
| |
|
| |
| === Step Four: Close ===
| |
| At the end of your program (or at least, at the end of the part that uses the Phidget), it is advisable to close your device. This ensures that the Phidget will be available to other programs that want to use it, since a channel can only be in use by one program at a time unless it's opened via the Phidget Server. It's not necessary to delete the object after closing in Javascript.
| |
|
| |
| <syntaxhighlight lang=javascript>
| |
|
| |
| ch.close();
| |
|
| |
| </syntaxhighlight>
| |
|
| |
|
| == Further Reading ==
| | [[Image:Networkserver_webserver_controlpanel.jpg|center|500px|link=https://cdn.phidgets.com/docs/images/c/c7/Networkserver_webserver_controlpanel.jpg]] |
| [[Phidget Programming Basics]] - Here you can find the basic concepts to help you get started with making your own programs that use Phidgets. | |
|
| |
|
| [[Data Interval/Change Trigger]] - Learn about these two properties that control how much data comes in from your sensors. | | ===Example Code=== |
| | Navigate to our [https://www.phidgets.com/?view=code_samples Code Sample Generator] to view code samples for both browser and Node.js applications that are tailored to your specific device. |
|
| |
|
| [[Using Multiple Phidgets]] - It can be difficult to figure out how to use more than one Phidget in your program. This page will guide you through the steps.
| |
|
| |
|
| [[Polling vs. Events]] - Your program can gather data in either a polling-driven or event-driven manner. Learn the difference to determine which is best for your application. | | Make sure the '''Remote (Network)''' box is checked when using the Phidget Network Server. If you do not check this box, your example will look for a [[#USB Connection | USB Connection]]. |
|
| |
|
| [[Logging, Exceptions, and Errors]] - Learn about all the tools you can use to debug your program. | | [[Image:Javascript_networkserver_browser_codesample.png|center|500px|link=https://cdn.phidgets.com/docs/images/5/5e/Javascript_networkserver_browser_codesample.png]] |
|
| |
|
| [[Phidget Network Server]] - Phidgets can be controlled and communicated with over your network- either wirelessly or over ethernet.
| | ==Version History== |
| | The Phidget JavaScript Libraries version history is reviewed here:<br><br> |
| | '''1.x.x''' - Initial release. Unstable.<br> |
| | '''2.x.x''' - Improved stability issues.<br> |
| | '''3.x.x''' - WebUSB support added. |
Get Started
JavaScript is supported for browser and Node.js applications. Phidget devices can be accessed either directly through a USB Connection or indirectly through a Network Connection.
JavaScript Libraries
Browser Applications
For browser applications, you can load the library directly from UNPKG:
<script src="https://unpkg.com/phidget22@3.x/browser/phidget22.min.js"></script>
Compiled and minified library files are also available here.
Node.js Applications
For Node.js applications, a npm package is available and can be installed with the following command:
USB Connection
Browser and Node.js applications can access Phidget devices directly via USB.
Supported Devices
USB connections with JavaScript are supported on Phidget devices running a PHIDUSB USB stack. To determine what USB stack your Phidget device is on, navigate to the product page and then to the specification tab, and look for the USB Stack specification. If you are using a VINT device, navigate to the product page for the VINT Hub you are using.
Browser Applications
Supported Browsers
In-browser USB connections are achieved through the WebUSB API. This API is currently supported by Chromium-based browsers like Google Chrome and Microsoft Edge.
JavaScript Control Panel (USB)
You can experiment with browser-based USB applications by opening the JavaScript Phidget Control Panel:
Click on the Connect USB Device button to give the website permission to access your device.
After granting permission, your device will be accessible from the control panel.
USB Permission
As demonstrated above, websites must request access to communicate with USB devices. This must be implemented through an interactive element, like a button. Use the requestWebUSBDeviceAccess method in the Phidget USBConnection API for this purpose.
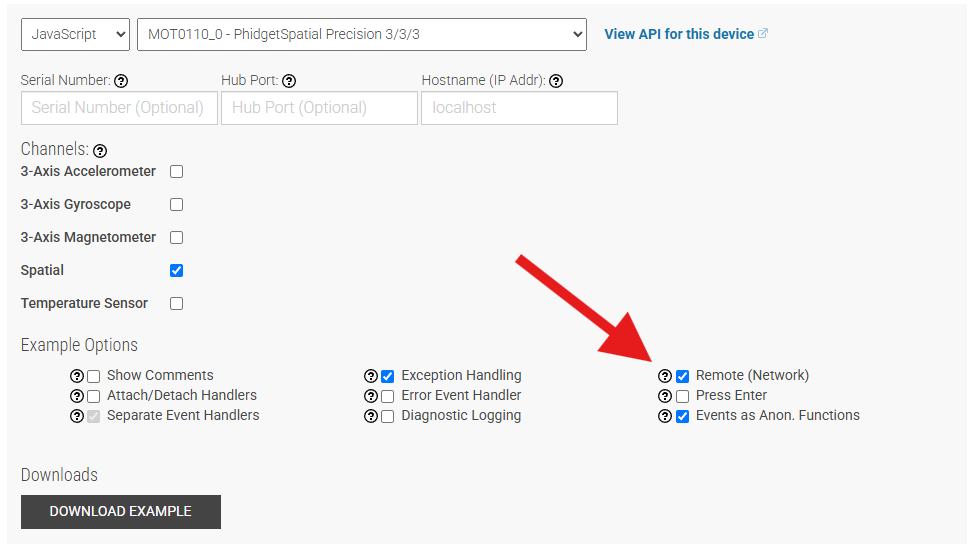
Example Code
Navigate to our Code Sample Generator to view code samples for both browser and Node.js applications that are tailored to your specific device.
Make sure to uncheck the Remote (Network) box when using a direct USB connection. If you leave this box checked, your application will look for a Network Connection.
Network Connection
Browser and Node.js applications can connect to Phidget devices through the Phidget Network Server. In this configuration, client applications can run on machines that don't have Phidget devices physically connected to them.
Running the Phidget Network Server
Before starting, ensure you are running the Phidget Network Server on your host machine.
Browser Considerations
When using a Network Connection in a browser-based application, you must enable the web server on your host machine.
JavaScript Control Panel (Network)
You can experiment with browser-based Network applications by opening the JavaScript Phidget Control Panel:
If you are accessing the JavaScript Control Panel from a machine that is not the host, you will need to enter the IP address or hostname in place of localhost (e.g. http://phidgetsbc:8080).
Example Code
Navigate to our Code Sample Generator to view code samples for both browser and Node.js applications that are tailored to your specific device.
Make sure the Remote (Network) box is checked when using the Phidget Network Server. If you do not check this box, your example will look for a USB Connection.
Version History
The Phidget JavaScript Libraries version history is reviewed here:
1.x.x - Initial release. Unstable.
2.x.x - Improved stability issues.
3.x.x - WebUSB support added.