Language - C Windows CodeBlocks: Difference between revisions
No edit summary |
|||
| Line 84: | Line 84: | ||
When you are building a project from scratch, or adding Phidget functionality to an existing project, you'll need to configure your development environment to properly link the Phidget C library. | When you are building a project from scratch, or adding Phidget functionality to an existing project, you'll need to configure your development environment to properly link the Phidget C library. | ||
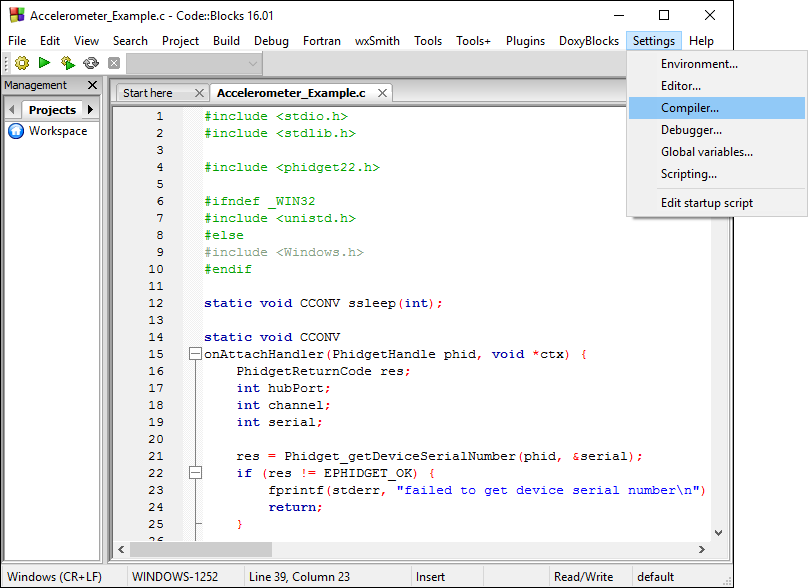
To start, open Code::Blocks, and navigate to Settings -> Compiler... as shown in the image below: | |||
[[Image:C_codeblocks_settings.png|link=|center]] | |||
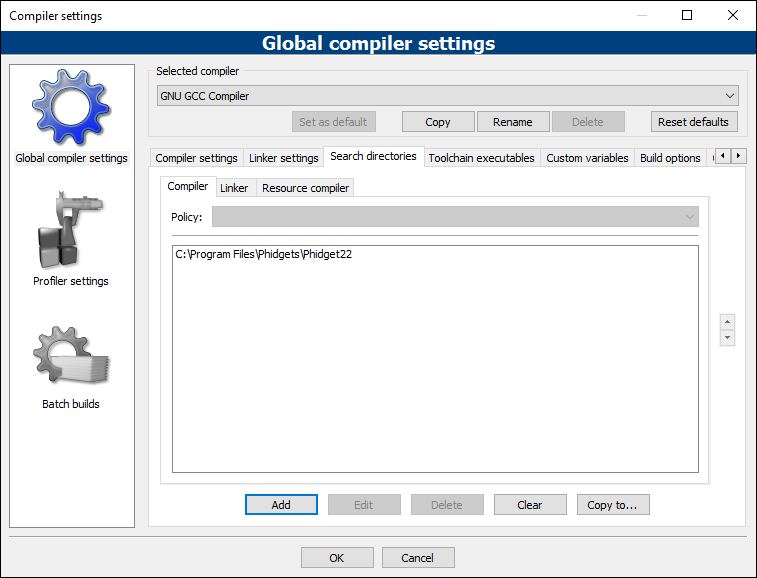
From the Global compiler settings screen, navigate to Search directories -> Compiler and add the following directory: | |||
*C:\Program Files\Phidgets\Phidget22 | |||
[[Image:C_codeblocks_compiler.PNG|link=|center]] | |||
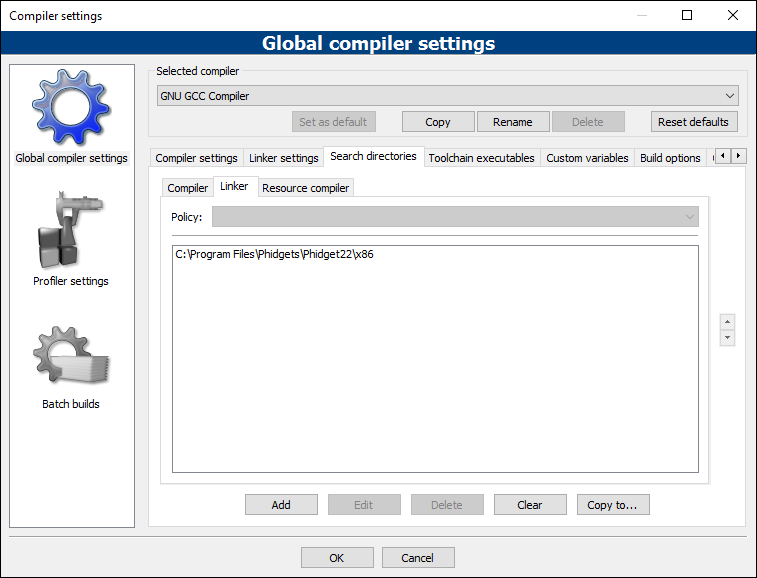
Next, select Search directories -> Linker and add the following directory: | |||
*C:\Program Files\Phidgets\Phidget22\x86 | |||
[[Image:C_codeblocks_linker.PNG|link=|center]] | |||
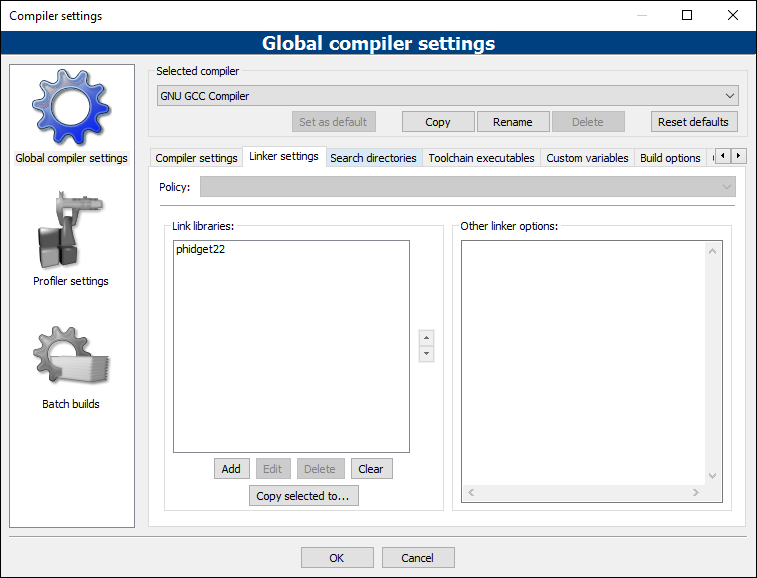
From the Global compiler settings screen, navigate to Linker settings and add the following line: | |||
*phidget22 | |||
[[Image:C_codeblocks_libraries.PNG|link=|center]] | |||
Next, create a new Console Application project, as follows: | |||
[[Image:C_codeblocks_console_application.png|link=|center]] | |||
Name your project, and finish creating the project. | |||
[[Image:C_codeblocks_name_project.png|link=|center]] | |||
Now your project is created, and you can open the generated main.c to begin coding. | |||
To include the Phidget C library, add the following line to your code: | To include the Phidget C library, add the following line to your code: | ||
| Line 90: | Line 124: | ||
</syntaxhighlight> | </syntaxhighlight> | ||
Your project now has access to the Phidget libraries. | |||
{{Language_-_C_Further_Reading}} | {{Language_-_C_Further_Reading}} | ||
Revision as of 20:57, 20 August 2018
| C Development Environments | ||||
|---|---|---|---|---|
|
Language - C Windows with Code::Blocks Welcome to using Phidgets with C! By using C, you will have access to the complete Phidget22 API, including events. Code::Blocks is a free, open source cross-platform IDE that can be used for C and C++. |
Install Phidget Drivers for Windows
Before getting started with the guides below, ensure you have the following components installed on your machine:
- You will need the Phidgets Windows Drivers
Use Our Examples
One of the best ways to start programming with Phidgets is to use our example code as a guide. In order to run the examples, you will need to download and install Code::Blocks.
Now that you have Code::Blocks installed, select an example that will work with your Phidget:
Next, open Code::Blocks, and navigate to Settings -> Compiler... as shown in the image below:
From the Global compiler settings screen, navigate to Search directories -> Compiler and add the following directory:
- C:\Program Files\Phidgets\Phidget22
Next, select Search directories -> Linker and add the following directory:
- C:\Program Files\Phidgets\Phidget22\x86
From the Global compiler settings screen, navigate to Linker settings and add the following line:
- phidget22
Next, create a new Console Application project, as follows:
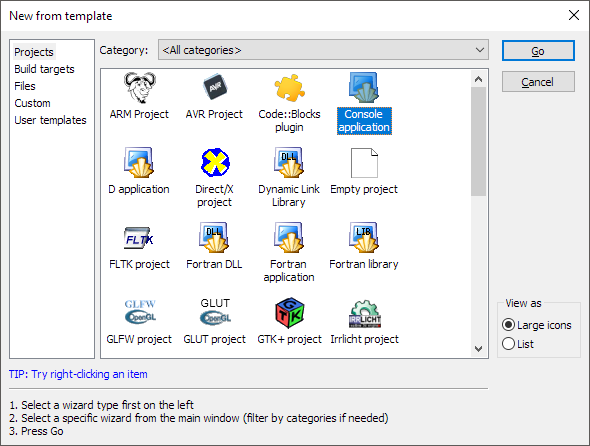
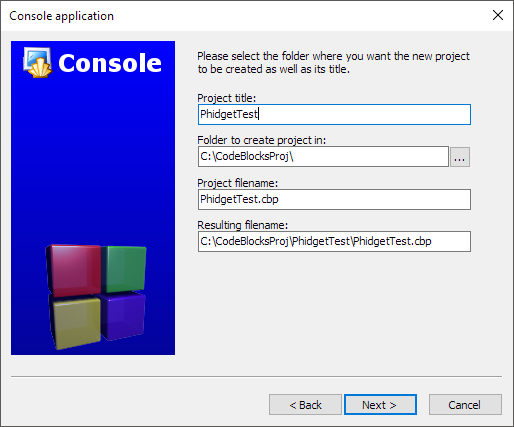
Name your project, and finish creating the project.
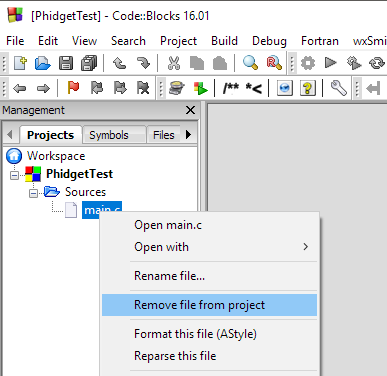
Next, remove main.c from the created project.
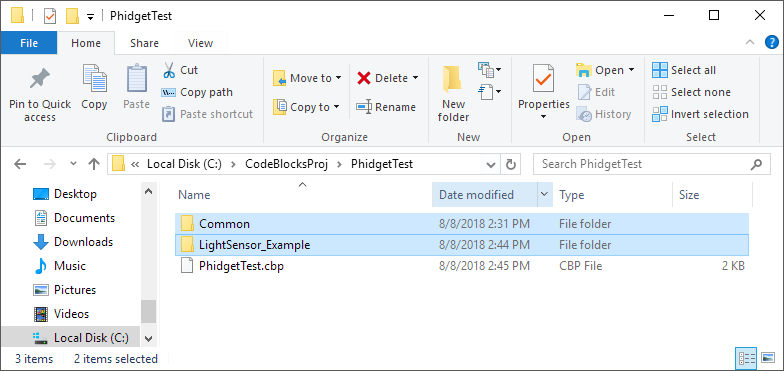
Copy the files from your downloaded example and paste them into the project directory.
Add the example C file, and PhidgetHelperFunctions.c to the project.
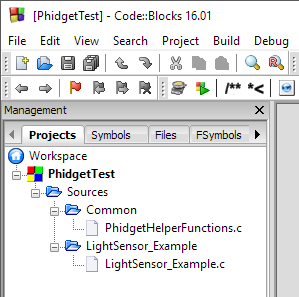
Lastly, you'll need to add the common directory to your project search directories. Right-click your project:
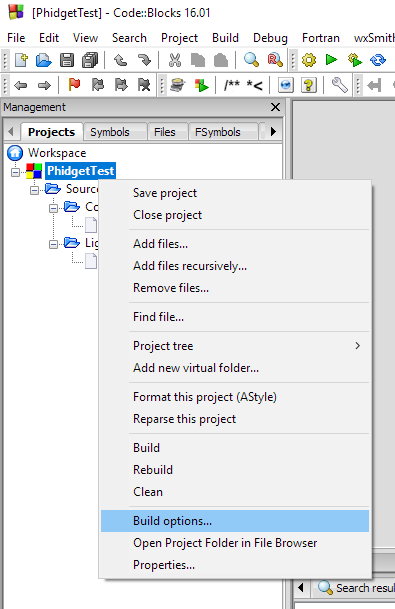
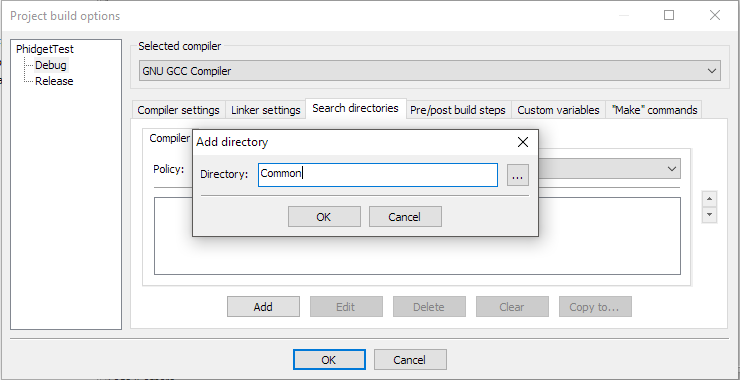
Then add the common directory under "Search directories":
You can now build and run the example:
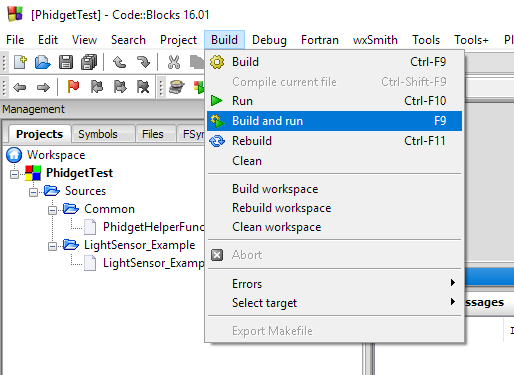
You should now have the example up and running for your device. Your next step is to look at the Editing the Examples section below for information about the example and important concepts for programming Phidgets. This would be a good time to play around with the device and experiment with some of its functionality.
To get our example code to run in a custom application, simply remove the calls to AskForDeviceParameters and PrintEventDescriptions, and hard-code the addressing parameters for your application.
If you are unsure what values to use for the addressing parameters, check the Finding The Addressing Information page.
For instance:
AskForDeviceParameters(&channelInfo, (PhidgetHandle)ch);

prc = Phidget_setDeviceSerialNumber((PhidgetHandle)ch, channelInfo.deviceSerialNumber);
CheckError(prc, "Setting DeviceSerialNumber", &(PhidgetHandle)ch);

prc = Phidget_setHubPort((PhidgetHandle)ch, channelInfo.hubPort);
CheckError(prc, "Setting HubPort", &(PhidgetHandle)ch);

prc = Phidget_setIsHubPortDevice((PhidgetHandle)ch, channelInfo.isHubPortDevice);
CheckError(prc, "Setting IsHubPortDevice", &(PhidgetHandle)ch);

Phidget_setChannel((PhidgetHandle)ch, channelInfo.channel);
CheckError(prc, "Setting Channel", &(PhidgetHandle)ch);

if (channelInfo.netInfo.isRemote) {
    prc = Phidget_setIsRemote((PhidgetHandle)ch, channelInfo.netInfo.isRemote);
    CheckError(prc, "Setting IsRemote", &(PhidgetHandle)ch);

    if (channelInfo.netInfo.serverDiscovery) {
        prc = PhidgetNet_enableServerDiscovery(PHIDGETSERVER_DEVICEREMOTE);
        CheckEnableServerDiscoveryError(prc, &(PhidgetHandle)ch);
    } else {
        prc = PhidgetNet_addServer("Server", channelInfo.netInfo.hostname,
                    channelInfo.netInfo.port, channelInfo.netInfo.password, 0);
        CheckError(prc, "Adding Server", &(PhidgetHandle)ch);
    }
}
Might become:
prc = Phidget_setDeviceSerialNumber((PhidgetHandle)ch, 370114);
CheckError(prc, "Setting DeviceSerialNumber", &(PhidgetHandle)ch);

prc = Phidget_setHubPort((PhidgetHandle)ch, 2);
CheckError(prc, "Setting HubPort", &(PhidgetHandle)ch);

prc = Phidget_setIsHubPortDevice((PhidgetHandle)ch, 1);
CheckError(prc, "Setting IsHubPortDevice", &(PhidgetHandle)ch);
Notice that you can leave out any parameter not relevant to your application for simplicity.
You can then manipulate the rest of the code as your application requires. A more in-depth description of programming with Phidgets can be found in our guide on Phidget Programming Basics.
By following the instructions for your operating system and compiler above, you now have working examples and a project that is configured. This teaching section will help you understand how the examples were written so you can start writing your own code.
Remember: your main reference for writing C code will be the Phidget22 API Manual and the example code.
Step One: Create and Address
You will need to create your Phidget object in your code. For example, we can create a digital input object like this:
PhidgetDigitalInputHandle ch;
PhidgetDigitalInput_create(&ch);
Next, we can address which Phidget we want to connect to by setting parameters such as DeviceSerialNumber.
Phidget_setDeviceSerialNumber((PhidgetHandle)ch, 496911);
Although we are not including it on this page, you should handle the return codes of all Phidget functions. Here is an example of the previous code with error handling:
PhidgetReturnCode prc;
PhidgetDigitalInputHandle ch;

prc = PhidgetDigitalInput_create(&ch);
if (prc != EPHIDGET_OK) {
	fprintf(stderr, "Runtime Error -> Creating DigitalInput: \n\t");
	fprintf(stderr, "Code: 0x%x\n", error);
	return 1;
}

prc = Phidget_setDeviceSerialNumber((PhidgetHandle)ch, 496911);
if (prc != EPHIDGET_OK) {
	fprintf(stderr, "Runtime Error -> Setting DeviceSerialNumber: \n\t");
	fprintf(stderr, "Code: 0x%x\n", error);
	return 1;
}
Step Two: Open and Wait for Attachment
After we have specified which Phidget to connect to, we can open the Phidget object like this:
Phidget_openWaitForAttachment((PhidgetHandle)ch, 5000);
To use a Phidget, it must be plugged in (attached). We can handle this by calling openWaitForAttachment, which will block indefinitely until a connection is made, or until the timeout value is exceeded. Simply calling open does not guarantee you can use the Phidget immediately.
Alternately, you could verify the device is attached by using event driven programming and tracking the attach events.
To use events to handle attachments, we have to modify our code slightly:
PhidgetDigitalInputHandle ch;
PhidgetDigitalInput_create(&ch);

Phidget_setOnAttachHandler((PhidgetHandle)ch, onAttachHandler, null);

Phidget_openWaitForAttachment((PhidgetHandle)ch, 5000);
Next, we have to declare the function that will be called when an attach event is fired - in this case the function onAttachHandler will be called:
static void CCONV onAttachHandler(PhidgetHandle ph, void *ctx) {
    printf("Phidget attached!\n");
}
We recommend using this attach handler to set any initialization parameters for the channel such as DataInterval and ChangeTrigger from within the AttachHandler, so the parameters are set as soon as the device becomes available.
Step Three: Do Things with the Phidget
We recommend the use of event driven programming when working with Phidgets. In a similar way to handling an attach event as described above, we can also add an event handler for a state change event:
PhidgetDigitalInputHandle ch;
PhidgetDigitalInput_create(&ch);

Phidget_setOnAttachHandler((PhidgetHandle)ch, onAttachHandler, null);
PhidgetDigitalInput_setOnStateChangeHandler(ch, onStateChangeHandler, null);

Phidget_openWaitForAttachment((PhidgetHandle)ch, 5000);
This code will connect a function to an event. In this case, the onStateChangeHandler function will be called when there has been a change to the channel's input. Next, we need to create the onStateChangeHandler function:
static void CCONV onStateChangeHandler(PhidgetDigitalInputHandle ph, void *ctx, int state) {
    printf("State: %d\n", state);
}
If you are using multiple Phidgets in your program, check out our page on Using Multiple Phidgets for information on how to properly address them and use them in events.
If events do not suit your needs, you can also poll the device directly for data using code like this:
int state;
PhidgetDigitalInput_getState(ch, &state);
printf("State: %d\n", state);
Important Note: There will be a period of time between the attachment of a Phidget sensor and the availability of the first data from the device. Any attempts to get this data before it is ready will result in an error code, and a specific nonsensical result. See more information on this on our page for Unknown Values.
Enumerations
Some Phidget devices have functions that deal with specific predefined values called enumerations. Enumerations commonly provide readable names to a set of numbered options.
Enumerations with Phidgets in C will take the form of ENUMERATION_NAME.
For example, specifying a SensorType to use the 1142 for a voltage input would look like:
SENSOR_TYPE_1142
and specifying a K-Type thermocouple for a temperature sensor would be:
THERMOCOUPLE_TYPE_K
The Phidget error code for timing out could be specified as:
EPHIDGET_TIMEOUT
You can find the Enumeration Type under the Enumerations section of the Phidget22 API for your device, and the Enumeration Name in the drop-down list within.
Step Four: Close and Delete
At the end of your program, be sure to close and delete your device:
Phidget_close((PhidgetHandle)ch);
PhidgetDigitalInput_delete(&ch);
Setting up a New Project
When you are building a project from scratch, or adding Phidget functionality to an existing project, you'll need to configure your development environment to properly link the Phidget C library.
To start, open Code::Blocks, and navigate to Settings -> Compiler... as shown in the image below:

From the Global compiler settings screen, navigate to Search directories -> Compiler and add the following directory:
- C:\Program Files\Phidgets\Phidget22

Next, select Search directories -> Linker and add the following directory:
- C:\Program Files\Phidgets\Phidget22\x86

From the Global compiler settings screen, navigate to Linker settings and add the following line:
- phidget22

Next, create a new Console Application project, as follows:

Name your project, and finish creating the project.

Now your project is created, and you can open the generated main.c to begin coding.
To include the Phidget C library, add the following line to your code:
#include <phidget22.h>
Your project now has access to the Phidget libraries.
Further Reading
Phidget Programming Basics - Here you can find the basic concepts to help you get started with making your own programs that use Phidgets.
Data Interval/Change Trigger - Learn about these two properties that control how much data comes in from your sensors.
Using Multiple Phidgets - It can be difficult to figure out how to use more than one Phidget in your program. This page will guide you through the steps.
Polling vs. Events - Your program can gather data in either a polling-driven or event-driven manner. Learn the difference to determine which is best for your application.
Logging, Exceptions, and Errors - Learn about all the tools you can use to debug your program.
Phidget Network Server - Phidgets can be controlled and communicated with over your network- either wirelessly or over ethernet.
