SAF1000 User Guide: Difference between revisions
No edit summary |
(→About) |
||
| Line 10: | Line 10: | ||
===About=== | ===About=== | ||
The Power Guard Phidget is designed to protect your hardware by detecting and preventing overvoltage and over-temperature situations. If the voltage or temperature exceeds the thresholds chosen in your program, it will automatically cut power. You can re-enable power via software when you’ve determined that conditions are safe to do so. | The Power Guard Phidget is designed to protect your hardware by detecting and preventing overvoltage and over-temperature situations. If the voltage or temperature exceeds the thresholds chosen in your program, it will automatically cut power. You can re-enable power via software when you’ve determined that conditions are safe to do so. | ||
[[Image:SAF1000_About.jpg|link=|700px]] | |||
Connect your power supply to the '''VIN''' and '''GND''' terminals, and the power lines for the rest of the system to the '''OUT''' and '''GND''' terminals, like in the picture above. | |||
===Explore Your Phidget Channels Using The Control Panel=== | ===Explore Your Phidget Channels Using The Control Panel=== | ||
Revision as of 20:20, 11 March 2021
Part 1: Setup
Part 2: Using Your Phidget
About
The Power Guard Phidget is designed to protect your hardware by detecting and preventing overvoltage and over-temperature situations. If the voltage or temperature exceeds the thresholds chosen in your program, it will automatically cut power. You can re-enable power via software when you’ve determined that conditions are safe to do so.
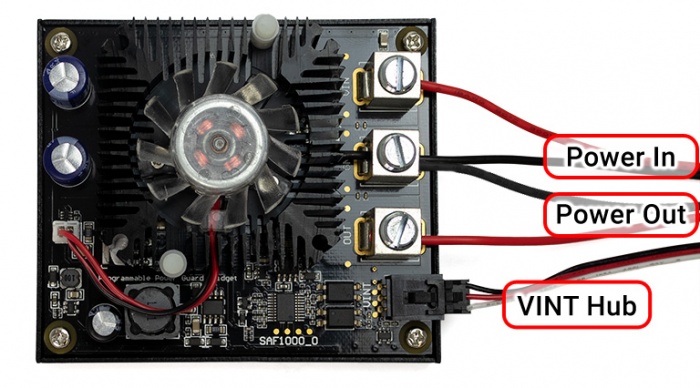
Connect your power supply to the VIN and GND terminals, and the power lines for the rest of the system to the OUT and GND terminals, like in the picture above.
Explore Your Phidget Channels Using The Control Panel
You can use your Control Panel to explore your Phidget's channels.
1. Open your Control Panel, and you will find the following channels:
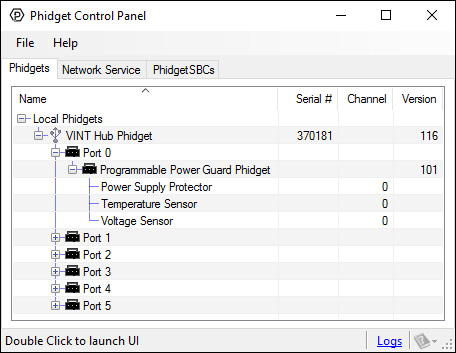
2. Double click on a channel to open an example program. Each channel belongs to a different channel class:
In your Control Panel, double click on "Power Supply Protector":
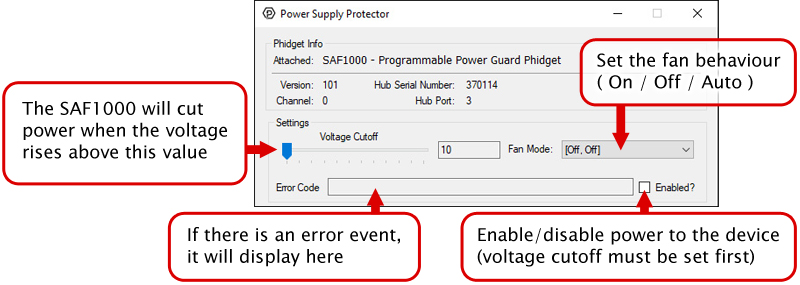
In your Control Panel, double click on "Temperature Sensor":

In your Control Panel, double click on "Voltage Sensor":

Part 3: Create your Program
Part 4: Advanced Topics and Troubleshooting
Before you open a Phidget channel in your program, you can set these properties to specify which channel to open. You can find this information through the Control Panel.
1. Open the Control Panel and double-click on the red map pin icon:

2. The Addressing Information window will open. Here you will find all the information you need to address your Phidget in your program.
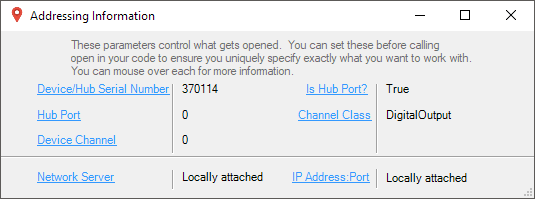
See the Phidget22 API for your language to determine exact syntax for each property.
Note: Graphing and logging is currently only supported in the Windows version of the Phidget Control Panel.
In the Phidget Control Panel, open the channel for your device and click on the ![]() icon next to the data type that you want to plot. This will open up a new window:
icon next to the data type that you want to plot. This will open up a new window:
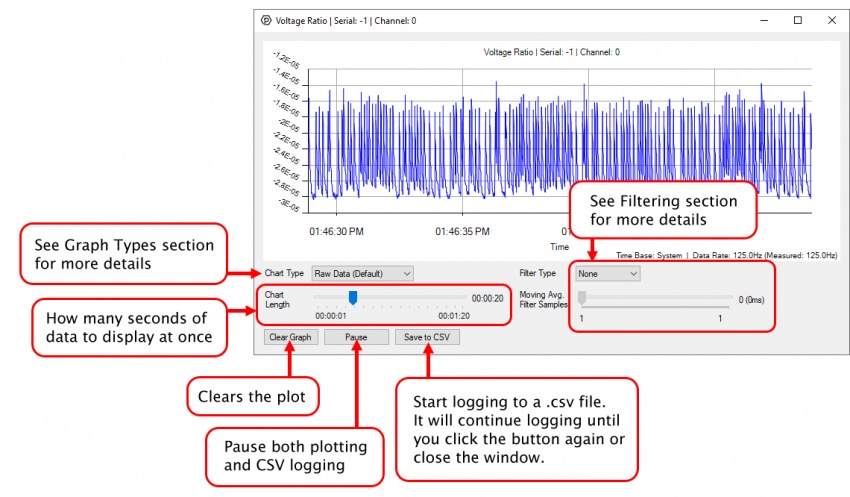
If you need more complex functionality such as logging multiple sensors to the same sheet or performing calculations on the data, you'll need to write your own program. Generally this will involve addressing the correct channel, opening it, and then creating an Event Handler and adding graphing/logging code to it.
The quickest way to get started is to download some sample code for your desired programming language and then search google for logging or plotting in that language (e.g. "how to log to csv in python") and add the code to the existing change handler.
Filtering
You can perform filtering on the raw data in order to reduce noise in your graph. For more information, see the Control Panel Graphing page.
Graph Type
You can perform a transform on the incoming data to get different graph types that may provide insights into your sensor data. For more information on how to use these graph types, see the Control Panel Graphing page.
Starting from firmware version 110, using Phidget22 library versions 1.0.0.20190107 and later, this device supports the use of a failsafe feature to put your device in a safe state should your program hang or crash.
With this feature, the PowerGuard channel on this device has a settable failsafe timer.
If the failsafe is not enabled, the device will behave as it did before the addition of this feature, maintaining the last state it received until it is explicitly told to stop.
Enabling the failsafe feature for a channel starts a recurring failsafe timer. Once the failsafe timer is enabled, it must be reset within the specified time or the channel will enter a failsafe state. Resetting the failsafe timer will reload the timer with the specified failsafe time, starting when the message to reset the timer is received by the Phidget.
For example: if the failsafe is enabled with a failsafe time of 1000ms, you will have 1000ms to reset the failsafe timer. Every time the failsafe timer is reset, you will have 1000ms from that time to reset the failsafe again.
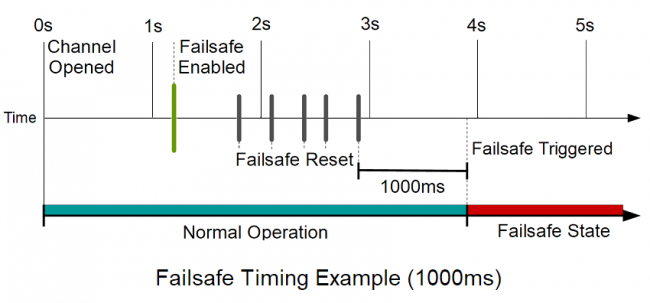
If the failsafe timer is not reset before it runs out, the channel will enter a failsafe state. For PowerGuard channels, this will disable the power output. Once the channel enters the failsafe state, it will reject any further input until the channel is reopened.
To prevent the channel from falsely entering the failsafe state, we recommend resetting the failsafe timer as frequently as is practical for your applicaiton. A good rule of thumb is to not let more than a third of the failsafe time pass before resetting the timer.
Once the failsafe has been enabled, it cannot be disabled by any means other than closing and reopening the channel.
When you use a failsafe in your program, we strongly recommend setting up an error event handler to catch the Failsafe Error Event, to allow your program to catch the failsafe event.
If you want your program to try to automatically recover from a failsafe state, you can close and re-open the channel from the error event handler after determining a failsafe condition caused the event.
