Phidget Control Panel: Difference between revisions
No edit summary |
No edit summary |
||
| Line 278: | Line 278: | ||
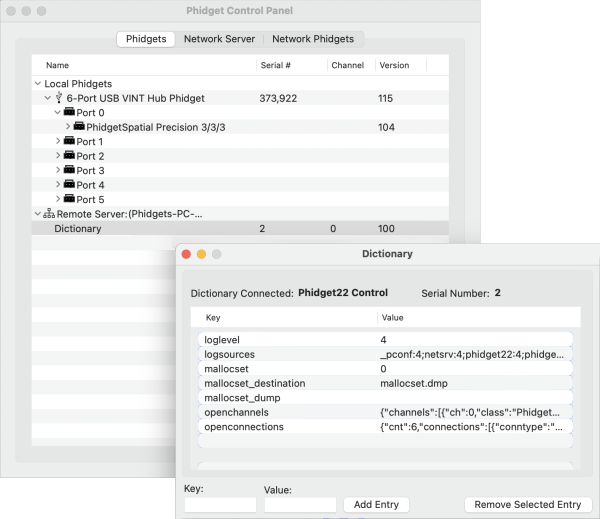
Next, make sure your Dictionary is enabled and then start your Phidget Network Server (or Restart, if it is already running). Navigate to the Phidgets tab and you will see your new Dictionary: | Next, make sure your Dictionary is enabled and then start your Phidget Network Server (or Restart, if it is already running). Navigate to the Phidgets tab and you will see your new Dictionary: | ||
[[File:Contorlpanel_macos_dictionary.png|link=https:// | [[File:Contorlpanel_macos_dictionary.png|link=https://www.phidgets.com/docs/images/3/33/Contorlpanel_macos_dictionary.png|center|600px]] | ||
Revision as of 22:16, 3 August 2023
Getting Started
The Phidget Control Panel is a powerful tool that will help you develop your Phidget applications. With the control panel, you can view all Phidgets attached to your machine/network, graph data from your devices, upgrade your firmware, and more!
We recommend using the Windows version of the Phidget Control Panel. There are macOS and browser-based options available, however, their functionality is limited.
Windows
Install
If you haven't already, follow the getting started with Windows guide. There, you will install the Phidget libraries, including the Phidget Control Panel.
Phidgets Tab
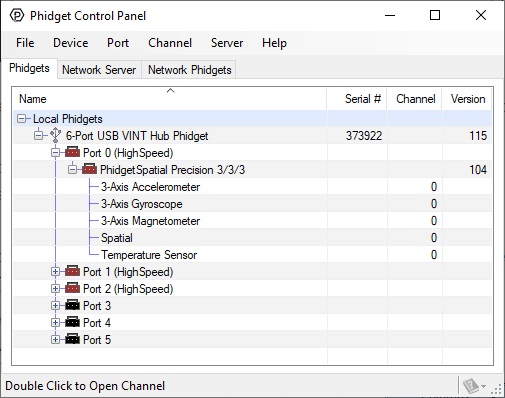
After opening the Phidget Control Panel, you will see something similar to this:
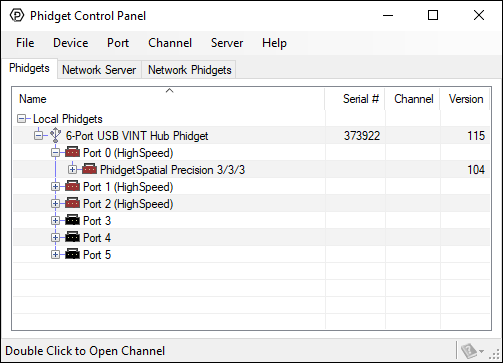
By default, the Phidgets tab will list any Phidget that is connected to your machine, as well as the following information:
- Serial number: allows you to differentiate between similar Phidgets.
- Channel: allows you to differentiate between similar objects on a Phidget.
- Version number: corresponds to the firmware version your Phidget is running.
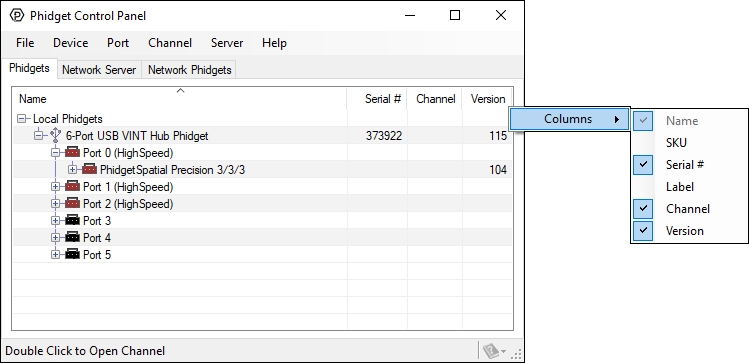
To add/remove information from the Phidget Control Panel, right-click on one of the column headers:
If an entry has a + symbol next to it, it can be expanding by clicking on the symbol, or double-clicking the entry:
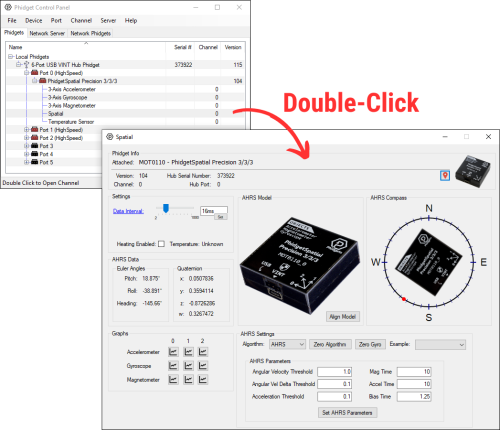
Running Applications
Every Phidget has an example application, double-click on a Phidget channel to run the program. You can also right-click on a Phidget channel and click Open Selected Channel.
These examples are intended for demonstration and debugging purposes; you'll eventually want to write your own program using our code samples for your preferred programming language.
Upgrading Firmware
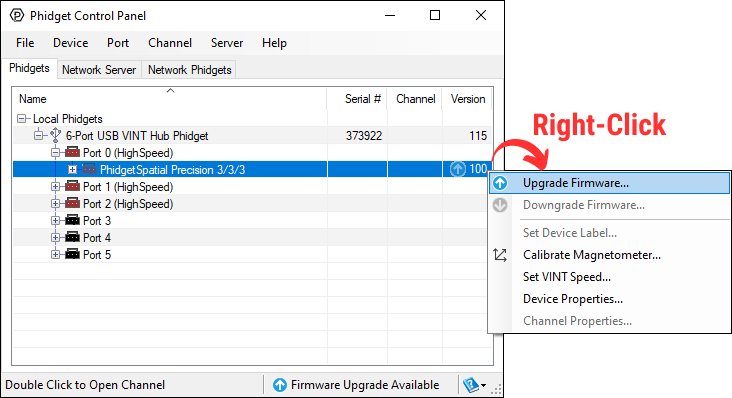
If a Phidget has a blue arrow icon (![]() ) next to it, it means the firmware is out of date. Right-click on the row and select Upgrade Firmware.
) next to it, it means the firmware is out of date. Right-click on the row and select Upgrade Firmware.
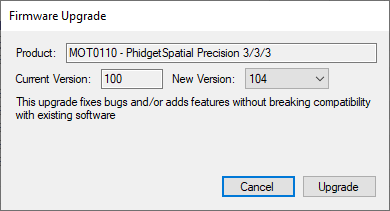
The latest version will be auto-selected and you can simply click Upgrade to complete.
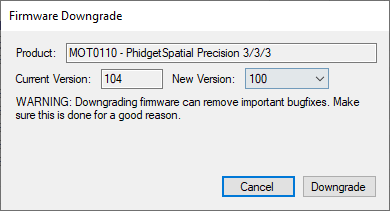
Downgrading Firmware
Firmware upgrades include important bug fixes and performance improvements, but there are some situations where you may want to revert to an old version of the firmware (e.g. when an application you're using is compiled using an older version of the Phidget library that doesn't recognize the new firmware).
You can downgrade by right-clicking on the device's row and selecting Downgrade Firmware.
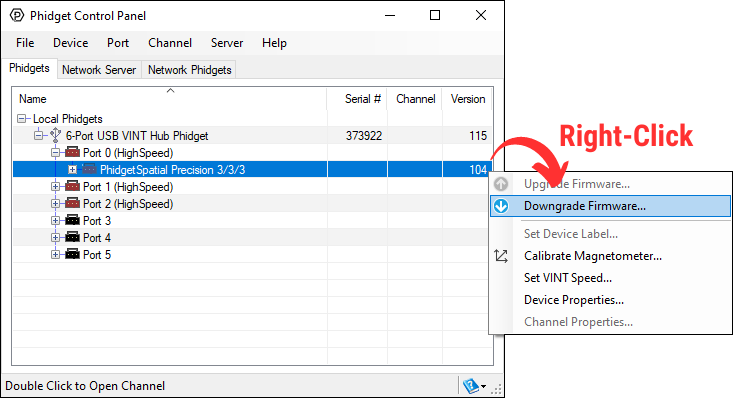
You can then select a specific firmware version.
Graphing and Data Logging
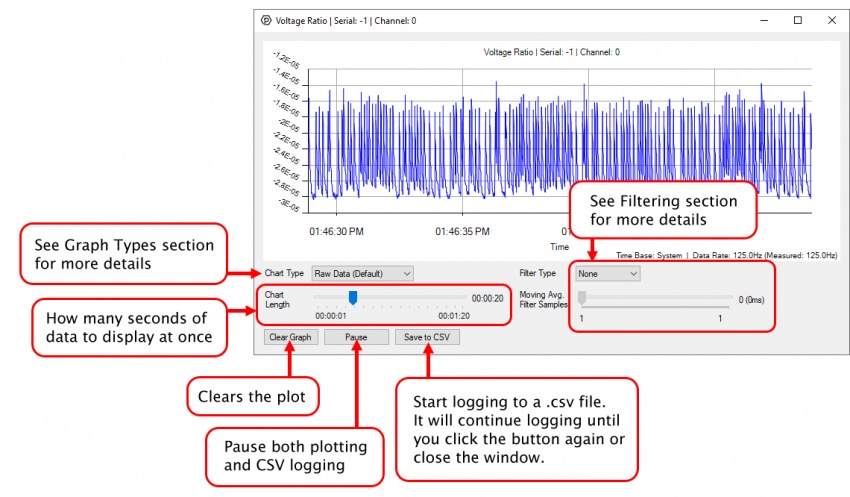
To plot data, open the channel for your device and click on the ![]() icon next to the data type that you want to plot. This will open up a new window:
icon next to the data type that you want to plot. This will open up a new window:
Filtering
You can perform filtering on the raw data in order to reduce noise in your graph. For more information, see the Control Panel Graphing page.
Graph Type
You can perform a transform on the incoming data to get different graph types that may provide insights into your sensor data. For more information on how to use these graph types, see the Control Panel Graphing page.
Error Logging
The Phidget Control Panel keeps a log file of all errors, warnings, and other information related to its operation. This information can provide useful insight when your device/system is not behaving as expected. To enable logging, first navigate to File > Options...
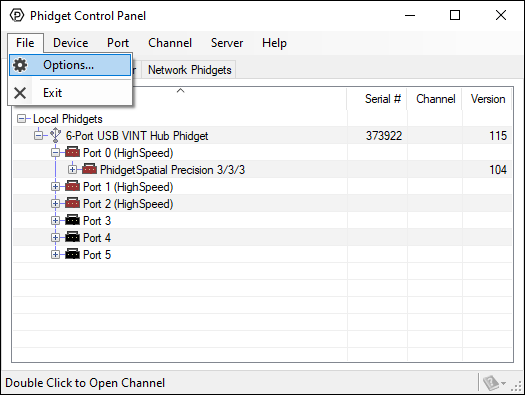
Next, check the box beside Enable Logging. For more information about log levels, view our logging details page.
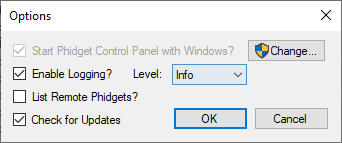
To view the log files, click on Help > Open Logs Folder in the menu at the top. You can also find it by navigating to the following location:
- C:/ProgramData/Phidgets/logs
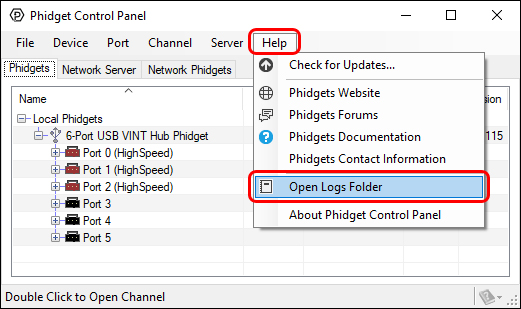
There are separate log files with different purposes:
- Phidget22Manager.log - This is the main log file for all Phidgets you access through the Phidget Control Panel.
- Phidget22NetworkServer_networkserver.log - If you have a Network Server running, this is the main log file for all activity on the server.
- Phidget22NetworkServer_access.log - This file logs requests made on the webpage hosted by your Network Server.
Setting VINT Speed
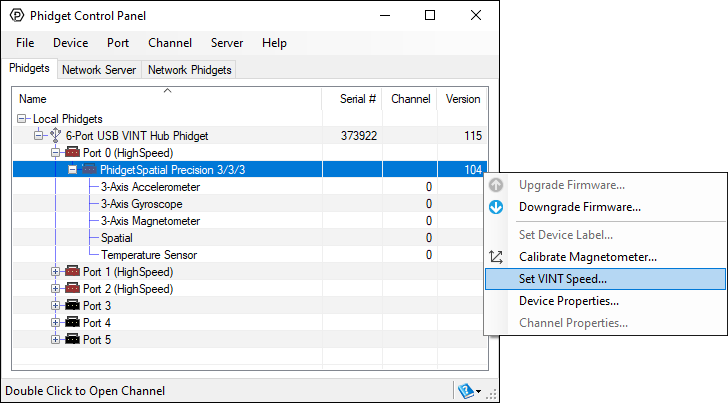
Right-click on a Phidget to set the VINT Speed.
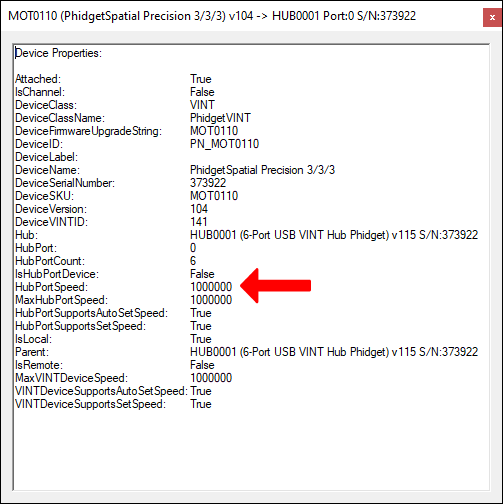
You can see the current VINT Speed in the properties menu.
Setting a Label
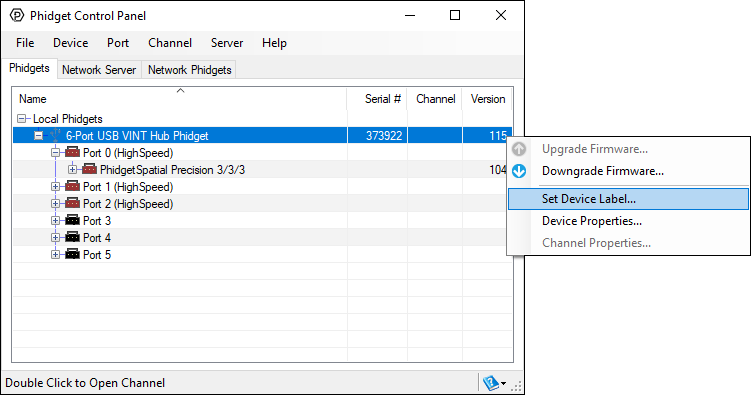
Right-click on a Phidget to set a label. See using a label for more information about how to use labels with Phidgets.
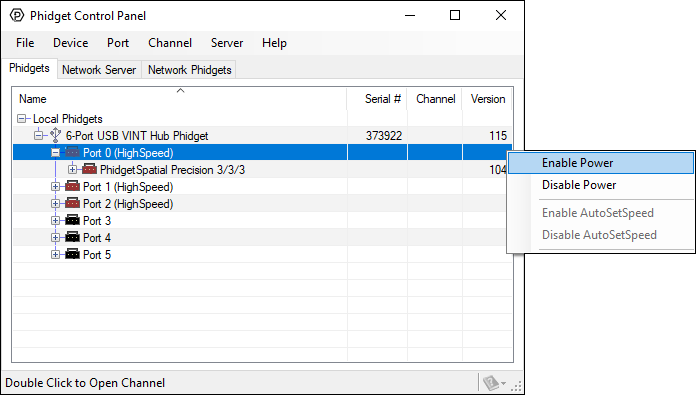
Set Hub Port Power
Power to VINT Hub ports can be controlled programmatically. Right-click on a hub port to turn the power on/off. For more information, visit the Phidget API, select your VINT Hub, and select USB as the interface type.
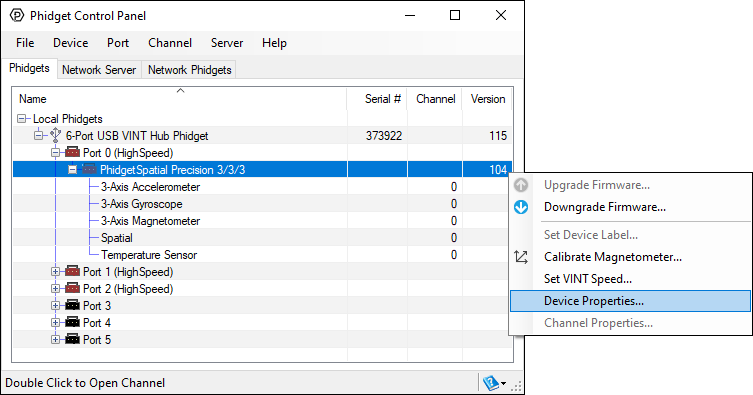
View Device/Channel Properties
Right-click on a device/channel to view its properties.
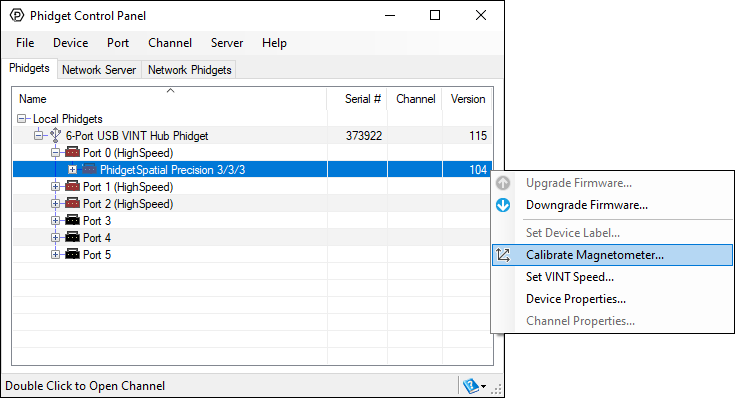
Access Device-Specific Options
Some devices have other options that can be accessed through the Phidget Control Panel. For example, the PhidgetSpatial Precision 3/3/3 shown in the example below has a Magnetometer Calibration program that can be accessed through the control panel.
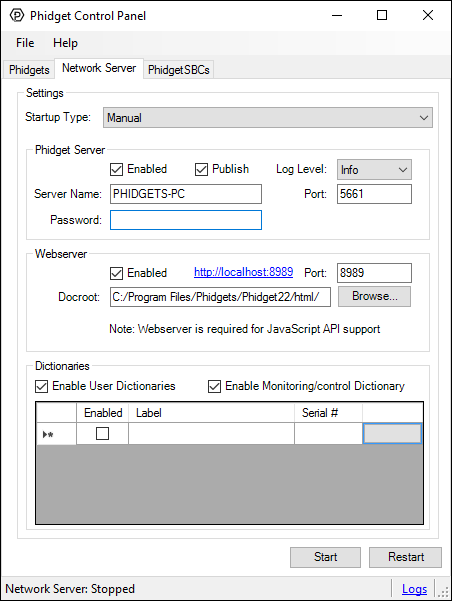
Network Server Tab
To get started, click on the Network Server tab:
Settings
- Startup Type: determines when the Phidget Network Server will start.
- Automatic: the Phidget Network Server will start automatically when Windows boots.
- Manual: the Phidget Network Server will start only when you click the Start button at the bottom of the Window, or, if another service starts it.
- Disabled: mode means the Phidget Network Server will stay off, regardless of what tries to start it.
Phidget Server Settings
- Enabled: enable the Phidget server. When you enable the Phidget Server, other computers on the network will be able to access the Phidgets that are connected to your computer.
- Publish: enable/disable mDNS. See the connecting to a Phidget Network Server for more information.
- Server Name: your server name will allow you to identify your Phidget Server from others on the network.
- Password (optional): prevent unauthorized computers on the network from accessing the Phidgets connected to your computer by setting a password.
- Log Level: defaults to Info. See logging section above for more information.
- Port: The port used by the Phidget Network Server (defaults to 5661).
Webserver Settings
- Enabled: enable the Webserver. The Webserver allows you to host a webpage that will have access to Phidgets through languages like JavaScript.
- Docroot: specifies the docroot path. This is where your webpage files will live and any/all additional libraries.
- Port: The port used by the Webserver (defaults to 8989).
Dictionaries Settings
- Enable User Dictionaries: in order to create/use a Phidget Dictionary with the Phidget Control Panel, make sure this setting is enabled.
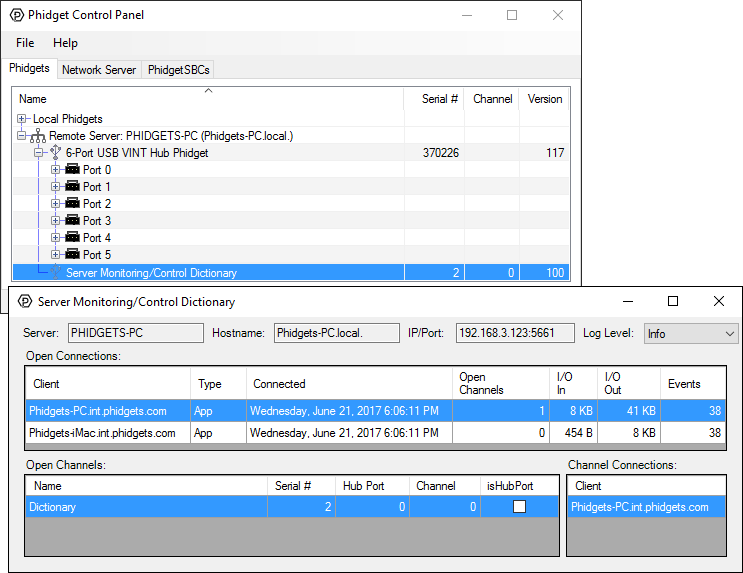
- Enable Monitoring/control Dictionary: by enabling this setting, you can view incoming/outgoing traffic related to your Phidget Network Server. Here is an example:
Adding a Phidget Dictionary
Phidget Dictionaries are an extremely powerful tool when working with Phidgets. See the Phidget Dictionary page for more information.
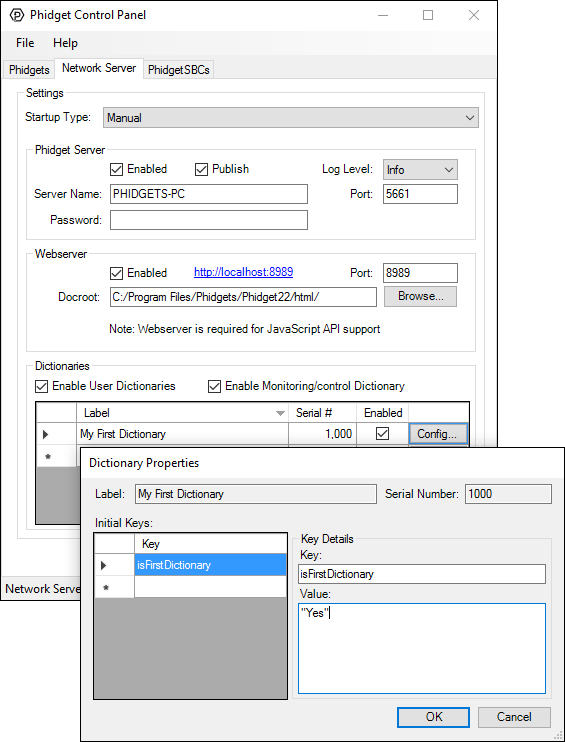
Creating a Phidget Dictionary is quick and easy with the Phidget Control Panel. First, specify a serial number for your Dictionary, and then give it a name (if you don't specify a serial number, a default will be provided).
Next, click on the Config... button. Here you can create a key-value pair for your Dictionary:
After you create your key-value pair, make sure your Dictionary is enabled and then start your Phidget Network Server (or Restart, if it is already running). Navigate to the Phidgets tab and you will see your new Dictionary:
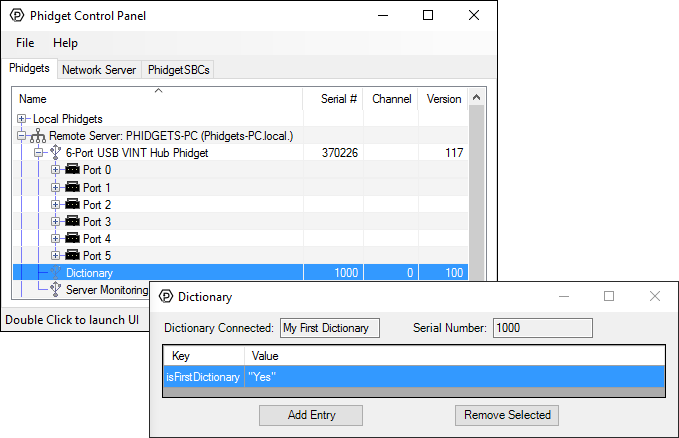
You can now access the Phidget Dictionary from any machine on the network.
Network Phidgets Tab
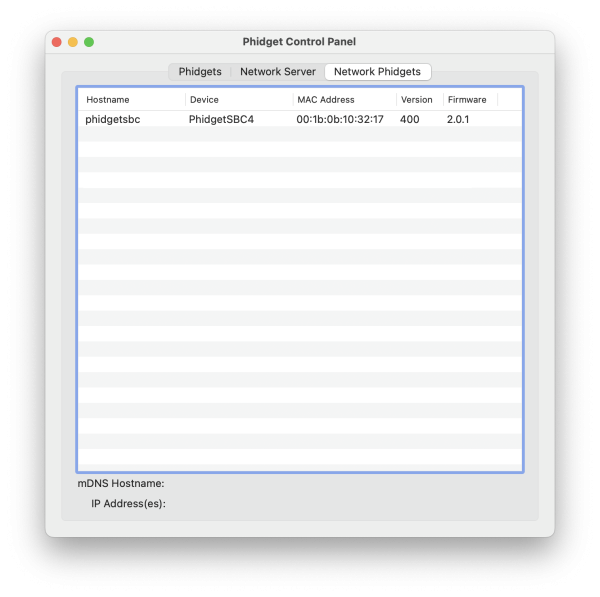
The last tab is the Network Phidgets tab, which displays a complete list of any Phidget SBCs or Wireless VINT Hubs connected to your network.
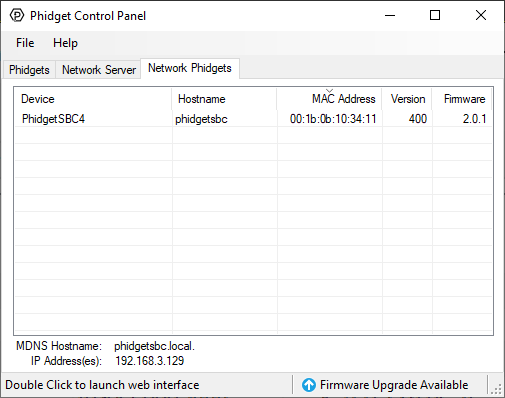
Just like the Phidgets tab, you can right-click on any of the column headers for view options:
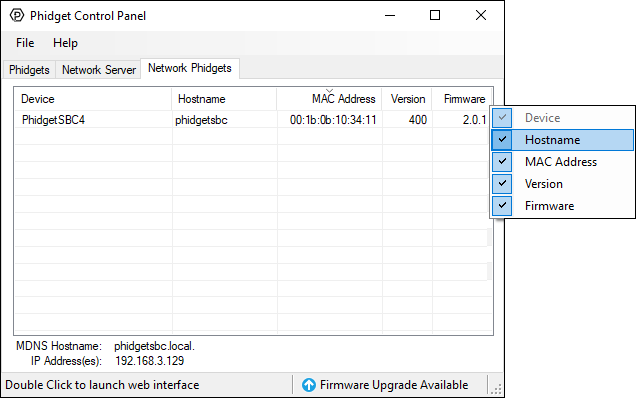
You can also double-click on a device to bring up its web interface.
Wireless VINT Hub Firmware Upgrade
If your Wireless VINT Hub has out-of-date firmware, a blue arrow icon (![]() ) will appear in its row.
) will appear in its row.
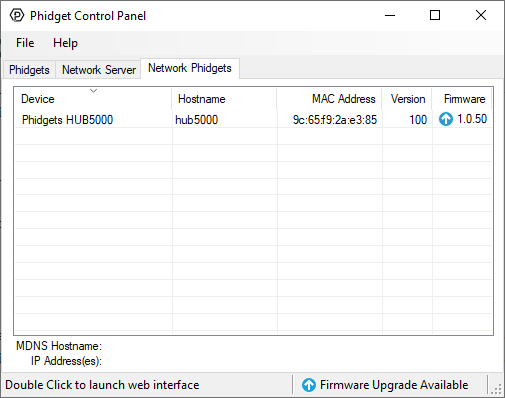
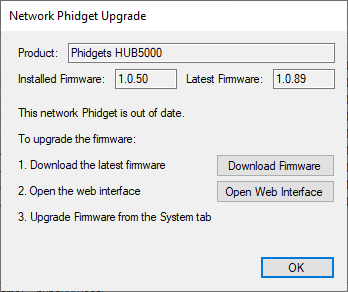
You can double-click on the entry for information about how to upgrade your device.
macOS
Install
If you haven't already, follow the getting started with macOS guide. There, you will install the Phidget libraries, including the Phidget Control Panel.
Phidgets Tab
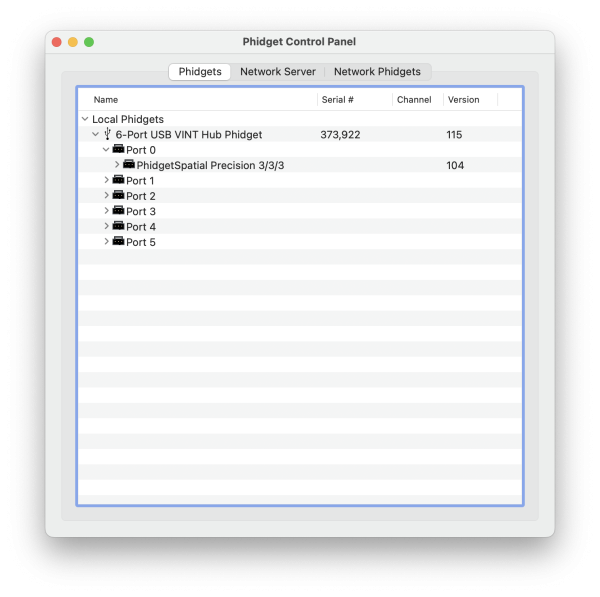
After opening the Phidget Control Panel, you will see something similar to this:
The Phidgets tab will list all Phidgets (and associated objects) that are connected to your machine, as well as the following information:
- Serial number: allows you to differentiate between similar Phidgets.
- Channel: allows you to differentiate between similar objects on a Phidget.
- Version number: corresponds to the firmware version your Phidget is running.
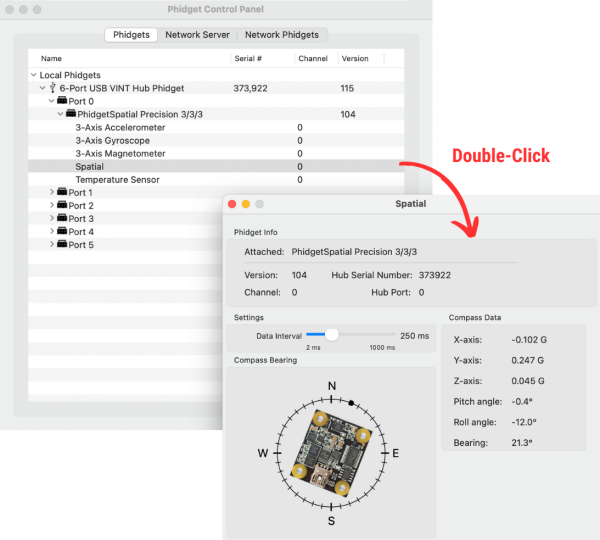
Running Applications
Every Phidget has an example program, double-click on a Phidget to run the program:
Note: important features for your device may be missing on the macOS version of the Phidget Control Panel. We recommend using the Windows version of the Phidget Control Panel when possible.
Upgrading Firmware
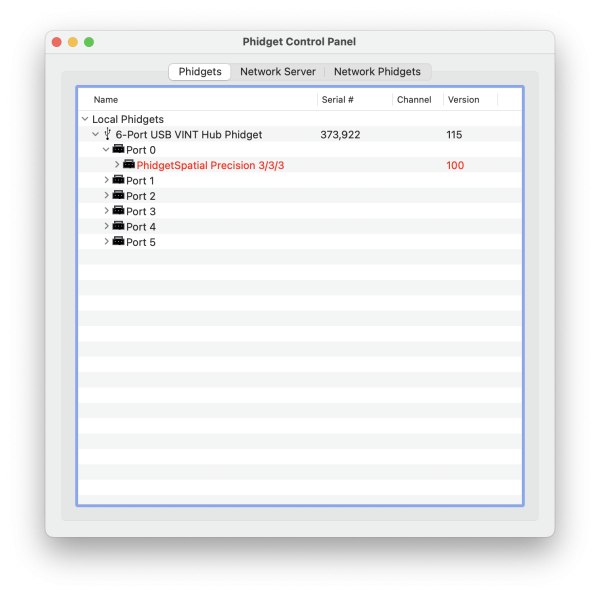
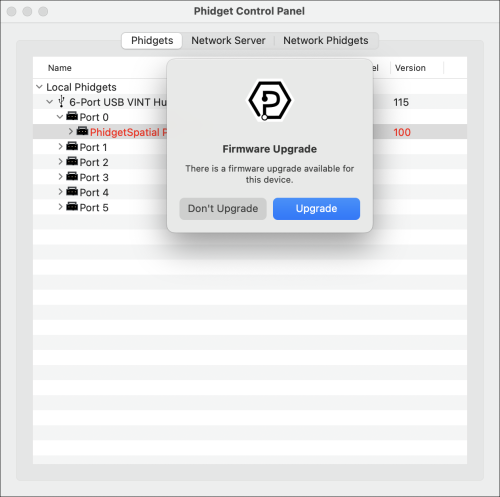
If a Phidget shows up in red on the list in the Phidgets tab, it means the firmware is out of date. Double-click on the Phidget to be given the option to apply the update.
Simply click Upgrade to complete.
Downgrading Firmware
This functionality is not supported in the macOS version of the Phidget Control Panel.
Graphing and Data Logging
This functionality is not supported in the macOS version of the Phidget Control Panel.
Error Logging
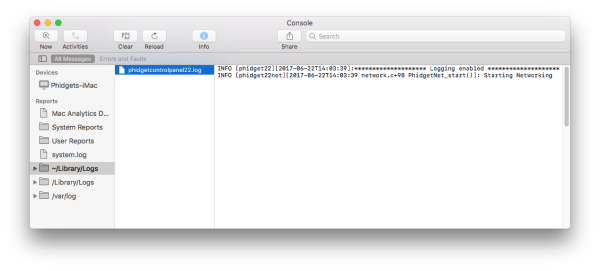
The Phidget Control Panel keeps a log file of all errors, warnings, and other information related to its operation. This information can be useful if you're having problems with your Phidgets, but you're not sure what's going wrong. To view the log file, open the Console application under Applications > Utilities
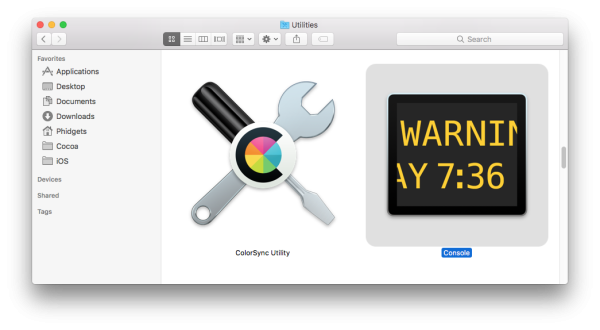
After opening the Console application, navigate to user logs (~/Library/Logs) on the left menu. You will likely have a list of logs from various applications. After finding the Phidget logs, you will see something like this:
Setting VINT Speed
This functionality is not supported in the macOS version of the Phidget Control Panel.
Setting a Label
This functionality is not supported in the macOS version of the Phidget Control Panel.
Set Hub Port Power
This functionality is not supported in the macOS version of the Phidget Control Panel.
View Device/Channel Properties
This functionality is not supported in the macOS version of the Phidget Control Panel.
Access Device-Specific Options
This functionality is not supported in the macOS version of the Phidget Control Panel.
Network Server Tab
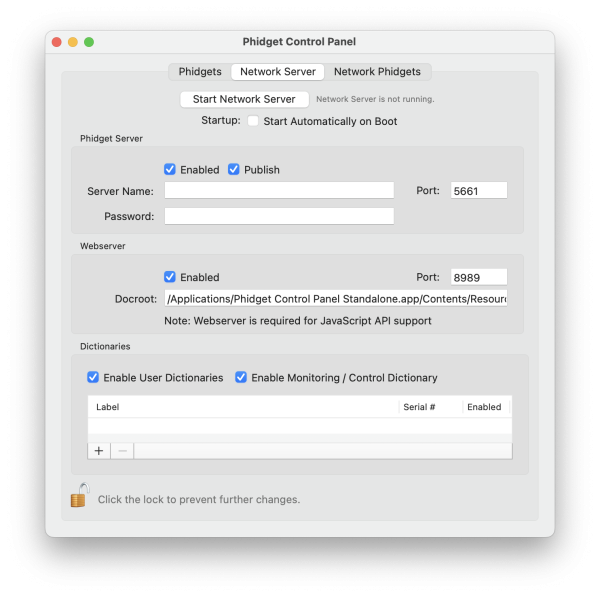
To get started, click on the Network Server tab:
Settings
- Start Network Server: start or stop the Network Server. The text to the right of the button will display the current status of the Network Server.
- Start Automatically on Boot: the Network Server will start automatically when the computer boots. Otherwise, you'll have to manually start the Network Server every time you want to use it.
Phidget Server Settings
- Enabled: enable the Phidget server. When you enable the Phidget Server, other computers on the network will be able to access the Phidgets that are connected to your computer.
- Publish: enable/disable mDNS. See the connecting to a Phidget Network Server for more information.
- Server Name: your server name will allow you to identify your Phidget Server from others on the network.
- Password (optional): prevent unauthorized computers on the network from accessing the Phidgets connected to your computer by setting a password.
- Port: The port used by the Phidget Network Server (defaults to 5661).
Webserver Settings
- Enabled: enable the Webserver. The Webserver allows you to host a webpage that will have access to Phidgets through languages like JavaScript.
- Docroot: specifies the docroot path. This is where your webpage files will live and any/all additional libraries.
- Port: The port used by the Webserver (defaults to 8989).
Dictionaries Settings
- Enable User Dictionaries: in order to create/use a Phidget Dictionary with the Phidget Control Panel, make sure this setting is enabled.
- Enable Monitoring/control Dictionary: by enabling this setting, you can view incoming/outgoing traffic related to your Phidget Network Server. Currently, you can view this information on a Windows machine only.
Adding a Phidget Dictionary
Phidget Dictionaries are an extremely powerful tool when working with Phidgets. See the Phidget Dictionary page for more information.
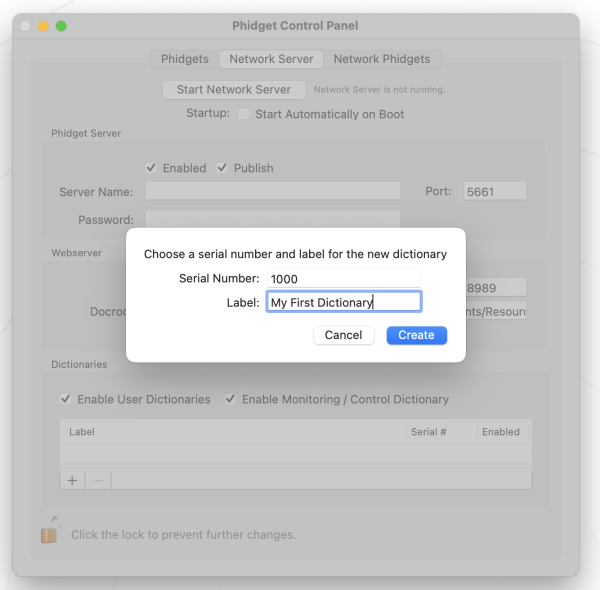
Creating a Phidget Dictionary is quick and easy with the Phidget Control Panel. Simply press the + button and specify a name and serial number for your Dictionary:
Next, make sure your Dictionary is enabled and then start your Phidget Network Server (or Restart, if it is already running). Navigate to the Phidgets tab and you will see your new Dictionary:
You can now access the Phidget Dictionary from any machine on the network.
Network Phidgets Tab
The last tab is the Network Phidgets tab, which displays a complete list of any Phidget SBC or Wireless VINT Hub connected to your network.
You can also double-click on a device to bring up its web interface.

