Language - C: Difference between revisions
No edit summary |
No edit summary |
||
| Line 83: | Line 83: | ||
Success! The project now has access to Phidgets. Next, view the [[#Write Code | write your own code]] section located below. | Success! The project now has access to Phidgets. Next, view the [[#Write Code | write your own code]] section located below. | ||
===GCC=== | ===GCC=== | ||
====Cygwin/MinGW==== | ====Cygwin/MinGW==== | ||
=====Use our examples===== | =====Use our examples===== | ||
One of the best ways to start programming with Phidgets is to use our example code as a guide. In order to run the examples, you will need to download and install either [http://www.mingw.org/ MinGW] or [https://www.cygwin.com/ Cygwin]. | |||
Now that you have either MinGW or Cygwin installed, select an example that will work with your Phidget: | |||
*{{SampleCode|C|C/C++ Examples}} | |||
If you are using Cygwin, navigate to the folder where the example is and open the command prompt. Enter the following command to compile the example: | |||
<syntaxhighlight lang='bash'> | <syntaxhighlight lang='bash'> | ||
gcc example.c -o example -I"/cygdrive/c/Program Files/Phidgets/Phidget22" -L"/cygdrive/c/Program Files/Phidgets/Phidget22/x86" -lphidget22 | |||
</syntaxhighlight> | </syntaxhighlight> | ||
If you are using MinGW, navigate to the folder where the example is and open the command prompt. Enter the following command to compile the example: | |||
<syntaxhighlight lang='bash'> | <syntaxhighlight lang='bash'> | ||
gcc example.c -o example -I"C:/Program Files/Phidgets/Phidget22" -L"C:/Program Files/Phidgets/Phidget22/x86" -lphidget22 | |||
</syntaxhighlight> | </syntaxhighlight> | ||
After | After running the commands above for either Cygwin or MinGW, an executable file called ''example.exe'' will be created. Enter the following command to run the example: | ||
<syntaxhighlight lang='bash'> | |||
example.exe | |||
</syntaxhighlight> | |||
You should now have the example up and running. When you are ready, the next step is configuring your project and writing your own code! | |||
=====Configure your project===== | |||
When you are building a project from scratch, or adding Phidget functionality to an exisiting project, you'll need to configure your development environment to properly link the Phidget C/C++ library. | |||
To include the Phidget C/C++ library, add the following line to your code: | |||
<syntaxhighlight lang='C'> | |||
#include <phidget22.h> | |||
</syntaxhighlight> | |||
You can now compile the file as shown in the previous section. | |||
The project now has access to Phidgets. Next, view the [[#Write Code | write your own code]] section located below. | |||
===Code::Blocks=== | ===Code::Blocks=== | ||
====Use our examples==== | |||
One of the best ways to start programming with Phidgets is to use our example code as a guide. In order to run the examples, you will need to download and install [http://www.codeblocks.org/downloads Code::Blocks]. | |||
Now that you have Code::Blocks installed, select an example that will work with your Phidget: | |||
*{{SampleCode|C|C/C++ Examples}} | |||
Open the example in Code::Blocks (you do not need to create a new project) and navigate to Settings -> Compiler... as shown in the image below: | |||
[[Image:C_codeblocks_settings.png|link=|center]] | |||
From the Global compiler settings screen, navigate to Search directories -> Compiler and add the following directory: | |||
*C:\Program Files\Phidgets\Phidget22 | |||
[[Image:C_codeblocks_compiler.PNG|link=|center]] | |||
Next, select Search directories -> Linker and add the following directory: | |||
*C:\Program Files\Phidgets\Phidget22\x86 | |||
[[Image: | [[Image:C_codeblocks_linker.PNG|link=|center]] | ||
Finally, from the Global compiler settings screen, navigate to Linker settings and add the following line: | |||
*phidget22 | |||
[[Image:C_codeblocks_libraries.PNG|link=|center]] | |||
You can now build and run the example: | |||
[[Image: | [[Image:C_codeblocks_run.png|link=|center]] | ||
You should now have the example up and running for your device. Play around with the device and experiment with some of the functionality. When you are ready, the next step is configuring your project and writing your own code! | |||
When you are building a project from scratch, or adding Phidget | ====Configure your project==== | ||
When you are building a project from scratch, or adding Phidget functionality to an existing project, you'll need to configure your development environment to properly link the Phidget C/C++ library. | |||
To include the Phidget C/C++ library, add the following line to your code: | |||
<syntaxhighlight lang='C'> | <syntaxhighlight lang='C'> | ||
#include <phidget22.h> | |||
</syntaxhighlight> | </syntaxhighlight> | ||
You can now compile the file as shown in the previous section. | |||
The project now has access to Phidgets. Next, view the [[#Write Code | write your own code]] section located below. | |||
==macOS== | ==macOS== | ||
| Line 186: | Line 204: | ||
You should now have the example up and running for your device. Play around with the device and experiment with some of the functionality. When you are ready, the next step is configuring your project and writing your own code! | You should now have the example up and running for your device. Play around with the device and experiment with some of the functionality. When you are ready, the next step is configuring your project and writing your own code! | ||
====Configure your project==== | ====Configure your project==== | ||
When you are building a project from scratch, or adding Phidget functionality to an exisiting project, you'll need to configure your development environment to properly link the Phidget C/C++ library. | When you are building a project from scratch, or adding Phidget functionality to an exisiting project, you'll need to configure your development environment to properly link the Phidget C/C++ library. | ||
| Line 194: | Line 213: | ||
</syntaxhighlight> | </syntaxhighlight> | ||
You can now compile the file as shown in the previous section. | |||
The | The project now has access to Phidgets. Next, view the [[#Write Code | write your own code]] section located below. | ||
===Use our examples=== | ==Linux== | ||
If you didn't come from the [[OS - Linux| Linux page]], be sure to check it out first before you continue reading! | |||
===GCC=== | |||
====Use our examples==== | |||
One of the best ways to start programming with Phidgets is to use our example code as a guide. You likely have gcc installed on your Linux machine already, but if not, you can easily get it by entering the following command in the terminal: | |||
<syntaxhighlight lang='C'> | |||
apt-get install gcc | |||
</syntaxhighlight> | |||
* | Next, select an example that will work with your Phidget: | ||
*{{SampleCode|C|C/C++ Examples}} | |||
To compile | To compile the example, enter the following command in the terminal: | ||
<syntaxhighlight lang='bash'> | <syntaxhighlight lang='bash'> | ||
gcc example.c -o example -lphidget22 | |||
</syntaxhighlight> | </syntaxhighlight> | ||
After compiling, you can run the program by entering the following command in the terminal: | |||
<syntaxhighlight lang='bash'> | <syntaxhighlight lang='bash'> | ||
./example | |||
</syntaxhighlight> | </syntaxhighlight> | ||
When | You should now have the example up and running. When you are ready, the next step is configuring your project and writing your own code! | ||
====Configure your project==== | |||
When you are building a project from scratch, or adding Phidget functionality to an exisiting project, you'll need to configure your development environment to properly link the Phidget C/C++ library. | |||
To include the Phidget C/C++ library, simply add the following line to your code: | |||
<syntaxhighlight lang='C'> | <syntaxhighlight lang='C'> | ||
#include <phidget22.h> | |||
</syntaxhighlight> | </syntaxhighlight> | ||
You can now compile the file as shown in the previous section. | |||
The project now has access to Phidgets. Next, view the [[#Write Code | write your own code]] section located below. | |||
==Write Code== | |||
By following the instructions for your operating system and compiler above, you probably now have a working example and want to understand it better so you can change it to do what you want. This [[#Edit the Examples|teaching section]] has resources for you to learn from the examples and write your own. | By following the instructions for your operating system and compiler above, you probably now have a working example and want to understand it better so you can change it to do what you want. This [[#Edit the Examples|teaching section]] has resources for you to learn from the examples and write your own. | ||
Your main reference for writing C/C++ code will be the {{Phidget22API}}. | Your main reference for writing C/C++ code will be the {{Phidget22API}}. | ||
| Line 379: | Line 402: | ||
[[Phidget Network Server]] - Phidgets can be controlled and communicated with over your network- either wirelessly or over ethernet. | [[Phidget Network Server]] - Phidgets can be controlled and communicated with over your network- either wirelessly or over ethernet. | ||
Revision as of 21:17, 31 May 2017
Quick Downloads
Documentation
Example Code
Libraries
- Windows Drivers Installer (32-Bit)
- Windows Drivers Installer (64-Bit)
- Windows Development Libraries
- macOS Installer
- Linux Libraries
- Linux Phidget Network Server
Getting started with C/C++
Welcome to using Phidgets with C/C++! By using C/C++, you will have access to the complete Phidget22 API, including events. We also provide example code in C/C++ for all Phidget devices.
If you are developing for Windows, keep reading. Otherwise, select your operating system to jump ahead:
Windows
If you didn't come from the Windows page, be sure to check it out first before you continue reading!
Visual Studio
Use our examples
One of the best ways to start programming with Phidgets is to use our example code as a guide. In order to run the examples, you will need to download and install Microsoft Visual Studio.
Now that you have Microsoft Visual Studio installed, select an example that will work with your Phidget:
Open the example project and start the example by pressing the Local Windows Debugger button:
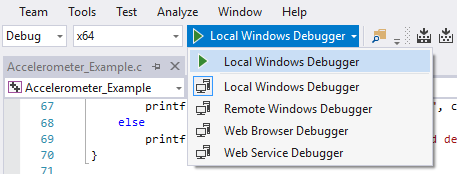
The application will open the Phidget, list basic information about the Phidget, and demonstrate the Phidget's functionality. Here is an example of an Accelerometer channel on a Spatial Phidget:
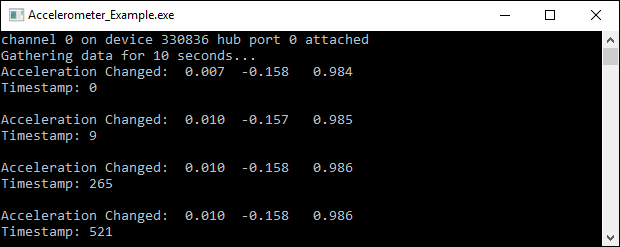
You should now have the example up and running for your device. Play around with the device and experiment with some of the functionality. When you are ready, the next step is configuring your project and writing your own code!
Configure your project
When you are building a project from scratch, or adding Phidget functionality to an existing project, you'll need to configure your development environment to properly link the Phidget C/C++ library. To begin:
Create a new Win32 Console application:
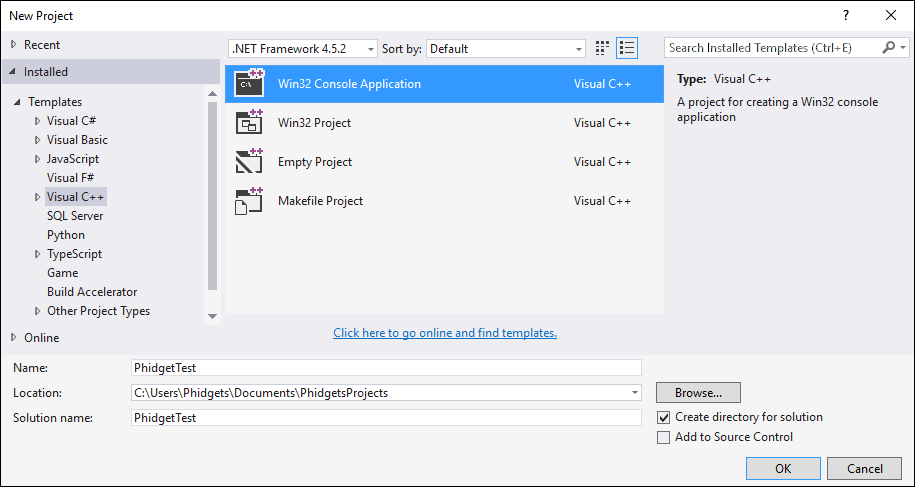
After creating a project with the default settings, access the project's properties:
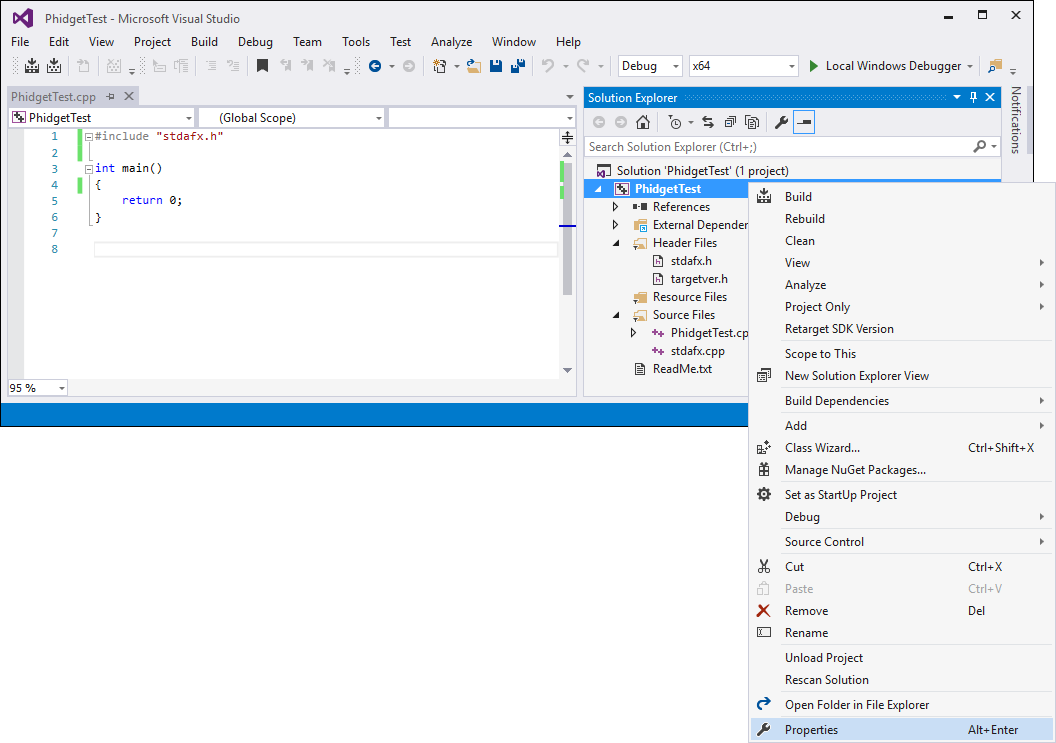
Next, navigate to Configuration Properties -> C/C++ -> General and add the following line to the additional include directories:
- C:\Program Files\Phidgets\Phidget22
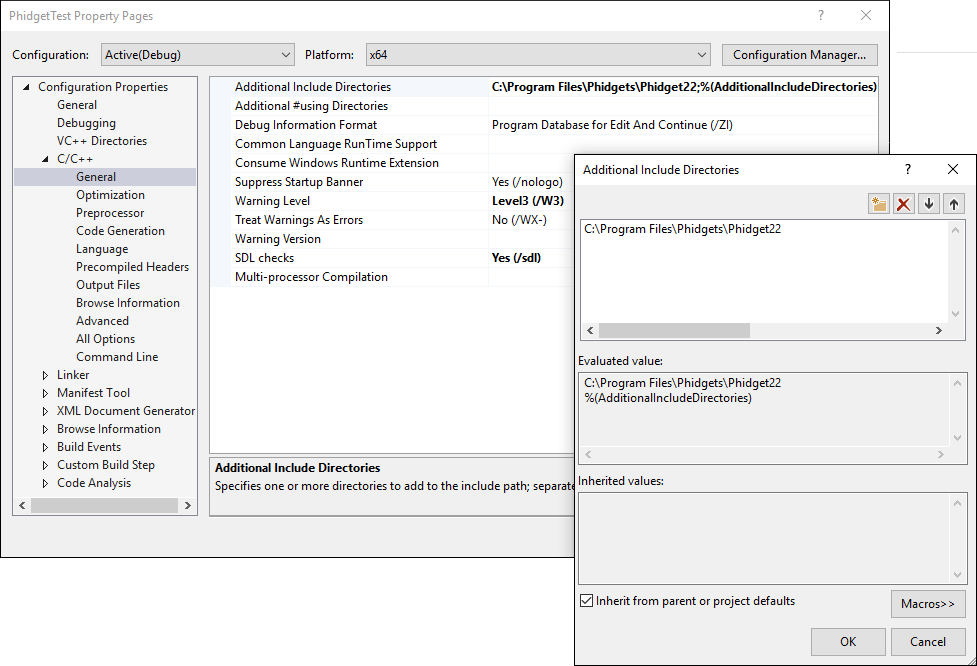
Navigate to Configuration Properties -> Linker -> Input and add the following line to the additional dependencies:
- C:\Program Files\Phidgets\Phidget22\phidget22.lib
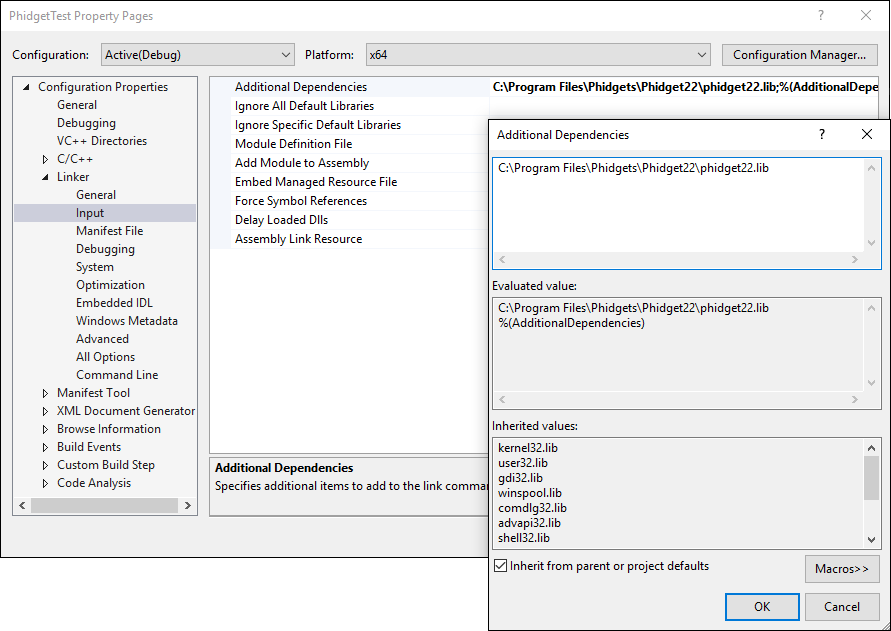
Finally, include the Phidget library in your code:
#include <phidget22.h>
Success! The project now has access to Phidgets. Next, view the write your own code section located below.
GCC
Cygwin/MinGW
Use our examples
One of the best ways to start programming with Phidgets is to use our example code as a guide. In order to run the examples, you will need to download and install either MinGW or Cygwin.
Now that you have either MinGW or Cygwin installed, select an example that will work with your Phidget:
If you are using Cygwin, navigate to the folder where the example is and open the command prompt. Enter the following command to compile the example:
gcc example.c -o example -I"/cygdrive/c/Program Files/Phidgets/Phidget22" -L"/cygdrive/c/Program Files/Phidgets/Phidget22/x86" -lphidget22
If you are using MinGW, navigate to the folder where the example is and open the command prompt. Enter the following command to compile the example:
gcc example.c -o example -I"C:/Program Files/Phidgets/Phidget22" -L"C:/Program Files/Phidgets/Phidget22/x86" -lphidget22
After running the commands above for either Cygwin or MinGW, an executable file called example.exe will be created. Enter the following command to run the example:
example.exe
You should now have the example up and running. When you are ready, the next step is configuring your project and writing your own code!
Configure your project
When you are building a project from scratch, or adding Phidget functionality to an exisiting project, you'll need to configure your development environment to properly link the Phidget C/C++ library.
To include the Phidget C/C++ library, add the following line to your code:
#include <phidget22.h>
You can now compile the file as shown in the previous section.
The project now has access to Phidgets. Next, view the write your own code section located below.
Code::Blocks
Use our examples
One of the best ways to start programming with Phidgets is to use our example code as a guide. In order to run the examples, you will need to download and install Code::Blocks.
Now that you have Code::Blocks installed, select an example that will work with your Phidget:
Open the example in Code::Blocks (you do not need to create a new project) and navigate to Settings -> Compiler... as shown in the image below:
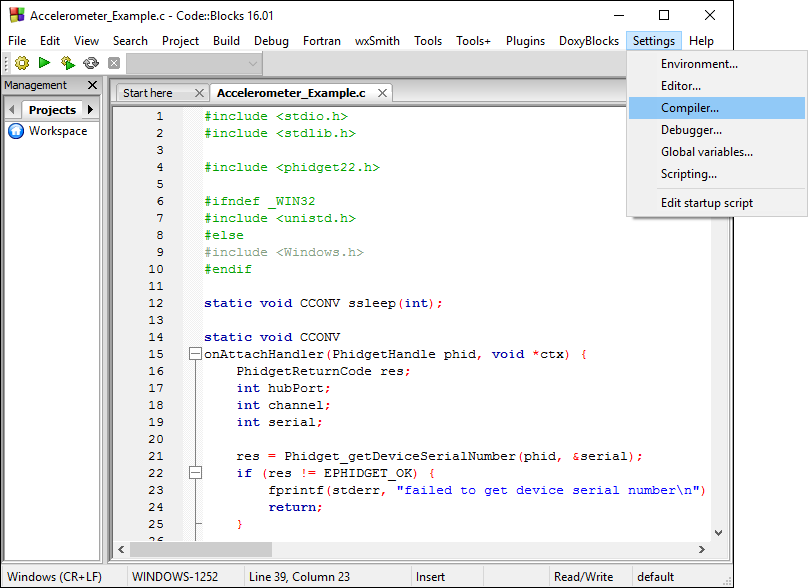
From the Global compiler settings screen, navigate to Search directories -> Compiler and add the following directory:
- C:\Program Files\Phidgets\Phidget22
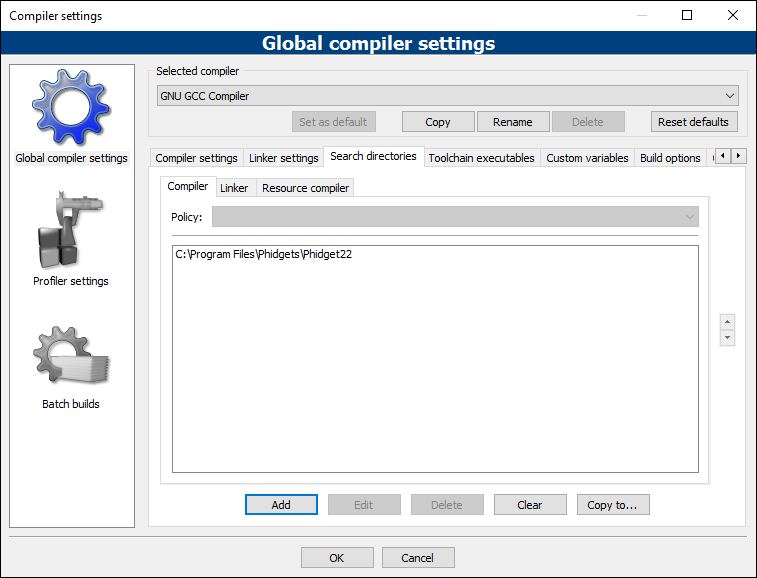
Next, select Search directories -> Linker and add the following directory:
- C:\Program Files\Phidgets\Phidget22\x86
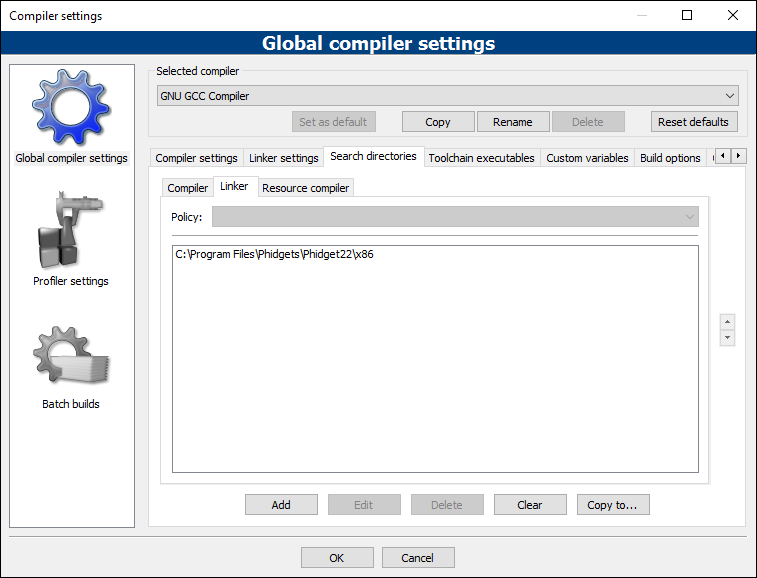
Finally, from the Global compiler settings screen, navigate to Linker settings and add the following line:
- phidget22
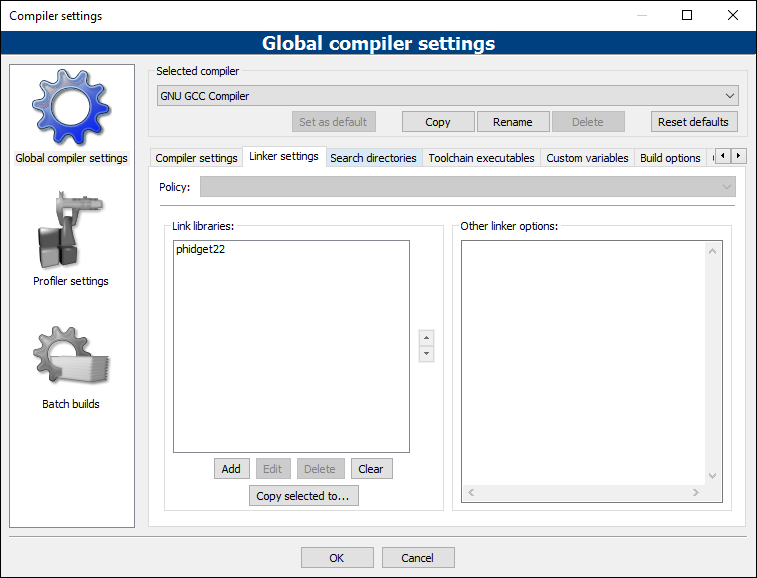
You can now build and run the example:
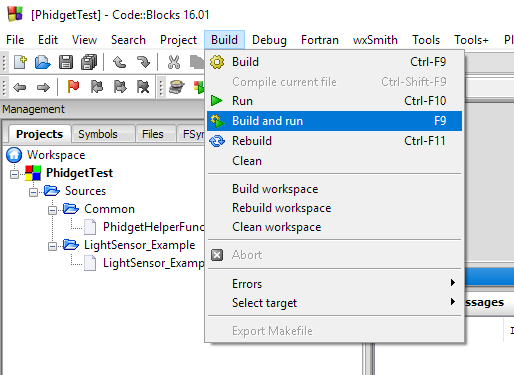
You should now have the example up and running for your device. Play around with the device and experiment with some of the functionality. When you are ready, the next step is configuring your project and writing your own code!
Configure your project
When you are building a project from scratch, or adding Phidget functionality to an existing project, you'll need to configure your development environment to properly link the Phidget C/C++ library.
To include the Phidget C/C++ library, add the following line to your code:
#include <phidget22.h>
You can now compile the file as shown in the previous section.
The project now has access to Phidgets. Next, view the write your own code section located below.
macOS
If you didn't come from the macOS page, be sure to check it out first before you continue reading!
GCC
Use our examples
One of the best ways to start programming with Phidgets is to use our example code as a guide. You likely have gcc installed on your macOS machine already, but if not, you can easily get it by downloading Xcode.
Next, select an example that will work with your Phidget:
To compile the example program, enter the following command in the terminal:
gcc example.c -o example -F /Library/Frameworks -framework Phidget22 -I /Library/Frameworks/Phidget22.framework/Headers
Finally, run the program by entering the following command in the terminal:
./example
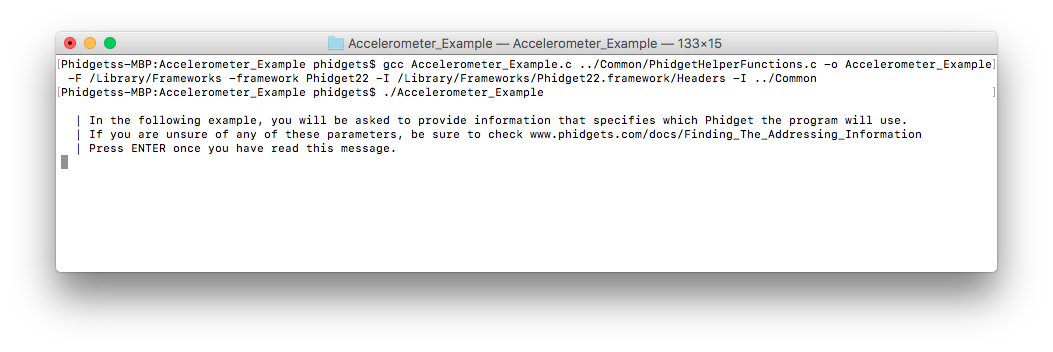
You should now have the example up and running for your device. Play around with the device and experiment with some of the functionality. When you are ready, the next step is configuring your project and writing your own code!
Configure your project
When you are building a project from scratch, or adding Phidget functionality to an exisiting project, you'll need to configure your development environment to properly link the Phidget C/C++ library.
To include the Phidget C/C++ library, simply add the following line to your code:
#include <phidget22.h>
You can now compile the file as shown in the previous section.
The project now has access to Phidgets. Next, view the write your own code section located below.
Linux
If you didn't come from the Linux page, be sure to check it out first before you continue reading!
GCC
Use our examples
One of the best ways to start programming with Phidgets is to use our example code as a guide. You likely have gcc installed on your Linux machine already, but if not, you can easily get it by entering the following command in the terminal:
apt-get install gcc
Next, select an example that will work with your Phidget:
To compile the example, enter the following command in the terminal:
gcc example.c -o example -lphidget22
After compiling, you can run the program by entering the following command in the terminal:
./example
You should now have the example up and running. When you are ready, the next step is configuring your project and writing your own code!
Configure your project
When you are building a project from scratch, or adding Phidget functionality to an exisiting project, you'll need to configure your development environment to properly link the Phidget C/C++ library.
To include the Phidget C/C++ library, simply add the following line to your code:
#include <phidget22.h>
You can now compile the file as shown in the previous section.
The project now has access to Phidgets. Next, view the write your own code section located below.
Write Code
By following the instructions for your operating system and compiler above, you probably now have a working example and want to understand it better so you can change it to do what you want. This teaching section has resources for you to learn from the examples and write your own. Your main reference for writing C/C++ code will be the Phidget22 API.
Code snippets
The following code snippets describe how to do various general tasks with Phidgets. You should be able to find places in the examples where these snippets exist, and modify them to suit your requirements.
Step One: Initialize and open
Before using a Phidget, it must first be created and opened.
//Create
PhidgetDigitalInputHandle device;
PhidgetDigitalInput_create(&device);

//Open
PhidgetReturnCode ret;
ret = Phidget_open((PhidgetHandle)device);
if(ret != EPHIDGET_OK)
{
  Phidget_getErrorDescription ( returnValue, &errorString );
  printf("\n%s", errorString );
}
The variable "device" is now a handle for the Phidget. This example is specific to the Digital Input. For another device, use the correspondingly named calls in the C API.
Note that Phidget_open() opens the software object, but not hardware. So, it is not a guarantee you can use the Phidget immediately.
Also note that you can catch error codes returned by the Phidget library as we did above when using the Phidget_open() call. In other words, this should probably be present around most of your Phidget calls, especially when you are learning how to use the Phidget and debugging your code:
PhidgetReturnCode ret;
const char* errorString;
ret = /*function call here*/;
if(ret != EPHIDGET_OK)
{
  Phidget_getErrorDescription ( returnValue, &errorString );
  printf("\n%s", errorString );
}
Step Two: Wait for attachment (plugging in) of the Phidget
To use the Phidget, it must be plugged in (attached). We can handle this simply by calling openWaitForAttachment in place of the basic open. This function works for any Phidget. openWaitForAttachment will block until a connection is made to the Phidget, or the specified timeout is exceeded:
Phidget_openWaitForAttachment((PhidgetHandle)device, 5000);
Sometimes, it makes more sense to handle the attachment via an event. This would be in instances where the Phidget is being plugged and unplugged, and you want to handle these incidents. Or, when you want to use event-driven programming because you have a GUI-driven program. In these cases, an event-driven code snippet to handle the attachment might look something like this:
void CCONV OnAttachedEventHandler(PhidgetHandle Device, void *userPtr)
{
  int serial;
  const char* deviceName;
  Phidget_getDeviceSerialNumber(Device, &serial);
  Phidget_getDeviceName(Device, &deviceName);
  printf("\nHello to Device %s, Serial Number: %d", deviceName, serial);
}
And the code to set up the event handler within the code opening your device might look like:
//Code for -creating- device here....

Phidget_setOnAttachHandler((PhidgetHandle)device,OnAttachedEventHandler, NULL)

//Code for -opening- device here....
Step Three: Do things with the Phidget
You can read data and interact with your Phidget both by polling it for its current state (or to set a state), or by catching events that trigger when the data changes.
For a Phidget Digital Input or Output, the polling method of getting the input state or setting an output state looks something like this:
//Get the state from a digital input
int state;
PhidgetDigitalInput_getState(digitalInputDevice, &state);

//Set the duty cycle for a digital output
PhidgetDigitalOutput_setDutyCycle(digitalOutputDevice, 0);
To catch data changes via events, you would use something like this:
void CCONV OnStateChangeHandler(PhidgetDigitalInputHandle digitalInput, void *userPtr, int state)
{
  printf("State: %d", state);
}

//...

//Within the function that opens the device

// Insert code to create an Digital Input called 'device'

// Hook our function above into the device object
  PhidgetDigitalInput_setOnStateChangeHandler(digitalInput, OnStateChangeHandler, NULL);

// Insert code to open 'device'
Step Four: Close and delete
At the end of your program, don’t forget to close and delete the device to free any locks on the Phidget that opening the device put in place!
Phidget_close((PhidgetHandle)device);
PhidgetDigitalInput_delete(&device);
C++ events
If you want to use C++ style, object-oriented events you can do that as well. The following examples show you how to do this:
Figure out how to properly load these
Further Reading
Phidget Programming Basics - Here you can find the basic concepts to help you get started with making your own programs that use Phidgets.
Data Interval/Change Trigger - Learn about these two properties that control how much data comes in from your sensors.
Using Multiple Phidgets - It can be difficult to figure out how to use more than one Phidget in your program. This page will guide you through the steps.
Polling vs. Events - Your program can gather data in either a polling-driven or event-driven manner. Learn the difference to determine which is best for your application.
Logging, Exceptions, and Errors - Learn about all the tools you can use to debug your program.
Phidget Network Server - Phidgets can be controlled and communicated with over your network- either wirelessly or over ethernet.
