LCD1100 User Guide: Difference between revisions
No edit summary |
No edit summary |
||
| Line 1: | Line 1: | ||
__NOINDEX__ | __NOINDEX__ | ||
<metadesc>Control a 64x128-pixel LCD display from a VINT port with this graphic LCD Phidget.</metadesc> | |||
[[Category:UserGuide]] | [[Category:UserGuide]] | ||
==Getting Started== | |||
== | {{UGIntro|LCD1100}} | ||
* [{{SERVER}}/products.php?product_id=LCD1100 LCD1100 - Graphic LCD Phidget] | |||
* {{VINTHub}} | |||
* {{CT|PhidgetCable|Phidget cable}} | |||
* USB cable and computer | |||
Next, you will need to connect the pieces:[[Image:LCD1100_Functional.jpeg|500px|right|link=]] | |||
# Connect the LCD1100 to the VINT Hub using the Phidget cable. | # Connect the LCD1100 to the VINT Hub using the Phidget cable. | ||
# Connect the VINT Hub to your computer with a USB cable. | # Connect the VINT Hub to your computer with a USB cable. | ||
Revision as of 22:49, 27 August 2018
Getting Started
Welcome to the LCD1100 user guide! In order to get started, make sure you have the following hardware on hand:
- LCD1100 - Graphic LCD Phidget
- VINT Hub
- Phidget cable
- USB cable and computer
Next, you will need to connect the pieces:
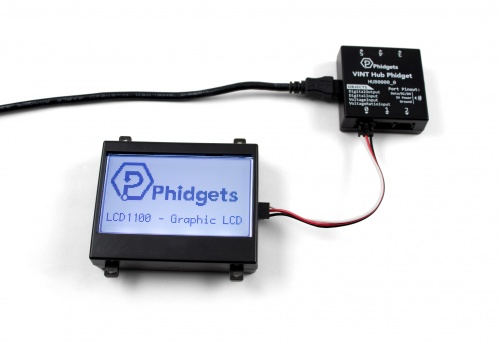
- Connect the LCD1100 to the VINT Hub using the Phidget cable.
- Connect the VINT Hub to your computer with a USB cable.
Using the LCD1000
Phidget Control Panel
In order to demonstrate the functionality of the LCD1100, the Phidget Control Panel running on a Windows machine will be used.
The Phidget Control Panel is available for use on both macOS and Windows machines.
Windows
To open the Phidget Control Panel on Windows, find the ![]() icon in the taskbar. If it is not there, open up the start menu and search for Phidget Control Panel
icon in the taskbar. If it is not there, open up the start menu and search for Phidget Control Panel
macOS
To open the Phidget Control Panel on macOS, open Finder and navigate to the Phidget Control Panel in the Applications list. Double click on the ![]() icon to bring up the Phidget Control Panel.
icon to bring up the Phidget Control Panel.
For more information, take a look at the getting started guide for your operating system:
Linux users can follow the getting started with Linux guide and continue reading here for more information about the LCD1100.
First Look
After plugging the LCD1100 into your computer and opening the Phidget Control Panel, you will see something like this:
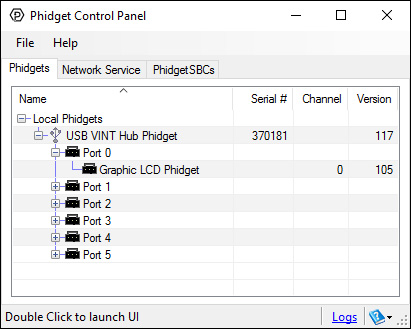
The Phidget Control Panel will list all connected Phidgets and associated objects, as well as the following information:
- Serial number: allows you to differentiate between similar Phidgets.
- Channel: allows you to differentiate between similar objects on a Phidget.
- Version number: corresponds to the firmware version your Phidget is running. If your Phidget is listed in red, your firmware is out of date. Update the firmware by double-clicking the entry.
The Phidget Control Panel can also be used to test your device. Double-clicking on an object will open an example.
Graphic LCD
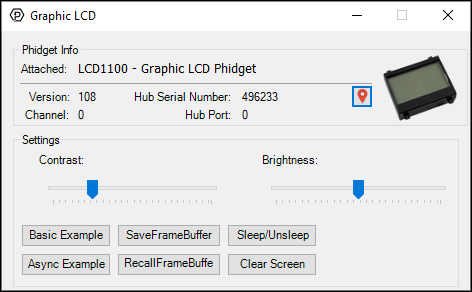
When you double click on a Graphic LCD object, a window like the one pictured will open.
- At the top of the window, information about your device and the properties of this particular channel will be listed.
- In the middle, brightness and contrast of the LCD screen can be adjusted.
- At the bottom, there are a number of buttons to demonstrate the functionality of the graphics LCD:
- Basic Example: Write some text, lines, boxes and a bitmap to the screen.
- SaveFrameBuffer: Save the current screen to memory.
- RecallFrameBuffer: Load the saved screen from memory and print it to the screen.
- Async Example: Prints a bitmap to the screen asynchronously (can occur while other draw functions are still running).
- Sleep/Unsleep: Toggles sleep mode, where the Phidget is still attached but in a minimal power consumption state.
- Clear Screen: Erases the screen.
Finding The Addressing Information
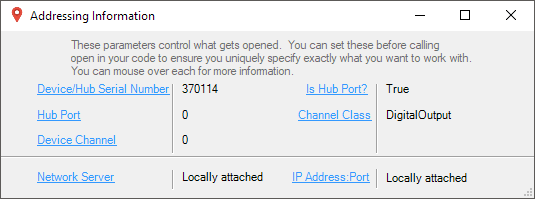
Before you can access the device in your own code, and from our examples, you'll need to take note of the addressing parameters for your Phidget. These will indicate how the Phidget is physically connected to your application. For simplicity, these parameters can be found by clicking the button at the top of the Control Panel example for that Phidget.

In the Addressing Information window, the section above the line displays information you will need to connect to your Phidget from any application. In particular, note the Channel Class field as this will be the API you will need to use with your Phidget, and the type of example you should use to get started with it. The section below the line provides information about the network the Phidget is connected on if it is attached remotely. Keep track of these parameters moving forward, as you will need them once you start running our examples or your own code.
Using Your Own Program
You are now ready to start writing your own code for the device. The best way to do that is to start from our examples:
This Phidget is compatible with the LCD Examples.
Once you have your example, you will need to follow the instructions on the page for your programming language to get it running. To find these instructions, select your programming language from the Software Overview page.
Technical Section
Custom Characters
Bitmaps
Bitmaps define images to be drawn on the screen of the Graphic LCD display. Bitmaps on the Graphic LCD display are made up of pixels arranged in a grid with a size defined when the bitmap is drawn.
You can create a bitmap by defining a byte array of ones and zeroes. Ones are colored in, and zeroes are empty. If you put a line break after each row, it'll be easy to edit the bitmap.
In C#, this may look something like this:
Byte[] heart = 	[0,0,0,0,0,
		 0,1,0,1,0,
		 1,1,1,1,1,
		 1,1,1,1,1,
		 0,1,1,1,0,
		 0,0,1,0,0,
		 0,0,0,0,0,
		 0,0,0,0,0];

gLCD.WriteBitmap(0, 0, 5, 8, heart);
Custom Characters
Custom characters are images associated with given unicode characters. A custom character can be any arrangement of pixels within the space allotted for a single character. Single characters are made up of pixels arranged in a grid with a size defined by setFontSize().
As with regular bitmaps for the Graphic LCD display, you can create a character bitmap by defining a byte array of ones and zeroes. Ones are colored in, and zeroes are empty. If you put a line break after each row, it'll be easy to edit the bitmap.
In C#, this may look something like this:
Byte[] heart = 	[0,0,0,0,0,
		 0,1,0,1,0,
		 1,1,1,1,1,
		 1,1,1,1,1,
		 0,1,1,1,0,
		 0,0,1,0,0,
		 0,0,0,0,0,
		 0,0,0,0,0];

gLCD.SetFontSize(LCDFont.User2, 5, 8);
gLCD.SetCharacterBitmap(LCDFont.User2,"\x6",heart);
Once stored, characters can be recalled into a text string by using the unicode value for the location (in this example, "\x6"). For example, in C#:
gLCD.WriteText(LCDFont.Dimensions_5x8, 0, 0,"I \x6 Phidgets!");
Custom characters on the LCD1100 are stored as images on the frame buffer for their font.
FONT_User1 is stored on frame buffer 1 and FONT_User2 is on frame buffer 2.
These characters occupy the same space as drawings on their framebuffer, and will be displayed onscreen if their framebuffer is flushed. They can also be overwritten by using drawing funcitons on their framebuffer, so it is recommended to only use a given framebuffer either for drawing or storing fonts, but not both.
We recommend using FONT_User2 (frame buffer 2) to store custom fonts, as it can be saved for later use.
In order to use the custom fonts, you must first define their size with setFontSize(). Once the font size is set, custom characters will be placed on the font's frame buffer at a location corresponding to the character number provided.
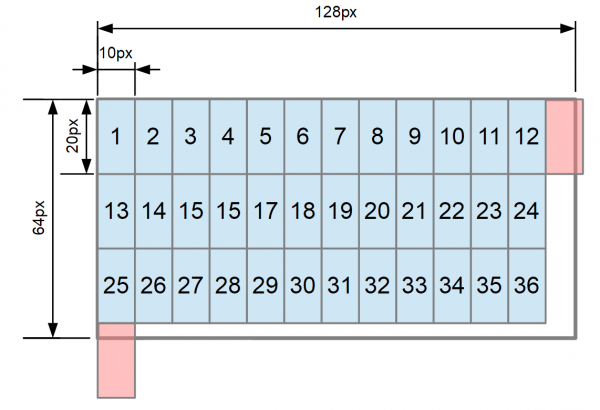
Characters for each font are stored in rows ordered left-to-right, top-to-bottom. Rows are filled with as many characters as will completely fit across the width of the screen. There are as many rows as will fit on the screen vertically.
On a screen 128 pixels wide by 64 pixels high, if your font is 10 pixels wide by 20 high, you will have 3 rows of 12 characters. This allows for a maximum of 36 characters of that size.
To quickly determine how many characters can be in your custom font, you can call
getMaxCharacters() in your code.
Custom character indexing starts with character 0x01 and can be any character between 0x01 and the maximum number of characters that fit on screen.
To determine if an ascii character can be used in a given custom font, you can look at its corresponding ascii value on an ascii table to determine if it is within the limit determined above.
What to do Next
- Programming Languages - Find your preferred programming language here and learn how to write your own code with Phidgets!
- Phidget Programming Basics - Once you have set up Phidgets to work with your programming environment, we recommend you read our page on to learn the fundamentals of programming with Phidgets.

