Language - Java
Java is a modern, object-oriented programming language maintained by Oracle.
Introduction
If this is your first time working with a Phidget, we suggest starting with the Getting Started page for your specific device. This can be found in the user guide for your device. That page will walk you through installing drivers and libraries for your operating system, and will then bring you back here to use Java specifically. Java is capable of using the complete Phidget22 API, including events. We also provide example code in Java for all Phidget devices.
Java can be developed with the javac command line compiler as well as in integrated development environments (IDEs) such as Netbeans and Eclipse.
Quick Downloads
List of download links, to be added once files are available
Documentation
Example Code
Libraries and Drivers
Getting Started with Java
If you are new to writing code for Phidgets, we recommend starting by running, then modifying existing examples. This will allow you to:
- Make sure your libraries are properly linked
- Go from source code to a test application as quickly as possible
- Ensure your Phidget is hooked up properly
Instructions are divided up by operating system. Choose:
- Windows XP / Vista / 7
- OS X
- Linux (including PhidgetSBC)
Windows
Describe Phidget library includes, and detail a step-by-step guide to get examples running in each supported IDE
- Javac
- Netbeans
- Eclipse
Javac (Command Line)
Download the examples and unpack them into a folder. Here, you can find an example program called HelloWorld which will work with any Phidget. You can also find example programs for all the devices. The source file will be named the same as the software object for your device. If you are not sure what the software object for your device is, find your Phidget in the drop-down menu on the Phidget22 API. A list of objects that Phidget uses will appear in the next drop-down menu. Please only use the simple examples. The full examples are intended for the NetBeans IDE.
Ensure that the phidget22.jar is in the same directory as the source code.
To compile in the Windows command prompt:
javac -classpath .;phidget22.jar example.java
This will create Java bytecode in the form of .class files. Type the following to run the program:
javac -classpath .;phidget22.jar example
If you wish, you can compile the project as a .jar so there are fewer files to maintain. The Java SDK provides the jar utility which packages all the .class files into a single .jar file. To begin, you will have to provide a Manifest file to indicate the program entry point. With your favourite text editor, create a new file with the following content:
Manifest-Version: 1.0
Class-Path: phidget22.jar
Main-Class: example
Ensure that the file ends in a single new line or a carriage return character. Save the file as example.mf and place it in the same directory as the other .class files. Next, create the .jar with:
jar -cfm example.jar example.mf *.class
Afterwards, you can run the .jar with:
java -jar example.jar
Once you have the Java examples running, we have a teaching section below to help you edit them.
Write your own code
When you are building a project from scratch, or adding Phidget function calls to an existing project, you'll need to configure your development environment to properly link the Phidget Java library. Please see the previous section for instructions. In your code, you will need to include the Phidget Java library:
import com.phidget22.*
NetBeans
Use our examples
You first download the examples, unpack them into a folder, and then find the source code for your device. The source file will be named the same as the software object for your device. If you are not sure what the software object for your device is, find your Phidget in the drop-down menu in the Phidget22 API. To use the examples you will have to import the source code into a new NetBeans project.
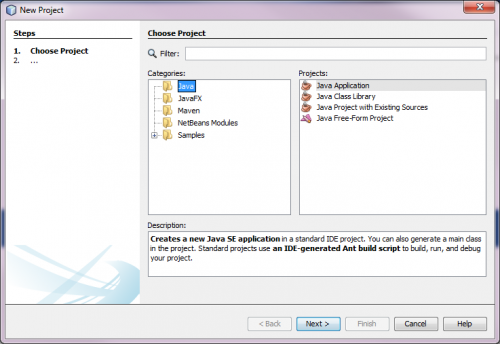
Start by creating a new project
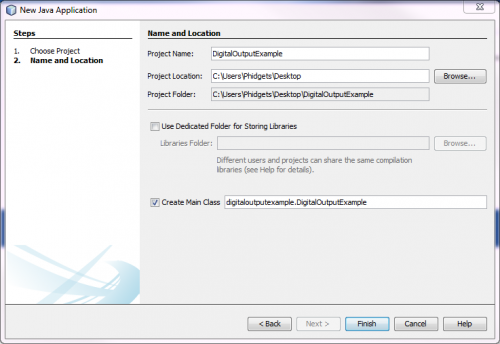
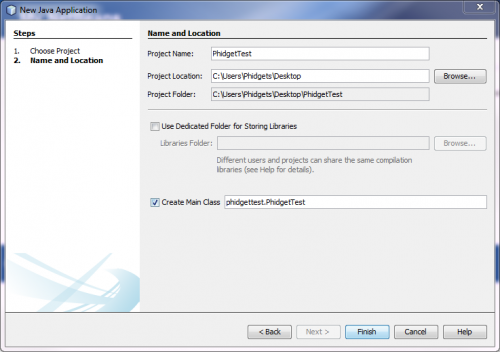
Next give your project a name.
Now you can delete the java file that was generated for your project and drag the java file from the examples folder into its place.
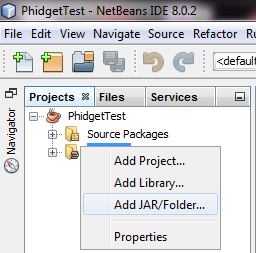
Add the phidget22.jar to the project. Do this by expanding your project and right clicking on the libraries tab.
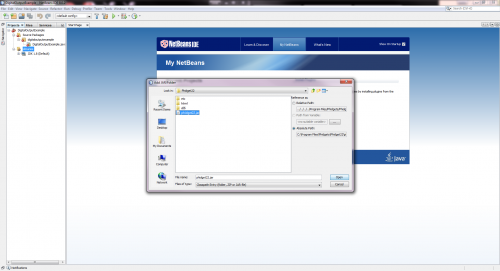
Find and select phidget22.jar
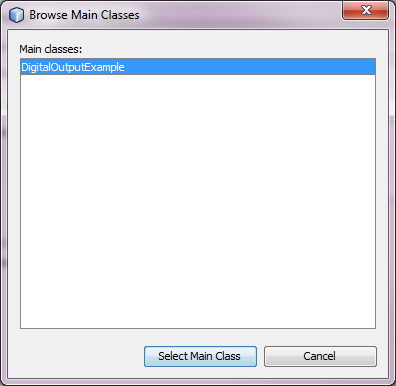
Finally, right click the project and go to properties. Select Run from categories and change the main class to the appropriate class.
Now the only thing to do is run the project!
Use our examples
When you are building a project from scratch, or adding Phidget function calls to an existing project, you'll need to configure your development environment to properly link the Phidget Java library. To begin: 1. Create a new Java application project with a descriptive name such as PhidgetTest.
2. Add a reference to the Phidget Java library. In the projects pane, right click Libraries and add the jar.
3. Find and select phidget22.jar
4. Then in your code, you will need to include the Phidget Java Library
import com.phidget22.*
The project now has access to the Phidget function calls and you are ready to begin coding.
Eclipse
Use our examples
1. Download the examples and unpack them into a folder. Here, you can find an example program called HelloWorld which will work with any Phidget. You will also find example programs for all the devices. The source file will be named the same as the software object for your device. If you are not sure what the software object for your device is, find your Phidget in the drop-down list on the Phidget22 API.
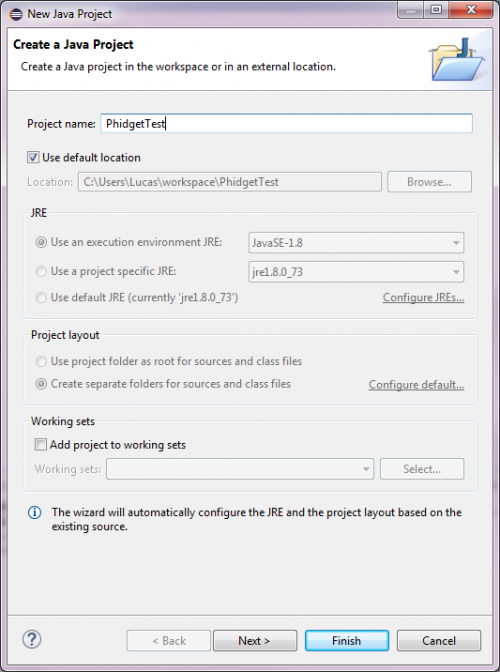
2. Generate a new Java project with a descriptive name such as PhidgetTest. Click next.
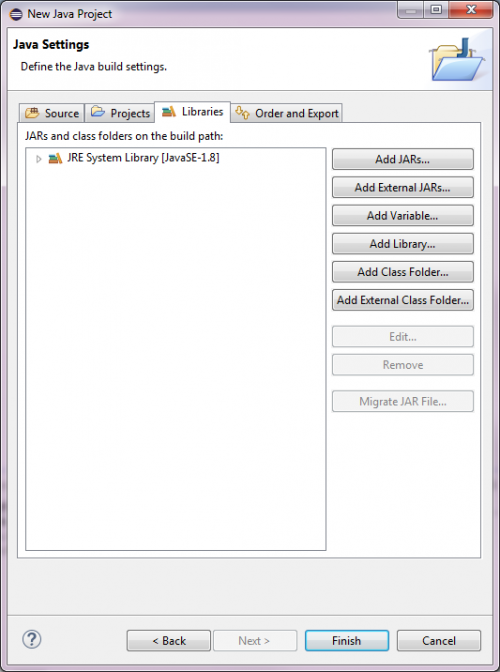
3. On the next screen, go to the libraries panel and add an external jar
4. Find and select phidget22.jar
5. Drag the example java file into the src folder that has been created for you.
6. Now the only thing left to do is run the examples!
Write your own code
When you are building a project from scratch, or adding Phidget function calls to an existing project, you'll need to configure your development environment to properly link the Phidget Java library. Please see the Use Our Examples section for instructions.
Follow instructions above for adding phidget22.jar to your project.
Next, your code will need to include the Phidget Java library:
import com.phidget22.*
The project now has access to the Phidget function calls and you are ready to begin coding.
OS X
Use our examples
The commands to compile in a OS X and Windows terminal are slightly different. Rather than prefixing phidget22.jar with a semi-colon( ; ), a colon( : ) is used. Make sure that the phidget22.jar file is in the same directory as the code you are trying to compile.
javac -classpath .:phidget22.jar example.java
Then, to run the program:
java -classpath .:phidget22.jar example
This method can be used on any of the examples. If you are interested in using an IDE then refer to the Windows section for information about setting up Phidgets projects in Eclipse or Netbeans.
Write your own code
With the method just discussed, notice that you need to link the phidget22.jar both at compile, and runtime. An alternative is to make a jar file of your program which includes the Phidget Java library. To do this first create a manifest file. A manifest is a text file used to define package related data. Make a text file called MyProgram.mf, where MyProgram is replaced by the name of your main class. Put the following lines into MyProgram.mf:
Manifest-Version: 1.0
Class-Path: phidget22.jar
Main-Class: MyProgram
Note: The manifest file should end with a carriage return. So, there should be an extra line at the bottom of the file. After creating the manifest file, you can use the jar function to create one self-contained file with your classes and the correct classpath.
jar –cfm MyProgram.jar MyProgram.mf *.class
Not sure if the following is still valid
If porting this for an external system, such as one that your customer would be running, the Phidget library would need to be compiled and distributed along with the .jar. Although we do not directly support this, if you are interested in how to construct this, we provide both a distribution example and information on cross-compiling: The Android Java libraries have an ARM-compiled libphidget22.so file included, as an example of distributing a compiled libphidget22.so with the jar file The Linux page has more detail for compiling the Phidget C Libraries for an external target.
Netbeans
We offer in-depth tutorials on using our examples in NetBeans and Eclipse in the Windows NetBeans and Windows Eclipse sections.
As our full examples are written with NetBeans, but NetBeans is not part of the standard OS X application suite, we offer installation instructions here before referring to the Windows sections.
Installation
To install NetBeans on a Mac, all you have to do is download the installer from their website and run it.
Use our examples
Once you have NetBeans installed, running our examples will be very similar to the process described in the Windows NetBeans section.
Write your own code
When you are building a project from scratch, or adding Phidget function calls to an existing project, you'll need to configure your development environment to properly link the Phidget Java library. Please see the Windows NetBeans section for instructions if you are unfamiliar with NetBeans.
In your code, you will need to include the Phidget Java library:
import com.phidget22.*
The project now has access to the Phidget function calls and you are ready to begin coding.
Linux Unsure about information in this section
Java has excellent support on Linux - there is an established implementation of the Java compiler and interpreter, and several Integrated Development Environments (IDEs) including NetBeans and Eclipse.
The first step in using Java on Linux is to install the base Phidget libraries. Compile and install them as explained on the main Linux page. That Linux page also describes the different basic Phidget library files, their installed locations, and their roles.
You will also need the Phidget Java Libraries (phidget22.jar).
Once downloaded, the phidget22.jar library file does not get 'installed' (i.e. do not run java -jar phidget22.jar). Rather, the library file gets put into the path of whatever program you write, and you will link it via both the java compiler and the java interpreter. We walk you through this below.
Description of Library Files
The Phidget Java libraries depend on the C libraries being installed as explained on the main Linux page. If you browse around within the phidget22.jar archive, you will find Java class files (too many to reasonably list here) that have names related to the devices they provide an API for.
These Java class files use the functions available in the dynamic Phidget22 C-language library on Linux. Dynamic libraries end with .so, and so the C library that the Phidget Java class files use is /usr/lib/libphidget22.so.
Javac (Command Line)
Use our examples
Linux gets somewhat complicated in that two Java compilers exist: openjdk and gcj. Furthermore, a given IDE can usually use either compiler. That being said, we only offer support here for openJDK and IDEs running openJDK.
To find out which type of compiler your computer has, use the -version option on the command line. You can use the same option for your runtime environment (interpreter):
$> java -version
java version "1.6.0_23"
OpenJDK Runtime Environment (IcedTea6 1.11pre) (6b23~pre11-0ubuntu1.11.10.1)
OpenJDK 64-Bit Server VM (build 20.0-b11, mixed mode)

$> javac -version
javac 1.6.0_23
The good news is that you can have both openjdk and gcj on your machine, co-habitating happily. There can be only one linked java and javac in /usr/bin/ however, and so this will correspond to whichever java compiler and interpreter you installed last.
If you do not have openjdk installed already (this is the default Java installation for most Linux machines, so you will probably know), and you choose to install it for Phidget purposes, it is important is that the java version be greater than the javac version. Otherwise, your runtime environment will consider the stuff your compiler produces to be newfangled nonsense. So when installing Java from a repository, you should install both the jdk and the jre. These are, unfortunately, usually separate packages in a repository (e.g. openjdk-7-jre and openjdk-7-jdk).
The simple examples in Java are meant to be compiled and run on the command line. The example package includes a Makefile so you can either make all of the examples at once, with:
make all
...Or you can make them individually. You can either use:
- The HelloWorld example, which will work with any Phidget, or
- The example with the name that corresponds to the family (software object) of your Phidget hardware.
The source file will be named the same as the software object for your device. If you are not sure what the software object for your device is, find your Phidget on our webpage, and then check the Phidget22 API documentation for it. Once you've identified the right example - say, HelloWorld.java - compile it on the command line with:
javac -classpath .:phidget22.jar HelloWorld.java
To run the example on a Linux machine without your udev USB rules set, you will need to run the Java example as root:
javac -classpath .:phidget22.jar HelloWorld.java
Write your own code
You'll note that the Phidget Java library file phidget22.jar needs to be explicitly linked at both points in the compile and run process. Alternatively, you can make a jar file which includes the Phidget Java library. This process takes two steps, the first of which is creating a text file called MyProgram.mf, where MyProgram is replaced by the name of your main class in both the filename and the text below:
Manifest-Version: 1.0
Class-Path: phidget22.jar
Main-Class: MyProgram
Note: The manifest file should end with a carriage return. So, there should be an extra line at the bottom of the file. After creating the manifest file, you can use the jar function to create one self-contained file with your classes and the correct classpath.
jar –cfm MyProgram.jar MyProgram.mf *.class
If porting this for an external system, such as one that your customer would be running, the Phidget library would need to be compiled and distributed along with the .jar. Although we do not directly support this, if you are interested in how to construct this, we provide both a distribution example and information on cross-compiling:
- The Android Java libraries have an ARM-compiled libphidget22.so file included, as an example of distributing a compiled libphidget22.so with the jar file
- The Linux page has more detail for compiling the Phidget C Libraries for an external target.
NetBeans
We offer in-depth tutorials on using our examples in NetBeans and Eclipse in the Windows NetBeans and Windows Eclipse sections.
Installation
Although Eclipse is standard in the Debian/Ubuntu package repository, NetBeans is no longer standard. What is more, Netbeans does not install by default into a folder within your path.
To install NetBeans:
1. Download the install script from website: http://netbeans.org/downloads/
2. Change the permissions of the downloaded file to be executable. Usually, this is something like:
chmod +x netbeans-7.1-ml-javase-linux.sh 3. Run the downloaded file as a script. (This will result in a GUI interaction that walks you through installation.)
4. To find the location where the NetBeans installation occurred, run: updatedb locate netbeans
5. Usually, the location of the binary is /usr/local/netbeans-7.1/bin/netbeans, where 7.1 is the installed version.
Use our examples
Once you have NetBeans installed, running our examples will be very similar to the process described in the Windows NetBeans section
Write your own code
When you are building a project from scratch, or adding Phidget function calls to an existing project, you'll need to configure your development environment to properly link the Phidget Java library. Please see the Windows NetBeans section for instructions if you are unfamiliar with NetBeans. In your code, you will need to include the Phidget Java library:
import com.phidget22.*
The project now has access to the Phidget function calls and you are ready to begin coding.
Edit the Examples
By following the instructions for your operating system and compiler above, you probably now have a working example and want to understand it better so you can change it to do what you want. This teaching section has resources for you to learn from the examples and write your own. Your main reference for writing Java code will be the Phidget22 API.
Code Snippets
When programming in Java, you're in luck. All of our code snippet examples on our Phidget Programming Basics page are in both C++ and Java. Therefore, we do not include any here, because that page is much more in-depth, and you won't have to have two pages open at once. So head over there, and start writing code!
Further Reading
Phidget Programming Basics - Here you can find the basic concepts to help you get started with making your own programs that use Phidgets.
Data Interval/Change Trigger - Learn about these two properties that control how much data comes in from your sensors.
Using Multiple Phidgets - It can be difficult to figure out how to use more than one Phidget in your program. This page will guide you through the steps.
Polling vs. Events - Your program can gather data in either a polling-driven or event-driven manner. Learn the difference to determine which is best for your application.
Logging, Exceptions, and Errors - Learn about all the tools you can use to debug your program.
Phidget Network Service - Phidgets can be controlled and communicated with over your network- either wirelessly or over ethernet.
Common Problems and Solutions/Workarounds
If you know of common problems using this lanaguage (for example, having to create sub-VIs when using multiple phidgets in labview) put them here.

