LED1000 User Guide
Part 1: Setup
Welcome to the LED1000 user guide! In order to get started, make sure you have the following hardware on hand:
- LED1000 - 32x Isolated LED Phidget
- VINT Hub
- Phidget cable
- USB cable and computer
- LEDs and cables
Next, you will need to connect the pieces:
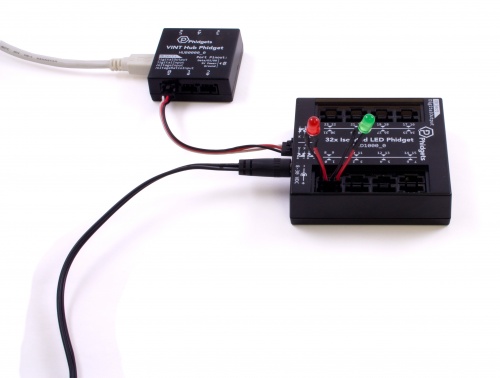
- Connect the LED1000 to the VINT Hub using the Phidget cable.
- Connect some LEDs to the LED Phidget's ports.
- Connect the VINT Hub to your computer with a USB cable.
Now that you have everything together, let's start using the LED1000!
Phidget Control Panel
In order to demonstrate the functionality of the LED1000, the Phidget Control Panel running on a Windows machine will be used.
The Phidget Control Panel is available for use on both macOS and Windows machines.
Windows
To open the Phidget Control Panel on Windows, find the ![]() icon in the taskbar. If it is not there, open up the start menu and search for Phidget Control Panel
icon in the taskbar. If it is not there, open up the start menu and search for Phidget Control Panel
macOS
To open the Phidget Control Panel on macOS, open Finder and navigate to the Phidget Control Panel in the Applications list. Double click on the ![]() icon to bring up the Phidget Control Panel.
icon to bring up the Phidget Control Panel.
For more information, take a look at the getting started guide for your operating system:
Linux users can follow the getting started with Linux guide and continue reading here for more information about the LED1000.
First Look
After plugging the LED1000 into your computer and opening the Phidget Control Panel, you will see something like this:
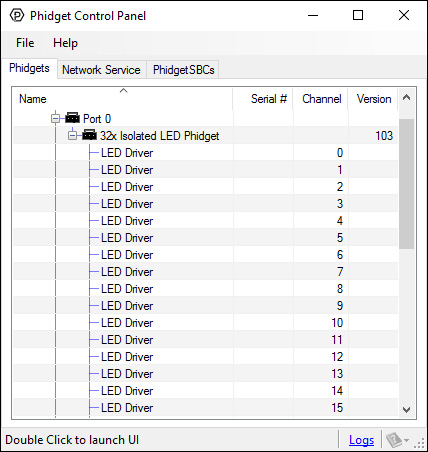
The Phidget Control Panel will list all connected Phidgets and associated objects, as well as the following information:
- Serial number: allows you to differentiate between similar Phidgets.
- Channel: allows you to differentiate between similar objects on a Phidget.
- Version number: corresponds to the firmware version your Phidget is running. If your Phidget is listed in red, your firmware is out of date. Update the firmware by double-clicking the entry.
The Phidget Control Panel can also be used to test your device. Double-clicking on an object will open an example.
Part 2: Using Your Phidget
About
The LED1000 is a dimmable LED controller. With this Phidget you can control the voltage, current limit, and duty cycle of up to 32 LEDs.
Explore Your Phidget Channels Using The Control Panel
You can use your Control Panel to explore your Phidget's channels.
1. Open your Control Panel, and you will find the following channels:

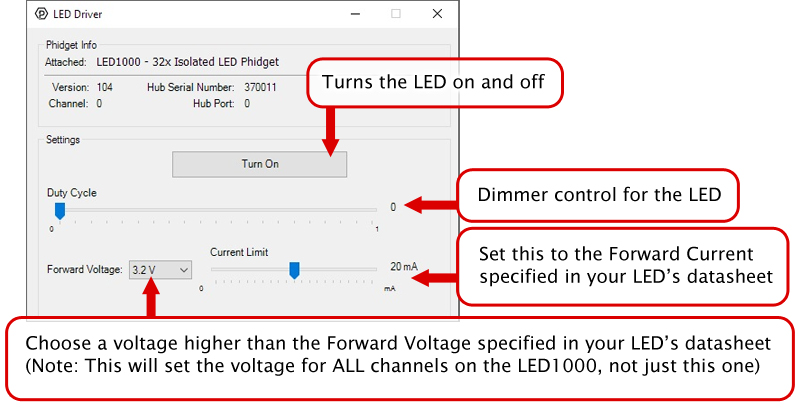
2. Double click on a channel to open an example program. Each channel belongs to the DigitalOutput channel class:
In your Control Panel, double click on "LED Driver":
Part 3: Create your Program
Part 4: Advanced Topics and Troubleshooting
Before you open a Phidget channel in your program, you can set these properties to specify which channel to open. You can find this information through the Control Panel.
1. Open the Control Panel and double-click on the red map pin icon:

2. The Addressing Information window will open. Here you will find all the information you need to address your Phidget in your program.
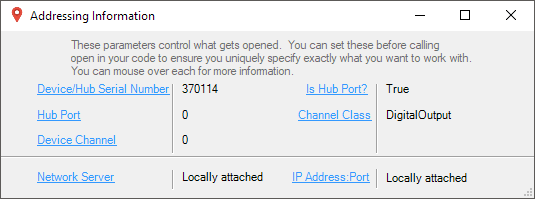
See the Phidget22 API for your language to determine exact syntax for each property.
You can have multiple LEDs hooked up to a single channel on the LED1000, (for example, a short string of LEDs) to reduce the amount of wiring, although you won't be able to control the lights individually. When using multiple LEDs on a single channel, you may need to increase the voltage limit for that channel. If the LEDs are too dim at the maximum voltage, you should spread them out to other channels.
If you're using high-current LEDs, you should spread your load evenly across the board to avoid having one of the controller chips overheat. There are two controller chips, each controlling the channels on one half of the board.
| Controller | Channels |
| 1 | 0, 1, 2, 3, 4, 5, 6, 7, 8, 9, 10, 11, 12, 13, 14, 15 |
| 2 | 16, 17, 18, 19, 20, 21, 22, 23, 24, 25, 26, 27, 28, 29, 30, 31 |
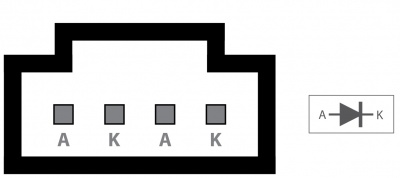
The connector used on the LED1000 is a Molex 70543-0003.
The mating connector used on our LED cables is the Molex 50-57-9404.
