Language - C Sharp
Quick Downloads
Documentation
- Phidget22 API (Select C# from drop-down menu)
Example Code
Libraries and Drivers
- Windows Drivers Installer (32-Bit)
- Windows Drivers Installer (64-Bit)
- Windows Development Libraries
- macOS Installer
- Linux Libraries
- Linux Phidget Network Server
Getting Started with C#
Welcome to using Phidgets with C#! By using C#, you will have access to the complete Phidget22 API, including events. We also provide example code in C# for all Phidget devices.
If you are developing for Windows, keep reading. Otherwise, select your operating system to jump ahead:
Windows
If you didn't come from the Windows page, be sure to check it out first before you continue reading!
Visual Studio
Use Our Examples
One of the best ways to start programming with Phidgets is to use our example code as a guide. In order to run the the examples, you will need to download and install Microsoft Visual Studio.
Now that you have Microsoft Visual Studio installed, download and unpack the examples:
Next, select an example that will work with your Phidget. Remember: your Phidget may have multiple channels, each one corresponding to a different class, and therefore, a different example. Open the .sln of the example you would like to use for your Phidget and follow these steps:
Start the example by pressing the Start button.

The application will open the Phidget and show you some basic information. Here is an example of a Digital Output channel on a RFID Phidget:
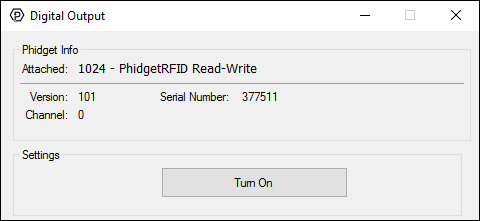
You should now have the example up and running for your device. Play around with the device and experiment with some of the functionality. When you are ready, the next step is configuring your project and writing your own code!
Configure your project
When you are building a project from scratch, or adding Phidget functionality to an existing project, you'll need to configure your development environment to properly link the Phidget C# libraries. To begin:
1. Create a new Windows Forms Application project:
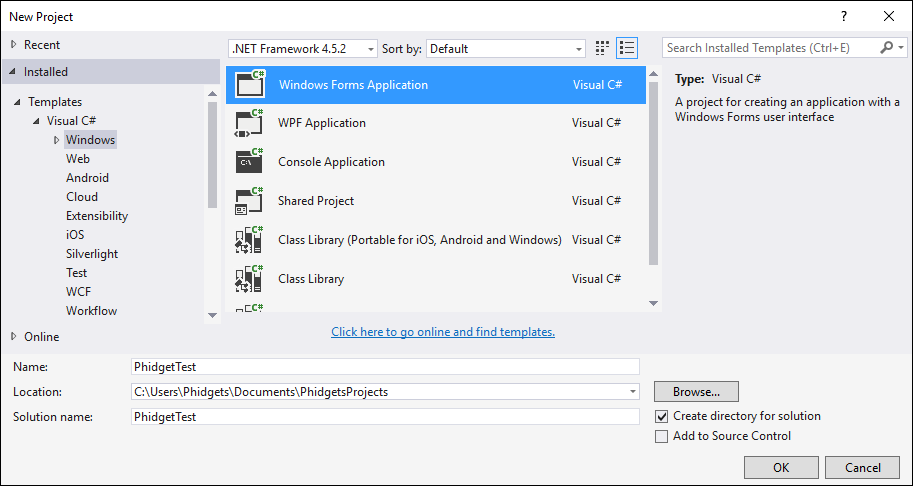
2. Add a reference to the Phidget .NET library:
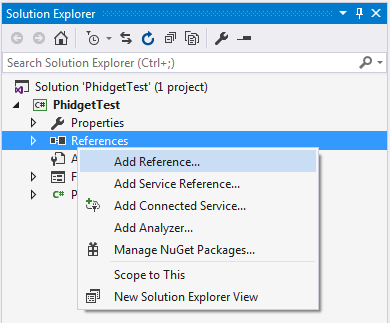
3. Click Browse... and navigate to the location of Phidget22.NET.dll (C:\Program Files\Phidgets\Phidget22.NET.dll)

4. Finally, to include the Phidget .NET library, add the following line to main window class file:
using Phidget22;
using Phidget22.Events;
Success! The project now has access to the Phidgets. Next, view the write your own code section located below.
Mono
This section will provide instructions on how to compile using the mcs compiler. Other compilers such as gmcs, smcs, and dmcs all work in the same way.
Use Our Examples
Download the examples and unpack them into a folder. Here, you can find the HelloWorld program that will work with any Phidget.
Note that the HelloWorld program is the only example that will work with Mono. The full examples use Windows Forms, which Mono and the Gtk# toolkit are not completely compatible with. Locate the Program.cs file as this contains the example source code. Copy the file into your working directory.
Place Phidget22.NET.dll in the same directory as your source code.
To compile and build an executable, run:
mcs /out:example.exe /r:phidget22.NET.dll Program.cs
If you have the Phidget22.NET.dll installed in another location, please change the path to the file's location accordingly.
Afterwards, you will have an executable named example.exe that you can run. Type the following to run the program:
mono example.exe
Once you have the HelloWorld example running, we have a teaching section below to help you follow them.
Write Your Own Code
When you are building a project from scratch, or adding Phidget function calls to an existing project, you'll need to configure your development environment to properly link the Phidget .NET library. Please see the Use Our Examples section for instructions.
In your code, you will need to include the Phidget .NET library:
using Phidget22;
using Phidget22.Events;
The project now has access to the Phidget function calls and you are ready to begin coding.
The same teaching section which describes the examples also has further resources for programming your Phidget.
MonoDevelop/Xamarin Studio
Use Our Examples
Download the examples and unpack them into a folder. Here, you can find example programs for all the devices, as well as a HelloWorld program that will work with any Phidget. The source file will be named the same as the software object for your device. If you are not sure what the software object for your device is, find your Phidget on our webpage, and then check the API documentation for it.
These examples were written in Visual Studio 2015, but are also compatible with MonoDevelop/Xamarin Studio.
To load all projects in MonoDevelop/Xamarin Studio, go to File → Open, and open AllExamples/AllExamples.sln
This will load all of the examples available for C#, and then you can set your main project to be the one that matches your device. If you are running under the .NET framework, you can use either the full or simple examples. Otherwise, if you are running under the Mono framework, please only use the simple examples. The full examples uses Windows Forms, which is not completely compatible with Mono's Gtk#.
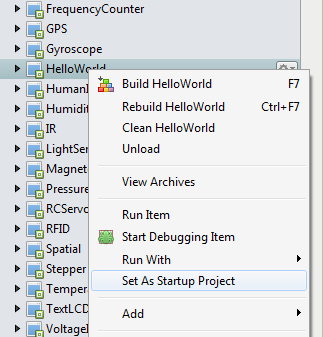
The only thing left to do is to run the examples! Right click the project, and click on Run With and select the target framework. Please note that the projects, by default try to find the Phidget22.NET.dll in the C\Program Files\Phidgets\Phidget22. If you have it installed in another location, please change the path to the file's location accordingly. If you are receiving an error message regarding that the namespace Phidget22 cannot be found, please re-add the reference to Phidget22.NET.dll. Please see the Write Your Own Code section for details.
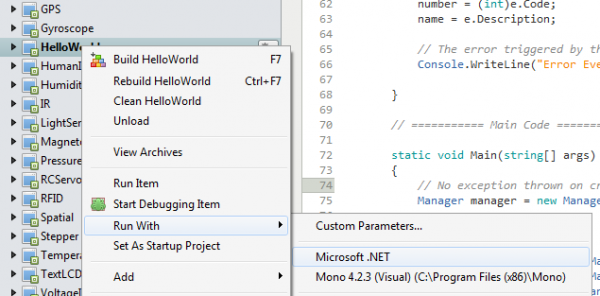
Once you have the C# examples running, we have a teaching section below to help you follow them.
Write Your Own Code
When you are building a project from scratch, or adding Phidget function calls to an existing project, you'll need to configure your development environment to properly link the Phidget .NET library. To begin:
1. Create a new C# .NET Console project with a descriptive name such as PhidgetTest.
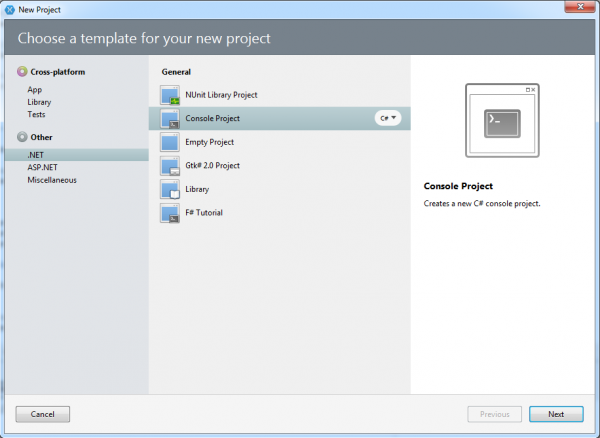
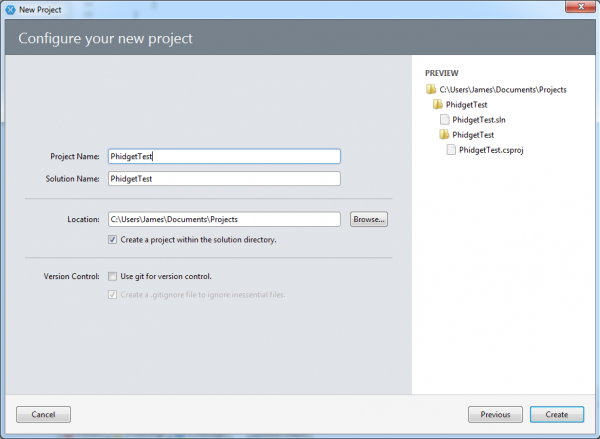
2. Add a reference to the Phidget .NET library.
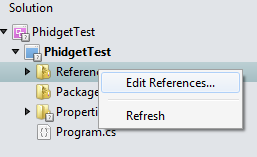
3. Select Phidget22.NET.dll. If you used our installer, by default, this file is placed in C:\Program Files\Phidgets\Phidget22. If it is in another location, please change the path to the file's location accordingly.
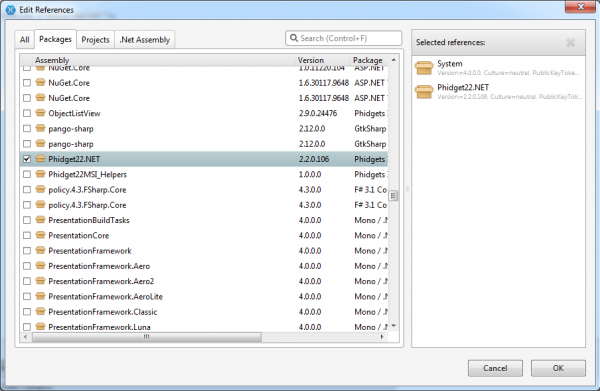
4. Then, in your code, you will need to include the Phidget .NET library:
  using Phidgets;
  using Phidgets.Events;
The project now has access to the Phidget function calls and you are ready to begin coding.
The same teaching section which describes the examples also has further resources for programming your Phidget.
macOS
Use Our Examples
The first thing you are going to need to do is install Mono (Note that Mono is only available for Intel Macs and not PowerPC). You will need both the SDK and the runtime.
Then, you will need the Phidget .NET libraries. These are part of the Windows library zip file download:
Extract the library zip file. Descriptions for the files are available on the OS - Windows page, but for now we only need the Phidget22.NET.dll file to run the Phidget C# examples in Mono. So remember where you unzipped these Windows libraries - you will need to copy the Phidget22.NET.dll file into your example directory shortly.
Next, you'll want to download and extract the Phidget C# Examples (For Windows, not for .NET Compact):
One more thing needs to be done before you can compile and run the examples. You need to set up a special configuration file so that Mono knows where to find the phidget22.dll. Since Mac does not use dll's you need to redirect it to the appropriate file. Create a new file in the same directory as the example you wish to compile and name it Phidget22.NET.dll.config. Put the following into the file:
  <configuration>
	<dllmap dll="phidget22.dll" target="/Library/Frameworks/Phidget22.framework/Versions/Current/Phidget22" />
  </configuration>
All that is left is to compile and run the code. When compiling, you need to link to the Phidget library. As the Phidget22.NET file is an "additional assembly" in C#/Mono, you can link to the assembly using the -r "reference" switch:
gmcs Program.cs -r:Phidget22.NET.dll
This will compile a *.exe file - in this case, Program.exe. This you can then run under Mono:
mono Program.exe
If you will be compiling with an IDE such as GTK# or MonoDevelop, we don't have explicit instructions by IDE for OS X. However, you will probably find the MonoDevelop section in the Windows portion above useful.
Write Your Own Code
When writing your code from scratch, you start it as you would any C# code on OS X. In your .cs source code file, you must include a reference to the Phidget Library:
using Phidgets;
using Phidgets.Events;
Then, you would compile your completed C# code the same way as the examples above.
Mono also has a few different IDEs which you can use to develop code, and these are especially useful if you are doing GUI development. We provide instructions for MonoDevelop - one such IDE - being used under Windows.
To learn how to write your own code for your Phidget, and to learn more about our API, we have a teaching section to help you follow the provided C# examples and which has resources such as the API reference.
Linux
C# has support on Linux through the Mono framework.
Use Our Examples
The first step in using C# with Phidgets on Linux is to make sure that you have all of Mono installed. Although you probably have already done this if you're a C# programmer, you want to make sure you have all of the packages you'll need. Try:
sudo apt-get mono-complete
Next, you'll want to install the main Phidget Libraries. Compile and install them as explained on the main Linux page. That Linux page also describes the different Phidget files, their installed locations, and their roles.
Then, you will need the Phidget .NET libraries. These are part of the Windows library zip file download:
Extract the library zip file. Descriptions for the files are available on the OS - Windows page, but for now we only need the Phidget22.NET.dll file to run the Phidget C# examples in Mono. So remember where you unzipped these Windows libraries - you will need to copy the Phidget22.NET.dll file into your example directory shortly.
Next, you'll want to download and extract the Phidget C# Examples (For Windows, not for .NET Compact):
To check that your Linux, Phidget, and Mono setup is all working together, you'll want to run the C# examples. Specifically, you'll want to run the simple C# examples. You can either use the HelloWorld program that will work with any Phidget, or you can find the source code for your device. The source file will be named the same as the software object for your device. If you are not sure what the software object for your device is, find your Phidget on our webpage, and then check the API documentation for it.
Let's say you're running the Temperature Sensor example (for the 1048 or 1051). The source code for the example is in the directory:
TemperatureSensorExamples → TemperatureSensor-simple → TemperatureSensor-simple → Program.cs
Other examples will be in directories named appropriately for their software object name. Once you have found the example you want to run, copy the Phidget22.NET.dll file that you unzipped earlier into that example directory where the Program.cs file is.
Then, compile the code. When compiling, you need to link to the Phidget library. As the Phidget22.NET file is an "additional assembly" in C#/Mono, you can link to the assembly using the -r "reference" switch:
gmcs Program.cs -r:Phidget22.NET.dll
This will compile a *.exe file - in this case, Program.exe. This you can then run under Mono:
sudo mono Program.exe
Remember that the sudo is needed unless you have your udev rules set on your Linux system.
If you will be compiling with an IDE such as GTK# or MonoDevelop, we don't have explicit instructions by IDE for Linux. However, you will probably find the MonoDevelop section in the Windows portion above useful.
Write Your Own Code
When writing your code from scratch, you start it as you would any C# code on Linux, such as within a text editor like Emacs, Vi, Gedit, or Kate. In your .cs source code file, you must include a reference to the Phidget Library:
using Phidgets;
using Phidgets.Events;
Then, you would compile your completed C# code the same way as the examples above.
Mono also has a few different IDEs which you can use to develop code, and these are especially useful if you are doing GUI development. We provide instructions for MonoDevelop - one such IDE - being used under Windows.
To learn how to write your own code for your Phidget, and to learn more about our API, we have a teaching section to help you follow the provided C# examples and which has resources such as the API reference.
Edit the Examples
By following the instructions for your operating system and compiler above, you probably now have a working example and want to understand it better so you can change it to do what you want. This teaching section has resources for you to learn from the examples and write your own. Your main reference for writing C# code will be the Phidget22 API Manual.
Code Snippets
The following code snippets describe how to do various general tasks with Phidgets. You should be able to find places in the examples where these snippets exist, and modify them to suit your requirements.
Step One: Initialize and Open
The Open() function opens the software object, but not hardware. So, it is not a guarantee you can use the Phidget immediately.
For example, if we were using an Digital Input as our device, the create and open calls would look like this:
using Phidget22;
using Phidget22.Events;

namespace Program
{
    class Code
    {
        static void Main(string[] args)
        {
            try
            {

                // Declare a DigitalInput object
                DigitalInput device = new DigitalInput();

                // Hook in any event handlers
                // ...

                // Open the device
                device.Open();

            }
            catch (PhidgetException ex) { Console.WriteLine(ex.Description); }
        }
    }
}
Step Two: Wait for Attachment (plugging in) of the Phidget
To use the Phidget, it must be plugged in (attached). We can handle this simply by calling open with a number as a parameter in place of the basic open. This function works for any Phidget. This will block until a connection is made to the Phidget, or the specified timeout is exceeded:
device.Open(5000);
Sometimes, it makes more sense to handle the attachment via an event. This would be in instances where the Phidget is being plugged and unplugged, and you want to handle these incidents. Or, when you want to use event-driven programming because you have a GUI-driven program. In these cases, an event-driven code snippet to handle the attachment might look something like this:
void attachEventHandler(object sender, Phidget22.Events.AttachEventArgs e) {
{
  Phidget attachedDevice = (Phidget)sender;
  int serialNumber = attachedDevice.DeviceSerialNumber;
  string deviceName = attachedDevice.DeviceName;
  Console.WriteLine("Hello Device {0},  Serial Number: {1}!", deviceName, serialNumber.ToString());
}
And the code to set up the event handler within the code opening your device might look like:
//Code for -creating- device here....

device.Attach += attachEventHandler;

//Code for -opening- device here....
Step Three: Do Things with the Phidget
We recommend the use of event driven programming when working with Phidgets. This allows the program to execute other tasks until the Phidget generates a new event. You can hook a custom function into an event trigger like this, using a Digital Input Phidget as an example:
device.StateChange += input_change;
The input_change method is defined as follows:
void input_change(object sender, Phidget22.Events.DigitalInputStateChangeEventArgs e) {
    textBox1.Text = "State: " + e.State;
}
Some values can be directly read and set on the Phidget. These functions can be used inside a polling loop as an alternative to event driven programming. The line inside the loop would be something like this, after which you could do something with the value:
bool val = device.State;

device.State = true;
Step Four: Close and Delete
At the end of your program, be sure to close your device.
private void Form1_FormClosing(object sender, FormClosingEventArgs e)  {
    Private Sub Form1_FormClosing(ByVal sender As Object, ByVal e As System.Windows.Forms.FormClosingEventArgs) Handles Me.FormClosing
        If device.Attached Then
            device.Close()
        End If
    End Sub
}
Further Reading
Phidget Programming Basics - Here you can find the basic concepts to help you get started with making your own programs that use Phidgets.
Data Interval/Change Trigger - Learn about these two properties that control how much data comes in from your sensors.
Using Multiple Phidgets - It can be difficult to figure out how to use more than one Phidget in your program. This page will guide you through the steps.
Polling vs. Events - Your program can gather data in either a polling-driven or event-driven manner. Learn the difference to determine which is best for your application.
Logging, Exceptions, and Errors - Learn about all the tools you can use to debug your program.
Phidget Network Server - Phidgets can be controlled and communicated with over your network- either wirelessly or over ethernet.
