|
Notice: This page contains information for the legacy Phidget21 Library. Phidget21 is out of support. Bugfixes may be considered on a case by case basis. Phidget21 does not support VINT Phidgets, or new USB Phidgets released after 2020. We maintain a selection of legacy devices for sale that are supported in Phidget21. We recommend that new projects be developed against the Phidget22 Library.
|
MURVV - Mobile Robot Log: Difference between revisions
No edit summary |
No edit summary |
||
| Line 18: | Line 18: | ||
{{Phlog| Sept 11, 2012 - The Controller|Fraser}} | {{Phlog| Sept 11, 2012 - The Controller|Fraser}} | ||
[[File:joystick. | [[File:joystick.jpg|thumb|file=|Joystick used on MURVV|link={{SERVER}}/wiki/images/1/18/Joystick.jpg]] | ||
Revision as of 16:53, 10 October 2012
Brief description of the project.
Check out the Application Guide for this project.
Fraser
Sept 13, 2012 - The Controller, finshed
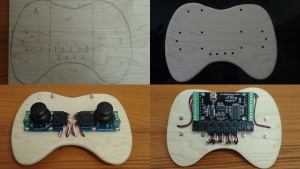
Finally got around to working on this project again. Went to a local wood dealer to find some nice thins to work with for electronics to rest on. It was hard to decide what kind of wood I wanted, they had a lot of thins in stock, and I was having trouble choosing between maple, walnut and some fancy looking cedar with a crazy red dye in it. In the end I thought that maple would look the best after being sanded down, so I went with that. I traced out the shape I wanted for the controller on to the wood, and measured out the placement and hole locations for the electronics. I then used a jig-saw to roughly cut out the shape - here it is important to leave about 0.25" around the edges so you have some room for adjustment if not happy with the size. Using a handheld rotary tool, I more delicately cut the shape out and rounded off the edges. Unfortunately I cheaped out when I bought my rotary tool way back, and it only has one speed setting, so I was burning the wood all the way around. I figured I would just cope with the burning and sand it all off later, which I did. I find that using nice sandpaper can make a big job a lot easier and gratifying. So I use the sandpaper which has a piece of foam on the back for comfort, and is made of much tougher material; as a result I get about 5-10 times the amount of use of a single piece compared to regular stuff. In the end, it turned out pretty nice and I was very impressed with the shape and feel I got. I then placed the 1018 and the two joysticks onto the wood. For the analog cables from the joysticks, I decided to go with a single hole for each; however this meant having to cut and re-solder the wires together. This is not a problem, but takes a while when working with small lengths and tight quarters, all while trying not to accidentally shrink the heat-shrink before its in place. Once this was done the controller was pretty much complete, so I had to try it out. I plugged it in, connected to MURVV, and instantly crashed it into a wall. It turns out I had reversed the joystick axes in porting to the new controller, woops. Luckily this is easily fixed in software; I made the changes and it works like a charm. The overall control of the robot is a lot more smooth and natural, and makes turning while moving forward much easier. I'd have to say this is the ideal controller setup for a strafing robot. I also added an LED to the controller for indicating when the device has its heading locked or not, since sometimes you forget and as a result the controls are completely off. In the future, I would like to add a potentiometer for adjusting the acceleration value, but it is not really imperative and I will leave it out for now.
Fraser
Sept 13, 2012 - The Controller, cont'd
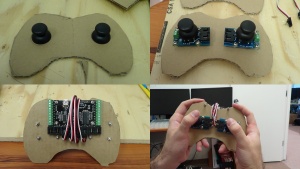
Decided to build up a quick prototype of the dual-joystick controller to see if it is actually something that would work reasonably well. Since it is just a prototype, I decided the best option was to make it out of cardboard since that would allow me to easily cut out shapes and make new pieces.
I personally really like the shape and feel of the XBOX360 controller, so I decided to model it off of that. I went online to try and find a Actual-Size photo of the controller so I could just print it, cut it out and outline it onto the cardboard, but I was not able to find any that were actually the real size. So I instead opted to look up the dimensions online and draw it out. I was able to sketch out a reasonably okay looking model, so I cut it out of the cardboard using a box-cutter. I then rested the two 1113_0 joysticks on the cardboard to find a position for them that felt comfortable. I took the caps off the 1113's in order to draw out circles where the joysticks would go; my intent was to have the joystick fit through them, but wasn't certain this would work at first. After this I cut out a second outline of the controller and mounted on the two 1113 joysticks. This part was tricky as having the screw holes go through would not leave much room for a 1018 to be mounted on the back side, so my intent was to use two of the screws from the 1113's for mounting the 1018. This meant positioning the joysticks in the right position such that they lines up with the mounting holes on the 1018. Once this was done, the joysticks and 1018 were mounted, I then connected the analog ports to the joysticks; from this point, the controller was basically done. I tried holding onto it to see how it felt, and it seemed pretty comfortable. Since I liked it, I decided it was a good enough prototype to make up a real version made out of a nice wood. My plan is to use a dremel to make nice rounded edges for the controller so it is more comfortable and not just a flat board.
Fraser
Sept 11, 2012 - The Controller
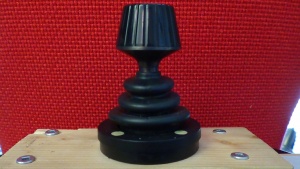
Thinking about my experience with MURVV, I couldn't help but be focused on how I thought it could be a lot more fun to drive it there was an easier mechanism for controlling it. I have previously mentioned my slight distaste towards the joystick we were using before. The thing I disliked most about it was the potentiometer for rotating the robot was located on the main knob for pushing the joystick in a direction (you can hopefully see what I mean in the picture). This meant that it can be easy to accidently rotate the robot when trying to move forward or strafe. My solution to this problem is to make a controller with dual-joystick control, so that the robot could be controlled more so like a modern FPS (unfortunately, there is no vertical rotation available for MURVV (yet?) so the second joystick would provide only lateral rotation). I could also integrate a potentiometer for controlling the amount of acceleration on the motors. In order to control the position of the webcam, I figure holding down the joystick button will allow this, and double tapping the joystick button (or triple) would reset the webcam to forward position. The left joystick button could be used to toggle heading lock on or off, with an LED showing the status for feedback.
This isnt exactly the cheapest solution for a controller given that a PS3 or XBOX controller is half the price of the 1018 I will need, but it will at least demonstrate some of the capabilities of certain phidgets, and will be a lot easier to customize and write software for the control of the robot (because I have no experience with Microsoft controller API's). So as it stands, it looks like I will need:
- 1018_2 x1
- 1113_0 x2
- 1109_0 x1 or 1112_1 x1
- an LED or two
- some sort of material for mounting and holding onto as a controller
Fraser
Sept 10, 2012 - Making the Movie
Last week I had been tasked with making a compilation video for the mecanum-wheeled robot we have designed and made here at Phidgets. Ideally, this video would show off the inherently fun and unique capabilities of the robot while providing a demonstration of what Phidgets can do with respect to robotic control. I originally thought this would be a very simple task given I have some experience making and editing compilation videos many years ago, but soon found out it wouldn't be as easy as I thought. We started with some short videos in a small cramped office, holding the camera on my knee for a steady shot, and getting some of the crumbiest video footage known to man; I threw the vids on my computer, and deleted them instantly after viewing.
We had been talking about buying a good video camera for a while now, so I went out to finally get one. I found an HD camcorder that met all the specifications I was looking for (mainly, 1080p, SD memory slot, USB), and it was available at a pretty good price. It was the Sony HDR-CX190 Handycam, for $300 CDN. I honestly hadn't used a real camcorder since about 1994 when they were two feet long and had a slot for a VHS tape, so I was pretty impressed by this new one. The picture was nice, but the biggest impression was the steady-shot feature which made the picture a lot less shaky when holding the camera. So once charged, I started filming.
Controlling the robot at first required a bit of training; it was a little finicky when trying to control the robot precisely. We had acceleration on the motors way down because we had been seeing some bad behavior of the robot when running at high acceleration (the robot would jitter a lot, it seemed like the DC controllers were continually turning off. We assumed that we were over working the DC controllers at high load and they were browning out). After getting a hang of the controls, I took some videos of the robot, mostly trying to get the different types of maneuverability the robot could achieve. The robot is essentially controlled the same way you would control a first-person-shooter, using back and forth on the joystick for forward and reverse, and left and right on the joystick maps to strafing left and right on the robot. The joystick also has a nob on the top for rotating the robot CW and CCW. One major problem I found was that the robot was very noisy, caused by the sound of the aluminum lid rattling and bouncing as the motors jittered, and there was this annoying clicking sound coming from the inside of the chassis (I assumed this was caused by a loose chain on the drive-train).
After a bit of filming, the robot stopped behaving - one of the wheels stopped spinning. Someone else informed me that the set-screw on the hubs seemed to be coming undone all the time, and recommended drilling a notch in the shaft for the set-screw to rest in. This meant taking the entire robot apart, and I voted against this. I decided to try using some Lock-Tite on the set-screw to make them stop coming off the shaft.
I waited the 24 hour curing time and went back to filming - but got fed up by the constant rattling in the robot and jerky action of the motors, so I decided to try and fix the problem. I lifted the robot off the ground to run the motors and see if it was friction causing the motors to behave strangely, but it turns out it was not that. The motors seemed to be turning off for a very short period of time every once in a while, causing the motor to jerk and the chain to stop and slap downwards against the chassis of the robot. This was definitely what was causing the noise I was hearing. We then ran the motors directly rather than through our robot control app, and the motors behaved perfectly. So Patrick looked at some of his software and found a couple logic errors that were causing the problems. After fixing those bugs, the robot behaved much nicer and smoother, and didn't make lots of noise. We then cranked up the acceleration and found pure bliss - the robot now responded incredibly sharp and fast, allowing for much easier control of movement. Unfortunately, this also meant it was much easier to ram the thing into walls.
From this point, the filming went well. I collected a number of shots of different movement types and styles of motion. We even threw a spatial device on board to allow us to lock heading on the robot so that we could spin the robot while maintaining forward motion (you can see this style of movement on the videos posted for the robot). We also wanted to name the robot, and tossed ideas around the office all day trying to think of a good name. Many names came out but none seemed to fit, we also didn't want anything too technical. I threw in the idea of naming it something random - and the first thing to come to mind I said - "Merv!"
"I like it!"
"But with a 'U' and two 'V's', MURVV"
"Sold!"
Yesterday while accumulating my final videos of MURVV, I decided to see if the thing had enough force/torque/friction to climb up the wall. It failed horribly. The thing just bumped up against the wall and sat there. Then, Patrick decided to give it a boost with his foot and sure enough, the thing climbed right up the wall. I tried to make it strafe along the wall, but that only resulted in sadness as the wall got covered in numerous black marks. We threw down a chuck of aluminum to see if it could climb the wall without help, and sure enough it did. I don't give up very easily, so I tried to make it strafe along the wall again. MURVV slightly tipped to the side as it stood on its end leaning with one wheel against the wall, and attempted to maneuver it back into a controllable position. It tipped slightly, I panicked and yanked the throttle, and the robot jumped to the wall and fell, smacking into the ground. We all stood in silence as the webcam popped out of its stand and rolled across the roof of the chassis. No more wall climbing for MURVV. The shock from the fall also managed to blow the 10A fuse... best solution? make it a 20A fuse.
I spent the day today mashing together the different shots of the robot I got into one large video. I decided to use Windows Movie Maker to do this, since its super easy to use and to integrate music and split up segments of video. I know everyone probably has something bad to say about Windows Movie Maker, but ease of use is my preference, and its free. Once getting all the video nicely tied together, I decided it needed some music. Thanks to a random recommendation from my coworker, Erik, I threw in Kung Fu Fighting. It happened to work perfectly for the video, and the end result was beautiful. Unfortunately, we dont have rights to Kung Fu Fighting, so we cant use it. We will need to find some music to use that isn't copyright protected before this video can be released.


