|
Notice: This page contains information for the legacy Phidget21 Library. Phidget21 is out of support. Bugfixes may be considered on a case by case basis. Phidget21 does not support VINT Phidgets, or new USB Phidgets released after 2020. We maintain a selection of legacy devices for sale that are supported in Phidget21. We recommend that new projects be developed against the Phidget22 Library.
|
1045 User Guide: Difference between revisions
(Created page with "==Getting Started== ===Checking the Contents=== {{UGbox| '''You should have received:''' * A PhidgetTemperatureSensor IR * A Mini-USB cable | '''In order to test your new Phi...") |
|||
| Line 28: | Line 28: | ||
{{UGbox| | {{UGbox| | ||
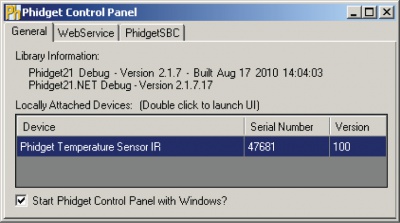
Double Click on the [[File:Ph.jpg|link=]] icon to activate the Phidget Control Panel and make sure that the Phidget Temperature Sensor IR is properly attached to your PC. | Double Click on the [[File:Ph.jpg|link=]] icon to activate the Phidget Control Panel and make sure that the Phidget Temperature Sensor IR is properly attached to your PC. | ||
|[[File: | |[[File:1045_0_ControlPanel.jpg|400px|link=]] | ||
| | | | ||
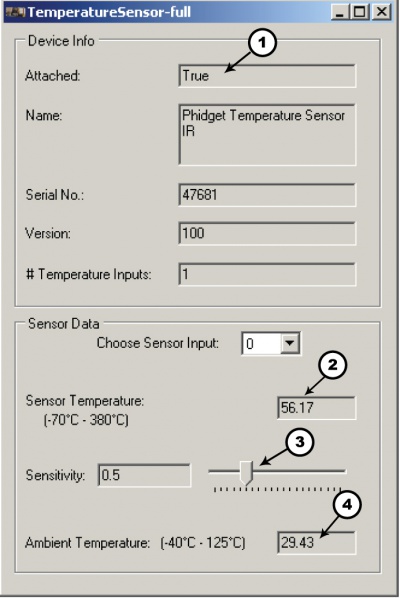
# Double Click on Phidget Temperature Sensor IR in the Phidget Control Panel to bring up TemperatureSensor-full and check that the box labelled Attached contains the word True. | # Double Click on Phidget Temperature Sensor IR in the Phidget Control Panel to bring up TemperatureSensor-full and check that the box labelled Attached contains the word True. | ||
Revision as of 20:18, 20 July 2012
Getting Started
Checking the Contents
|
You should have received:
|
In order to test your new Phidget you will also need:
| |
Connecting the Pieces
|
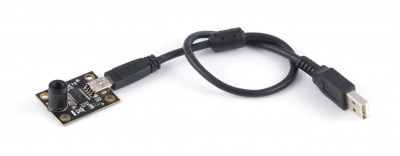
Connect the PhidgetTemperatureSensor IR to your computer using the Mini-USB cable. |
| |
Testing Using Windows 2000 / XP / Vista / 7
Make sure you have the current version of the Phidget library installed on your PC. If you don't, follow these steps:
- Go to the Quick Downloads section on the Windows page
- Download and run the Phidget21 Installer (32-bit, or 64-bit, depending on your system)
- You should see the
 icon on the right hand corner of the Task Bar.
Running Phidgets Sample Program
Double clicking on the ![]() icon loads the Phidget Control Panel; we will use this program to ensure that your new Phidget works properly.
icon loads the Phidget Control Panel; we will use this program to ensure that your new Phidget works properly.
The source code for the TemperatureSensor-full sample program can be found in the quick downloads section on the C# Language Page. If you'd like to see examples in other languages, you can visit our Languages page.
Updating Device Firmware
If an entry in this list is red, it means the firmware for that device is out of date. Double click on the entry to be given the option of updating the firmware. If you choose not to update the firmware, you can still run the example for that device after refusing.
|
Double Click on the |

| |
|

|
Testing Using Mac OS X
- Go to the Quick Downloads section on the Mac OS X page
- Download and run the Phidget OS X Installer
- Click on System Preferences >> Phidgets (under Other) to activate the Preference Pane
- Make sure that the Phidget Temperature Sensor IR is properly attached.
- Double Click on Phidget Temperature Sensor IR in the Phidget Preference Pane to bring up the TemperatureSensor-full Sample program. This program will function in a similar way as the Windows version.
Using Linux
For a step-by-step guide on getting Phidgets running on Linux, check the Linux page.
Using Windows Mobile / CE 5.0 / CE 6.0
For a step-by-step guide on getting Phidgets running on Windows CE, check the Windows CE page.
Technical Details
Measured Temperatures
The 1045 is factory calibrated in wide temperature ranges: -40 to 125 °C for the ambient temperature and -70 to 382.2 °C for the object temperature.
To get the most accurate reading, it is important that the object being measured occupies the full field of view of the sensor while not making physical contact with the sensor. In addition, the temperature of the object and of the environment also affect the overall accuracy. The highest degree of accuracy is +/- 0.5 degrees Celsius when both the ambient temperature and the object temperature are between 0 and 50 degrees Celsius. As either temperature changes, the accuracy can decrease to up to +/- 4 degrees Celsius.
The measured value is the average temperature of all objects in the 10° Field Of View of the sensor.
The sensor is configured to continuously transmit the temperature of the measured object every 32ms.
Board Temperature
It is very important to understand that these accuracies are only guaranteed and achievable when the sensor is in thermal equilibrium and under isothermal conditions (there are no temperature differences across the sensor package board. The accuracy of the thermometer can be influenced by temperature differences in the board induced by causes like (among others): Hot electronics behind the sensor, heaters/coolers behind or beside the sensor or by a hot/cold object very close to the sensor that not only heats the sensing element in the thermometer but also the 1045 board.
The 1045 assumes that the ambient temperature has settled to a constant temperature. If the surrounding temperature is constantly changing, or if there is a difference of temperature across the sensor package, additional infra-red radiation will be sensed which can result in temperature errors outside of the calibrated errors.
Emissivity
In order to measure temperature using infrared radiation, it is absolutely essential to know the emissivity of the surface being measured. Emissivity is a measure of how effective a surface is at radiating energy. An emissivity of 1 is the most effective radiator - for a given temperature, it will radiate the most heat. The 1045 assumes that the surface being measured has an emissivity of 1. If the 1045 is used to measure a surface with an emissivity of 0.5, the measured temperature will be 50% of the difference in temperature between the board and object.
A few examples of some materials with a large difference in emissivity are aluminum, with a typical value of 0.18, and plastics, which can have a value ranging from 0.85 to 0.95. The visible colour of the object does not necessarily mean it has a higher emissivity value. A heavily oxidized aluminum object has an emissivity value of around 0.3, even though it looks very dark. The closer the value is to 1, the better the object is at emitting radiation.
The 1045 is calibrated for an object emissivity of 1.
For an arbitrary emissivity, the measured temperature can be converted to the surface temperature using this formula:
Surface Temperature = (Sensor Temperature - Ambient Temperature) * Emissivity + Ambient Temperature
A good resource of emissivity values of different materials can be found on this site.
Emissivity is a complicated topic, as it can vary depending on the temperature of the material. For precise measurements, you may have to calculate the emissivity of your material by comparing the reported Sensor Temperature to the actual surface temperature measured with a contact thermocouple.
IR measurements are true surface temperature measurements. For example, when measuring the temperature of a person, the actual temperature measured by an IR thermometer will be temperature of the clothing and not the skin temperature. Emissivity of the clothes is another issue that has to be considered.
Sumlight Immunity
The Temperature Sensor also contains a built-in optical filter to cut off the visible spectra and increase immunity against errors introduced by any surrounding light sources.
The wavelength pass band of this optical filter is from 5.5 to 14μm.
API
We document API Calls specific to this product in this section. Functions common to all Phidgets and functions not applicable to this device are not covered here. This section is deliberately generic. For calling conventions under a specific language, refer to the associated API manual in the Quick Downloads section for that language. For exact values, refer to the device specifications.
Functions
int TemperatureInputCount () [get] : Constant = 1
- Returns the number of temperature inputs (IR Sensors) that can be read by the PhidgetTemperatureSensor.
double Temperature (int Index) [get] : °C
- Returns the temperature measured by the IR sensor. This value is returned in degrees Celsius but can easily be converted into other units. This value will always be between TemperatureMin and TemperatureMax. Please refer to the device specifications for noise and accuracy details.
double TemperatureMax (int Index) [get] : Constant = 380°C
- Returns the maximum temperature that can be returned by an IR Sensor input.
double TemperatureMin (int Index) [get] : Constant, = -70°C
- Returns the minimum temperature that can be returned by an IR Sensor input.
double TemperatureChangeTrigger(int Index) [get,set] : °C
- Sets / gets the change trigger for an input. This is the amount by which the sensed temperature must change between TemperatureChangeEvents. By default this is set to 0.1. Setting TemperatureChangeTrigger to 0 will cause all temperature updates to fire events. This is helpful for applications that are implementing their own filtering.
double AmbientTemperature () [get] : °C
- Returns the temperature of the 1045 board, measured at the base of the IR Sensor. This temperature is used as a reference for IR sensor temperature measurement. This value will always be between getAmbientTemperatureMin and getAmbientTemperatureMax.
double AmbientTemperatureMax () [get] : Constant = 125°C
- Returns the maximum temperature that can be returned by the ambient sensor.
double AmbientTemperatureMin () [get] : Constant = -40°C
- Returns the minimum temperature that can be returned by the ambient sensor.
Events
OnTemperatureChange(int ProbeIndex, double Temperature) [event]
- Event that fires whenever the temperature measured by the IR sensor changes by more than the TemperatureChangeTrigger.
OnError(int code, String description) [event]
- PhidgetTemperatureSensor returns EEPHIDGET_OUTOFRANGE when an input goes out of the range specified by TemperatureMin-TemperatureMax. The event is reported once per input per out-of-range type, until the value has gone back into range. The description specifies the input, the type of out-of-range error and the out of range value that was read.
Product History
| Date | Board Revision | Device Version | Comment |
|---|---|---|---|
| February 2011 | 0 | 100 | Product Release |

